# Abstraxn | Documentation
> Elevate your Web3 UX with AI-powered agents, supported by streamlined infra
## Abstraxn Overview
Welcome to **Abstraxn**—where **AI-native agents** transform how users interact with Web3. Our intelligent agents stand between users and blockchain complexity, using streamlined infra tools under the hood.
### The AI-First Experience
* **Chat AI Agent**\
Embed a conversational interface that understands your documentation, whitepaper, FAQs—and lets users interact naturally.\
Answer questions, fetch context, and trigger on-chain actions—all through plain language.
* **Agent Marketplace** *(coming soon)*\
Pick ready-made agents for tasks like trading, yield optimization, or NFT interactions.
* **Agentic Framework** *(coming soon)*\
Build and orchestrate your own Web3 agents on top of our AI runtime.
### Supporting Web3 Infrastructure (Behind the Scenes)
Our AI agents rely on a lean set of core infra capabilities—tools you used to offer, now seamlessly orchestrated:
• **Relayer & Bundler**\
Batch and broadcast encrypted user operations securely via EIP-7702 flows.\
• **Paymasters**
* **Verifying Paymaster** — Sponsor transactions from an off-chain balance
* **ERC-20 Paymaster** — Let users pay gas with tokens\
• **Smart Accounts & Signers**\
Safe, Kernel, ThirdWeb, etc. integrated with Dynamic, Web3Auth, Privy and more.\
• **Plug & play SDK** for EIP-7702 / bundler / paymaster orchestration
### How It All Fits
Your users see only the **AI layer**—a natural, intuitive experience. Everything else—including gas sponsorship, bundling, smart wallet logic—happens automatically behind the scenes.
**Abstraxn = AI-driven UX + streamlined Web3 tooling**\
(no more forms, approvals, or juggling wallets)
### Documentation at a Glance
| Section | Description |
| --------------- | --------------------------------------------------------------- |
| **Overview** | This AI-first introduction |
| **AI Stack** | Chat integration, Knowledge ingestion, Marketplace & Framework |
| **Web3 Infra** | Bundler, Relayer, Paymasters, Smart Wallets, Signers, SDK usage |
| **Quickstarts** | Code examples, sample apps, embedding guides |
| **Reference** | Endpoints, SDK API, configuration details |
| **Guides** | Best practices: security, performance, UX design |
### What's Next for Developers
1. **Start with AI**: Connect your docs/whitepaper → embed agent UI → test question-to-action flows.
2. **Extend with Infra**: Enable real on-chain actions—gasless swaps, staking, bridging—all powered behind the agent.
3. **Deepen with tools**: Use our SDK to customize agent behavior, account flows, or add new wallet interfaces.
**Coming Soon**: Explore our Agent Marketplace and Agentic Framework to plug-and-play or build your own task-specific agents.
### Why This Matters
* **Superior UX**: Users don't need to learn Web3. They express intent.
* **Faster adoption**: Conversational interfaces reduce drop-offs and confusion.
* **Developer-first**: One SDK. One integration. Infinite agent-driven experiences.
### Let's Build Conversational Web3
Start with the **Getting Started** guide next—and see how a single line of code + your docs can unlock intelligent, action-oriented Web3 interactions via Abstraxn.
## Pricing Plans
Choose the tier that matches your use case—from testing automations to large-scale multi-agent deployments.
| Plan | Price | Best For | Features Included | RPS | Monthly Requests | Support | Supported Chains |
| -------------------------- | ------- | ---------------------------------------- | ----------------------------------------- | ----------- | ---------------- | ------------------------- | -------------------------- |
| **Starter** | $99/mo | Test flows, small automations | Ask AI | 50 | 50,000 | Standard Support | — |
| **Growth** | $399/mo | Production dApps with infra integration | Ask AI + Web3 Stack | 150 | 200,000 | Priority Support | Up to 3 chains |
| **Scale** *(Most Popular)* | $699/mo | Multi-agent flows, higher throughput | Ask AI + Web3 Stack + Agentic Framework | 300 | 500,000 | Priority Support | Up to 10 chains |
| **Enterprise** | Custom | High-scale, custom logic, agent training | Everything in Scale + custom enhancements | 2.5× faster | Custom | Dedicated Support Channel | Choose from 50+ EVM chains |
***
### Plan Details
#### Starter – $99/month
Ideal for prototyping automation flows or basic AI interactions. Includes 50 RPS with up to 50K monthly requests and standard support.
#### Growth – $399/month
Perfect for production-grade dApps. Adds bundled Web3 tooling alongside AI. Handles 150 RPS and 200K requests/month with priority support and coverage for up to **3 chains**.
#### Scale – $699/month *(Most Popular)*
Best for growing applications needing multi-agent orchestration and advanced use. Supports 300 RPS and 500K requests/month, Agentic Framework access, and up to **10 chains**.
#### Enterprise – Custom Pricing
Tailored for large-scale deployments, custom logic, SLAs, and agent training. Unlimited throughput, 2.5× faster execution, dedicated support, and access to **50+ EVM chains**. Contact us for a quote.
***
### Why Abstraxn Licensing Makes Sense
* **Transparent quotas** by RPS and monthly volume—no hidden token meters
* **Modular upgrade path**—start small on Starter → scale up to Growth, Scale, or Enterprise
* **Multi-chain support** scales with your needs—from none to +50 chains
* **Built for usage growth**—your investment directly maps to your live usage and user impact
***
### Ready to Get Started?
Set up your plan in minutes or **upgrade seamlessly** as your traffic grows.
Have custom needs or targeting large-scale adoption? Contact us to get set up with the **Enterprise** plan today:
[Contact Sales](https://www.abstraxn.com/contact-us/)
***
### TL;DR
* **Starter** — $99/mo → ask questions, test functionality
* **Growth** — $399/mo → AI + Web3 stack in production
* **Scale** — $699/mo → Multi-agent + infra orchestration
* **Enterprise** → Custom → Unlimited scale, custom features, multi-chain support
All plans include our AI-first UX layer. Higher tiers unlock deeper infra tooling and chaining capabilities.
## Abstraxn Relayer SDK
The **@abstraxn/relayer** package empowers your dApp to transform user intent into on-chain execution—**gaslessly**, **securely**, and with **real-time updates**.
***
### Installation
You can install our SDK by running the following command in your terminal:
:::code-group
```bash [npm]
npm install @abstraxn/relayer@latest
```
```bash [Yarn]
yarn add @abstraxn/relayer@latest
```
:::
***
### Setup & Configuration
To obtain the Relayer URL and API Key:
To begin, you’ll need a Relayer URL and API Key. Retrieve these from your Abstraxn Dashboard:
* Visit [https://dashboard.abstraxn.com/](https://dashboard.abstraxn.com/)
* Log in or sign up
* Go to Apps → click Create New App → enter name, chain, description
* Within the app, navigate to Relayer → click Add Relayer, assign a name, select app
* Click View Details → copy your Relayer URL and API Key
:::warning
⚠️ **Warning:** Keep your API key secret. Store it in environment variables on the server side — never embed it into public client code.
:::
***
### Basic Integration (Node / Server)
```js
import { Relayer } from "@abstraxn/relayer";
import { ChainId } from "@abstraxn/core-types";
const relayerConfig = {
relayerUrl: "https://your-relayer-url.com",
chainId: ChainId.MAINNET,
signer: yourSignerInstance,
provider: yourProviderInstance
};
const relayer = new Relayer(relayerConfig);
// Example: Building a relayer transaction
const buildTxParams = {
contractAddress: "0xYourContractAddress",
abi: yourContractAbi,
method: "yourMethodName",
args: ["arg1", "arg2"],
};
// Build and send transaction to relayer
relayer.buildRelayerTx(buildTxParams).then(async (txData) => {
console.log("Build Relayer Transaction Response: ", txData);
const response = await relayer.sendRelayerTx(txData);
// response = {message: string; transactionId: string; }
const status = await relayer.getRelayerTxStatus(response.transactionId);
return status;
// status = {hash: string | null;data: string | null;status: string;receipt: TransactionReceipt | null;createdAt: string;reason?: string | null;}
});
```
***
### Real-Time WebSocket Integration
Real-time updates (v0.1.5+). Server or client can subscribe to live events for instant UX.
```js
const relayer = new Relayer({
relayerUrl: process.env.Abstraxn_URL,
apiKey: process.env.Abstraxn_KEY,
chainId: ChainId.MAINNET,
signer,
provider,
webSocket: {
enabled: true,
autoConnect: true,
reconnection: true,
},
});
const txData = await relayer.buildRelayerTx(params);
const resp = await relayer.sendRelayerTxWithRealTimeUpdates({
...txData,
enableRealTimeUpdates: true,
webSocketEvents: {
onTransactionUpdate: (update) => {
console.log("TX Update:", update);
},
onError: (err) => console.error("WS Error:", err),
},
});
console.log("Relayer transaction submitted:", resp.transactionId);
```
Status flow moves: initiated → pending → confirmed / failed / rejected
***
### API Reference
* new Relayer (options)
* `options.relayerUrl: string` (required)
* `options.apiKey: string` (required)
* `options.chainId: number | ChainId`
* `options.signer` (ethers/web3 signer)
* `options.provider` (ethers/web3 provider)
* `options.webSocket?: { enabled: boolean, autoConnect?: boolean, reconnection?: boolean }`
* `buildRelayerTx(params: BuildRelayerTxParams)` → prepares payload for relay
* `buildRelayerTxEIP712(params)` → prepare EIP-712 signed payload flows
* `sendRelayerTx(payload)` → submit prepared payload to relayer service
* `sendRelayerTxWithRealTimeUpdates(payloadWithWsOptions)` → submit + subscribe to WS updates
* `getRelayerTxStatus(transactionId)` → poll current state
* `subscribeToTransaction(transactionId, events)` → register handlers for updates
* `unsubscribeFromTransaction(transactionId)`
* `connectWebSocket()` / `disconnectWebSocket()` / `isWebSocketConnected()`
***
### Polling vs Real-Time — When to use which?
| Mode | When to use | Pros | Cons |
| --------- | ----------------------------------------------- | --------------------------------------- | -------------------------------------------------- |
| Polling | Simple server workflows, short-lived tasks | Easy to implement, works behind proxies | Latency, repeated requests |
| WebSocket | Real-time UIs, mobile clients, instant feedback | Instant updates, better UX | Requires persistent connection, reconnect handling |
***
### Integrations & Best Practices
* **Server-side relay orchestration:** Keep API keys and critical signing on the server.
* **Intent validation:** Validate user intent before creating relayer payloads. Agents should sanitize and verify prior to send.
* **Retries & idempotency:** Implement idempotency keys / dedupe when re-sending in case of network issues.
* **Fallbacks:** If WebSocket connectivity fails, gracefully fallback to polling.
* **Monitoring:** Log transactionId, status, and relayer response codes for observability.
***
### Security Notes
* Never expose apiKey in client-side code.
* Use short-lived server tokens and rotate keys when possible.
* Validate contract ABI and method inputs to avoid unintended on-chain calls.
* Enforce authorization: ensure only approved apps/users can request relayer submits.
***
### Troubleshooting
**Q: sendRelayerTx returns an error / 4xx or 5xx**
* Verify relayerUrl and apiKey are correct.
* Check server time skew (if signatures used).
* Inspect payload (ABI, method, args) for mismatches.
**Q: WebSocket won't connect**
* Ensure your environment allows outgoing WS connections.
* Check CORS / firewall rules.
* Confirm webSocket.enabled and autoConnect flags are set.
**Q: Transactions stuck in pending**
* Check blockchain network congestion and relayer health page (dashboard).
* Verify gas estimation and paymaster configuration if used.
***
### Quickstart Checklist
* Create an App on dashboard → Add Relayer → copy Relayer URL + API Key
* Install `@abstraxn/relayer` in your server environment
* Instantiate Relayer with secure credentials
* `buildRelayerTx()` → `sendRelayerTx()` or `sendRelayerTxWithRealTimeUpdates()`
* Monitor via `getRelayerTxStatus()` or WebSocket events
* Integrate with Smart Accounts, Paymaster, Bundler for full agent flows
***
### TL;DR
The `@abstraxn/relayer` SDK enables agent-driven, gasless on-chain execution with both polling and real-time capabilities. Keep keys server-side, validate intent, and prefer WebSocket for best UX.
***
### Useful Links
* NPM package: [https://www.npmjs.com/package/@abstraxn/relayer](https://www.npmjs.com/package/@abstraxn/relayer)
* Dashboard: [https://dashboard.abstraxn.com/](https://dashboard.abstraxn.com/)
* Contact / support: [https://www.abstraxn.com/contact-us/](https://www.abstraxn.com/contact-us/)
## Supported Chains
Abstraxn AI agents operate on a broad set of **EVM-compatible chains**. Below is a list of **production-ready** mainnets and their corresponding testnets, each identified by chain ID and slug for use in SDK config, RPC routing, or agent initialization.
### Mainnets
| Chain / Network | Chain ID | Slug |
| ------------------- | -------- | ------------- |
| Ethereum | 1 | ethereum |
| BNB Chain (BSC) | 56 | binance |
| Polygon (PoS) | 137 | polygon |
| Avalanche (C-Chain) | 43114 | avalanche |
| Optimism | 10 | optimism |
| Arbitrum One | 42161 | arbitrum |
| Arbitrum Nova | 42170 | arbitrum-nova |
| Base | 8453 | base |
| Celo | 42220 | celo |
| Zora | 7777777 | zora |
| Mantle | 5000 | mantle |
| Berachain | 80094 | berachain |
| Blast | 81457 | blast |
| Bob | 60808 | bob |
| Gnosis Chain | 100 | gnosis |
| Linea | 59144 | linea |
| Moonbeam (Polkadot) | 1284 | moonbeam |
| OP BNB | 204 | opbnb |
| Scroll | 534352 | scroll |
| Sei | 1329 | sei |
### Testnets & Previews
| Network | Chain ID | Slug |
| ----------------- | --------- | ---------------------- |
| Goerli (Ethereum) | 5 | goerli |
| Base Sepolia | 84532 | base-sepolia |
| Optimism Sepolia | 11155420 | optimism-sepolia |
| Arbitrum Sepolia | 421614 | arbitrum-sepolia |
| Polygon Amoy | 80002 | polygon-amoy |
| Zora Sepolia | 999999999 | zora-sepolia |
| Mantle Sepolia | 5003 | mantle-sepolia |
| Blast Sepolia | 168587773 | blast-sepolia |
| Bob Sepolia | 808813 | bob-sepolia |
| Celo Alfajores | 44787 | celo-alfajores-testnet |
### Why It Matters
* **Uniform UX across chains** — agents behave identically regardless of network
* **Consistent SDK config** — use chain IDs or slugs to route intent and execution
* **Gas-optimized routing** — choose lower-cost chains for actions; fall back to Ethereum when needed
* **Future expansion** — we keep pace with emerging EVM chains; want one added? Let us know.
### Example Integration Snippet
```js
import { Agent } from '@abstraxn/sdk'
const supportedChains = [
{ name: 'Ethereum', chainId: 1, slug: 'ethereum', rpc: 'https://mainnet.infura.io/v3/…' },
{ name: 'Polygon', chainId: 137, slug: 'polygon', rpc: 'https://polygon-rpc.com' },
{ name: 'Arbitrum', chainId: 42161, slug: 'arbitrum', rpc: 'https://arb1.arbitrum.io/rpc' },
// …other chains
]
Agent.initialize({
apiKey: 'YOUR_API_KEY',
chains: supportedChains
})
```
## Why Choose Abstraxn?
**Intent is the new interface**: at Abstraxn, we believe users shouldn't need to *learn Web3*. Instead, they express intent and our AI agents execute.
***
### AI-First, Infra-Powered
* **Effortless Web3 interaction** through conversational agents
* Users chat. Agents handle all the complexity behind the scenes.
* Our lightweight infra stack (relayers, bundlers, EIP-7702 paymasters, smart accounts/signers) powers the actions invisibly.
***
### Users Stay Because You Understand Them
* **Users stick with platforms that understand them**, not the other way around
* Embed an AI Chat Agent that listens, answers, guides—and even acts.
* No confusing forms, no wallet juggling, just natural language intent.
***
### Built to Deliver Impact
* Boost engagement, retention, and transaction volume with intuitive user flows
* Drive developer velocity with modular SDKs, React components, and API-first interfaces
* Scale easily—AI agents manage the state, infra executes the logic
***
### Secure by Design
* Only trusted flows reach the chain—agents vet intent before action
* Gasless UX with EIP-7702-backed paymasters and bundled transactions
* Pluggable smart accounts and signers (Safe, Kernel, ThirdWeb, Dynamic, Web3Auth, Privy)
***
### Future-Ready & Modular
* **Agent Marketplace** (coming soon): plug-and-play use-case agents for trading, staking, NFTs…
* **Agentic Framework** (coming soon): build and orchestrate your own AI agents atop our infrastructure
* One integration & limitless UX possibilities
***
### Quick Summary
| Benefit | Delivered By Abstraxn |
| ------------------------ | -------------------------------------------------------------- |
| **AI-Driven UX** | Chat-first interface powered by natural language intent |
| **Invisible Web3 Infra** | Relayers, bundles, paymasters, smart accounts handled in-agent |
| **Developer Friendly** | JS SDK, React embeds, REST APIs for any stack |
| **Secure & Compliant** | Intent checking, paymaster logic, wallet integrations |
| **Scalable & Modular** | Marketplace & framework support future use cases |
***
### TL;DR: Why Us?
* Because **Intent is the new interface**
* So you get **Effortless Web3 interaction**
* And because **Users stick with platforms that understand them**, not the other way around
***
**Next Steps for Developers**
1. Embed the **Chat AI Agent**—make your documentation interactive.
2. Enable **chain actions**, powered by infrastructure beneath the conversation.
3. Explore upcoming tools: **Agent Marketplace** & **Agentic Framework** to expand capabilities.
Abstraxn turns user intent into Web3 action—without friction. Let's build the future of conversational blockchain UX together.
## Wallets API Quickstart (SDK)
The **signer-test-sdk** package empowers your dApp to onboard users with secure, easy-to-use wallets.
***
### 1. Installation
Install the package using your preferred package manager:
:::code-group
```bash [npm]
npm i signer-test-sdk
```
```bash [Yarn]
yarn add signer-test-sdk
```
```bash [Bun]
bun add signer-test-sdk
```
```bash [pnpm]
pnpm add signer-test-sdk
```
:::
***
### 2. Get Your API Key
1. Visit [https://dashboard.abstraxn.com/](https://dashboard.abstraxn.com/)
2. Log in or sign up
3. Go to **Apps** → click **Create New App**
4. Navigate to **Wallets** → click **Add Wallet Service**
5. Click **View Details** → copy your **API Key**
:::warning
**Warning:** Keep your API key secure by storing it in environment variables. Never expose it in public client-side code.
:::
***
### 3. Basic Usage
#### Setup Provider
Wrap your app with `AbstraxnProvider`:
```tsx
import { AbstraxnProvider } from "signer-test-sdk/react";
function App() {
return (
);
}
```
#### Connect Wallet
Use the `ConnectButton` component to connect wallets:
```tsx
import { ConnectButton } from "signer-test-sdk/react";
function WalletButton() {
return ;
}
```
#### Sign Transaction
Use the `usePrepareTransaction` hook to sign transactions:
```tsx
import { usePrepareTransaction } from "signer-test-sdk/react";
import { createPublicClient, http } from "viem";
import { polygonAmoy } from "viem/chains";
function SendTransaction() {
const { prepareTransaction, isConnected } = usePrepareTransaction();
const handleSend = async () => {
if (!isConnected) return;
const rpcUrl = "https://rpc-amoy.polygon.technology";
const preparedTx = await prepareTransaction(
"0x...", // recipient address
"0.001", // amount
rpcUrl,
polygonAmoy.id
);
const publicClient = createPublicClient({
chain: polygonAmoy,
transport: http(rpcUrl),
});
const hash = await publicClient.sendRawTransaction({
serializedTransaction: preparedTx.signedTransaction as `0x${string}`,
});
console.log("Transaction hash:", hash);
};
return ;
}
```
***
### Useful Links
* Dashboard: [https://dashboard.abstraxn.com/](https://dashboard.abstraxn.com/)
* Support: [https://www.abstraxn.com/contact-us/](https://www.abstraxn.com/contact-us/)
## React Quickstart
> Learn how to get started with Abstraxn Smart Wallets in React.
Create a new app with embedded wallets, social login, and gasless transactions.
> You can also follow the [Quickstart in the Dashboard](https://dashboard.abstraxn.com/services/smart-wallets/quickstart).
### 1. Clone template repo
```bash
npx create-next-app my-abstraxn-wallets-app -e https://github.com/abstraxn/smart-wallets-quickstart
cd my-abstraxn-wallets-app
```
:::info
**Note:** The template repository URL is a placeholder. Once your demo repository is ready, update this URL with the actual repository link.
:::
### 2. Set up environment
Once you have your project cloned down and you are in the `my-abstraxn-wallets-app` level in your terminal, go to your project's root, create a `.env` file and copy-paste the following into it:
```shell
# Paste this in your .env file
NEXT_PUBLIC_ABSTRAXN_API_KEY=YOUR_ABSTRAXN_API_KEY
```
#### Get Your API Key
1. Visit [https://dashboard.abstraxn.com/](https://dashboard.abstraxn.com/)
2. Log in or sign up
3. Go to **Apps** → click **Create New App**
4. Navigate to **Wallets** → click **Add Wallet Service**
5. Click **View Details** → copy your **API Key**
### 3. Run app
In your terminal, run:
```bash
npm run dev
```
Your `localhost:3000` should now display the following:
### 4. Log in and view the app
You can use a service like [Temp Mail](https://temp-mail.org/en/) to test logins with throwaway email accounts.
> Note: Social login will not work just yet!
Once you use an email, you will receive a 6-digit authentication code. Copy-paste it into the following screen:
Once you have signed in, you can interact with your wallet! 🎉
### 5. Next steps
You're all set to \[take your app to the next level with transactions!]\(/guides/Wallets/Get Started/React/From scratch/Initialization)
In the Dashboard, you can set your app up with:
* [Smart Accounts](/guides/Accounts/SmartAccounts/Accounts) - Integrate with various smart account providers
* Social login methods
* Gas sponsorship via [Paymasters](/guides/Paymaster/Paymaster)
* Customized styling
* [AI Chat Agents](/guides/AI/chatAI) - Add conversational interfaces to your app
### Manual Setup (Alternative)
If you prefer to set up from scratch instead of using the template, check out our \[From Scratch guide]\(/guides/Wallets/Get Started/React/From scratch/Initialization) for step-by-step instructions.
### Useful Links
* Dashboard: [https://dashboard.abstraxn.com/](https://dashboard.abstraxn.com/)
* Support: [https://www.abstraxn.com/contact-us/](https://www.abstraxn.com/contact-us/)
* Documentation: [Getting Started](/guides/getting-started)
## App Integration
> Integrate Abstraxn Smart Wallets into your Next.js application
Now that you've set up your provider configuration, it's time to integrate Abstraxn Smart Wallets into your Next.js application.
### Using the Connect Button
The `ConnectButton` component is a ready-to-use button that triggers the onboarding modal:
```tsx
"use client";
import { ConnectButton } from "@abstraxn/signer/react";
export default function Home() {
return (
Welcome to My App
);
}
```
### Using Hooks
You can use the provided hooks to access wallet state and functionality:
```tsx
"use client";
import { useIsConnected, useAddress, useAbstraxnWallet } from "@abstraxn/signer/react";
export function WalletInfo() {
const isConnected = useIsConnected();
const address = useAddress();
const { disconnect, loading } = useAbstraxnWallet();
if (!isConnected) {
return
Not connected
;
}
return (
Connected: {address}
);
}
```
### Sending Transactions
To send transactions, use the `usePrepareTransaction` hook which prepares and signs the transaction:
```tsx
"use client";
import { usePrepareTransaction, useIsConnected, useAddress } from "@abstraxn/signer/react";
import { createPublicClient, http } from "viem";
import { polygonAmoy } from "viem/chains";
export function SendTransaction() {
const { prepareTransaction } = usePrepareTransaction();
const isConnected = useIsConnected();
const address = useAddress();
const [loading, setLoading] = useState(false);
const handleSend = async () => {
if (!isConnected || !address) {
alert("Please connect your wallet first");
return;
}
setLoading(true);
try {
const rpcUrl = "https://rpc-amoy.polygon.technology";
// Prepare and sign transaction (this signs via API internally)
const preparedTx = await prepareTransaction(
"0x...", // recipient address
"0.001", // amount in native currency
rpcUrl,
polygonAmoy.id // chain ID
);
// Create public client to send the signed transaction
const publicClient = createPublicClient({
chain: polygonAmoy,
transport: http(rpcUrl),
});
// Execute the signed transaction
const hash = await publicClient.sendRawTransaction({
serializedTransaction: preparedTx.signedTransaction as `0x${string}`,
});
console.log("Transaction hash:", hash);
} catch (error) {
console.error("Transaction failed:", error);
} finally {
setLoading(false);
}
};
return (
);
}
```
### Alternative: Using Hook to Trigger Onboarding
You can also trigger the onboarding modal programmatically using the `showOnboarding` method:
```tsx
"use client";
import { useAbstraxnWallet } from "@abstraxn/signer/react";
export function CustomConnectButton() {
const { showOnboarding, loading } = useAbstraxnWallet();
return (
);
}
```
### Complete Example
Here's a complete example combining all the pieces:
```tsx
"use client";
import { useState } from "react";
import {
ConnectButton,
useIsConnected,
useAddress,
useAbstraxnWallet,
usePrepareTransaction
} from "@abstraxn/signer/react";
import { createPublicClient, http } from "viem";
import { polygonAmoy } from "viem/chains";
export default function Home() {
const isConnected = useIsConnected();
const address = useAddress();
const { disconnect } = useAbstraxnWallet();
const { prepareTransaction } = usePrepareTransaction();
const [loading, setLoading] = useState(false);
const [txHash, setTxHash] = useState(null);
const handleSend = async () => {
if (!isConnected || !address) {
alert("Please connect your wallet first");
return;
}
setLoading(true);
try {
const rpcUrl = "https://rpc-amoy.polygon.technology";
const preparedTx = await prepareTransaction(
"0x742d35Cc6634C0532925a3b844Bc9e7595f0bEb",
"0.001",
rpcUrl,
polygonAmoy.id
);
const publicClient = createPublicClient({
chain: polygonAmoy,
transport: http(rpcUrl),
});
const hash = await publicClient.sendRawTransaction({
serializedTransaction: preparedTx.signedTransaction as `0x${string}`,
});
setTxHash(hash);
alert(`Transaction sent! Hash: ${hash}`);
} catch (error) {
console.error(error);
} finally {
setLoading(false);
}
};
return (
My Abstraxn App
{isConnected && (
Address: {address}
{txHash &&
Tx Hash: {txHash}
}
)}
);
}
```
### Next Steps
* Learn about \[customizing the UI]\(./UI Customization)
* Explore \[authentication methods]\(./Dashboard customization)
* Check out more in the [Wallets Guide](/guides/Wallets/Quickstart)
## Dashboard Customization
> Customize your wallet dashboard settings including email templates, social login providers, and security configurations
The Abstraxn Dashboard provides comprehensive customization options for your wallet service. You can configure email templates, enable social login providers, and set up security settings to match your brand and requirements.
### Email Template Customization
Customize the email verification template that users receive when signing in with email OTP. This allows you to brand the authentication emails to match your application's identity.
#### Accessing Email Template Settings
1. Navigate to your app in the [Abstraxn Dashboard](https://dashboard.abstraxn.com/)
2. Go to **Wallets** → Select your wallet service
3. Click on the **Email Login** tab
#### Available Customization Options
##### Project Name
Set your application name that will appear in the email subject and body:
* **Field**: Project name
* **Default**: "YOUR APP NAME"
* **Usage**: This name appears in the email subject line and verification code message
##### Support URL (Optional)
Add a support URL where users can get help:
* **Field**: Support URL (optional)
* **Format**: e.g., `support@dapp.xyz` or `https://support.yourdomain.com`
* **Purpose**: Provides users with a way to contact support if they encounter issues
##### Logo (Optional)
Upload your application logo to appear in the email:
* **Field**: Logo (optional)
* **Accepted formats**: `.png`, `.jpg`, or `.webp`
* **Size limit**: Up to 2MB
* **Display**: Logo appears in the email template to reinforce your brand identity
##### Primary Color (Optional)
Set your brand's primary color for the email template:
* **Field**: Primary color (optional)
* **Format**: Hex color code (e.g., `#9333ea`)
* **Usage**: Applied to buttons, highlights, and accent elements in the email
#### Email Preview
The dashboard provides a live preview of how your verification email will appear to users. The preview shows:
* Email subject line with verification code
* Sender information
* Branded email body with your logo and colors
* 6-digit verification code display
* Security disclaimer text
#### Saving Settings
After configuring your email template settings, click **Save Settings** to apply your changes. The updated template will be used for all future email verification codes sent to your users.
### Social Login Configuration
Enable and configure social authentication providers to allow users to sign in with their existing accounts from popular services.
#### Accessing Social Login Settings
1. Navigate to your app in the [Abstraxn Dashboard](https://dashboard.abstraxn.com/)
2. Go to **Wallets** → Select your wallet service
3. Click on the **Social Login** tab
#### Available Social Providers
##### Google Social Login
Enable Google OAuth authentication for your application.
**Configuration Options:**
* **Toggle**: Enable/disable Google login
* **Client ID (optional)**: Your Google OAuth Client ID
* Format: `e.g. ey1289x....`
* Leave empty to use Abstraxn's default credentials
* **Client Secret (optional)**: Your Google OAuth Client Secret
* Format: Secret key from Google Console
* Toggle visibility with the eye icon
**Using Default Credentials:**
* Start quickly with Abstraxn's default Google credentials
* No additional setup required
* Suitable for development and testing
**Using Your Own Credentials:**
For production or greater control over security and branding:
1. Create a project in [Google Cloud Console](https://console.cloud.google.com/)
2. Enable Google+ API
3. Create OAuth 2.0 credentials
4. Add the callback URL provided by Abstraxn to your Google Console API client
5. Copy your Client ID and Client Secret to the dashboard
6. Click the copy icon next to the callback URL message to copy the required callback URL
##### X (Twitter) Social Login
Enable X (formerly Twitter) OAuth authentication for your application.
**Configuration Options:**
* **Toggle**: Enable/disable X login
* **Client ID (optional)**: Your X OAuth Client ID
* Format: `e.g. ey1289x....`
* Leave empty to use Abstraxn's default credentials
* **Client Secret (optional)**: Your X OAuth Client Secret
* Format: Secret key from X Developer Portal
* Toggle visibility with the eye icon
**Using Default Credentials:**
* Start quickly with Abstraxn's default X credentials
* No additional setup required
* Suitable for development and testing
**Using Your Own Credentials:**
For production or greater control:
1. Create an app in [X Developer Portal](https://developer.twitter.com/)
2. Configure OAuth 2.0 settings
3. Add the callback URL provided by Abstraxn to your X Console API client
4. Copy your Client ID and Client Secret to the dashboard
5. Click the copy icon next to the callback URL message to copy the required callback URL
##### Discord Social Login
Enable Discord OAuth authentication for your application.
**Configuration Options:**
* **Toggle**: Enable/disable Discord login
* **Client ID (optional)**: Your Discord OAuth Client ID
* **Client Secret (optional)**: Your Discord OAuth Client Secret
**Setup Steps:**
1. Create an application in [Discord Developer Portal](https://discord.com/developers/applications)
2. Configure OAuth2 redirect URI
3. Add the callback URL provided by Abstraxn
4. Copy your Client ID and Client Secret to the dashboard
#### Enabling Social Login in Your App
After configuring social login providers in the dashboard, you can enable them in your application code:
```tsx
const providerConfig: AbstraxnProviderConfig = {
apiKey: process.env.NEXT_PUBLIC_ABSTRAXN_API_KEY,
ui: {
authMethods: ["otp", "google", "twitter", "discord"], // Enable configured providers
},
};
```
### Passkey Authentication
Enable Passkey (WebAuthn) authentication to allow users to sign in using biometric authentication or security keys.
#### Accessing Passkey Settings
1. Navigate to your app in the [Abstraxn Dashboard](https://dashboard.abstraxn.com/)
2. Go to **Wallets** → Select your wallet service
3. Click on the **Passkey** tab
#### Configuration
**Enable Passkey:**
* **Toggle**: Enable/disable Passkey authentication
* **Description**: Allow users to authenticate with Passkeys using biometric authentication (fingerprint, face recognition) or security keys
**Benefits:**
* Enhanced security with public key cryptography
* Passwordless authentication experience
* Support for biometric authentication
* Cross-device compatibility
#### Enabling Passkey in Your App
After enabling Passkey in the dashboard, add it to your authentication methods:
```tsx
const providerConfig: AbstraxnProviderConfig = {
apiKey: process.env.NEXT_PUBLIC_ABSTRAXN_API_KEY,
ui: {
authMethods: ["otp", "passkey", "google"], // Include 'passkey'
},
};
```
### Security Settings
Configure security settings to protect your application and control access.
#### Accessing Security Settings
1. Navigate to your app in the [Abstraxn Dashboard](https://dashboard.abstraxn.com/)
2. Go to **Wallets** → Select your wallet service
3. Click on the **Security** tab
#### Origin Whitelist (Recommended)
The Origin Whitelist restricts which domains can initiate wallet connections, preventing unauthorized access and potential security vulnerabilities.
**Configuration:**
* **Field**: Origin Whitelist
* **Format**: Full URL with protocol (e.g., `https://example.com`)
* **Purpose**: Only allow wallet connections from whitelisted origins
* **Security**: Helps prevent cross-site request forgery (CSRF) attacks
**Adding Origins:**
1. Enter the full URL of your application domain
2. Include the protocol (`https://` or `http://`)
3. Click **Submit** to add the origin to the whitelist
4. You can add multiple origins for different environments (development, staging, production)
**Example Origins:**
```
https://myapp.com
https://www.myapp.com
https://staging.myapp.com
http://localhost:3000 // For local development
```
**Best Practices:**
* Always whitelist your production domain
* Include staging and development URLs as needed
* Remove unused origins regularly
* Never whitelist wildcard domains (`*`) in production
:::info
**Note:** While the origin whitelist is optional, it's highly recommended for production applications to enhance security and prevent unauthorized access.
:::
### Next Steps
After configuring your dashboard settings:
* \[Customize the UI]\(./UI Customization) - Further customize the login experience in your app
* \[Integrate your app]\(./App Integration) - Connect your application to the configured wallet service
* [Set up Smart Accounts](/guides/Accounts/SmartAccounts/Accounts) - Configure smart account providers
* [Configure Paymaster](/guides/Paymaster/Paymaster) - Enable gasless transactions
### Useful Links
* Dashboard: [https://dashboard.abstraxn.com/](https://dashboard.abstraxn.com/)
* Support: [https://www.abstraxn.com/contact-us/](https://www.abstraxn.com/contact-us/)
* Documentation: [Getting Started](/guides/getting-started)
## Environment Setup
> How to set up Abstraxn Smart Wallets using the Abstraxn Dashboard.
### Get Your API Key
To use Abstraxn Smart Wallets, you need to obtain an API key from the Abstraxn Dashboard.
:::tip
**Why create an App first?**
An **App** in the Abstraxn Dashboard represents your application or project. It acts as a container that organizes all your services, including Wallet Services, Paymasters, Bundlers, and more.
Think of it this way:
* **App** = Your project/application (e.g., "My DApp", "NFT Marketplace")
* **Wallet Service** = A specific wallet service configuration within that app
You need to create an App first because Wallet Services are associated with a specific App. This allows you to:
* Organize multiple services under one project
* Manage different configurations for different apps
* Track usage and analytics per application
Once you create an App, you can then add a Wallet Service to it, which will provide you with the API Key needed for your React application.
:::
1. Visit [https://dashboard.abstraxn.com/](https://dashboard.abstraxn.com/) and log in or sign up
2. Navigate to the **Apps** section:
* Direct link: [https://dashboard.abstraxn.com/auth/apps](https://dashboard.abstraxn.com/auth/apps)
:::info
**First-time users:** If you're visiting for the first time and haven't created any apps yet, you'll see an empty table with a **Create New App** button at the top. This is normal - proceed to step 3 to create your first app.
:::
If you already have apps, you'll see a list of your existing apps and a **Create New App** button at the top.
3. Click the **Create New App** button to open the creation modal
Fill in the form:
* **Chain**: Select the blockchain (e.g., Ethereum, Polygon, etc.)
* **Network**: Select the network (Mainnet, Testnet, etc.)
* **Name**: Enter a name for your app
* **Description**: (Optional) Add a description
* Click **Create App**
4. After creating your app, navigate to **Wallets** section:
* Direct link: [https://dashboard.abstraxn.com/auth/wallets](https://dashboard.abstraxn.com/auth/wallets)
5. Click **Add Wallets** button to create a new wallet service
Fill in the form:
* **Wallet Name**: Enter a name for your wallet service
* **App**: Select the app you created earlier
* Click **Create Wallet**
6. After creating the wallet, click **View Details** on your wallet from the wallets list
7. On the wallet details page, you'll see your **API Key** displayed. Click the copy button to copy it.
The wallet details page URL format is: `https://dashboard.abstraxn.com/auth/wallets/{walletId}`
:::warning
**Warning:** Keep your API key secure by storing it in environment variables. Never expose it in public client-side code or commit it to version control.
:::
### Configure Environment Variables
Create a `.env` file at the root of your project and add your API key.
#### For Vite Projects
Create a `.env` file in your project root:
```env
VITE_ABSTRAXN_API_KEY=your_api_key_here
```
The `VITE_` prefix is required for Vite to expose the variable to your client-side code. Access it in your code using:
```tsx
import.meta.env.VITE_ABSTRAXN_API_KEY;
```
#### For Next.js Projects
Create a `.env.local` file in your project root:
```env
NEXT_PUBLIC_ABSTRAXN_API_KEY=your_api_key_here
```
The `NEXT_PUBLIC_` prefix is required for Next.js to expose the variable to the browser. Access it in your code using:
```tsx
process.env.NEXT_PUBLIC_ABSTRAXN_API_KEY;
```
:::tip
**Note:** For Next.js, you can also use `.env` for server-side only variables, but use `.env.local` for variables that should be available in the browser. The `.env.local` file is automatically ignored by git.
:::
### Additional Configuration (Optional)
#### Wallet Service Configuration
To enable specific login methods and customize your wallet service:
1. Navigate to **Wallets** → **Configuration** in the [dashboard](https://dashboard.abstraxn.com/services/smart-wallets/configuration)
2. Configure your preferred authentication methods (OTP, Passkey, Google, Discord, Twitter, etc.)
3. Customize wallet settings as needed
## Initialization
> Build Abstraxn Smart Wallets in a new app
In this doc and the following ones, we will build a React application with Abstraxn Smart Wallets from scratch. This guide supports both **Vite** and **Next.js** setups.
### Create a new React app
Choose your preferred framework:
#### Option 1: Vite + React (Recommended)
Start by initializing a new React application with Vite:
```bash
npm create vite@latest my-abstraxn-app -- --template react-ts
cd my-abstraxn-app
```
Or with other package managers:
```bash pnpm
pnpm create vite my-abstraxn-app --template react-ts
cd my-abstraxn-app
```
```bash yarn
yarn create vite my-abstraxn-app --template react-ts
cd my-abstraxn-app
```
#### Option 2: Next.js
Start by initializing a new [Next.js app](https://nextjs.org/):
```bash
npx create-next-app@latest \
--typescript \
--tailwind \
--app
cd my-abstraxn-app
```
This command passes in flags to use Typescript, Tailwind and the next app router.
### Install Dependencies
You will need these core libraries:
* **@abstraxn/signer**: Abstraxn Signer SDK for handling wallet interactions and transaction signing
* **@tanstack/react-query**: A required async state library for managing smart wallet state ([learn more](https://tanstack.com/query/latest/docs/framework/react/overview))
Install them with:
```bash npm
npm install @abstraxn/signer @tanstack/react-query
```
```bash pnpm
pnpm add @abstraxn/signer @tanstack/react-query
```
```bash yarn
yarn add @abstraxn/signer @tanstack/react-query
```
### Setup AbstraxnProvider
The Abstraxn SDK requires wrapping your application with the `AbstraxnProvider` component. This provides the wallet context to all components in your app.
#### For Vite Projects
Update your `src/main.tsx` (or `src/main.jsx`) file:
```tsx
import { StrictMode } from "react";
import { createRoot } from "react-dom/client";
import "./index.css";
import App from "./App.tsx";
import {
AbstraxnProvider,
type AbstraxnProviderConfig,
} from "@abstraxn/signer/react";
const providerConfig: AbstraxnProviderConfig = {
apiKey: import.meta.env.VITE_ABSTRAXN_API_KEY || "YOUR_API_KEY",
autoConnect: false,
autoInit: true,
enableLogging: true,
ui: {
authMethods: ["otp", "passkey", "google", "discord", "twitter"],
theme: "light",
logoName: "My App",
welcomeMessage: "Welcome to My App",
showFooter: true,
},
};
createRoot(document.getElementById("root")!).render(
);
```
#### For Next.js Projects
Update your `app/layout.tsx` (App Router) or `pages/_app.tsx` (Pages Router):
**app/layout.tsx** (App Router):
```tsx
import {
AbstraxnProvider,
type AbstraxnProviderConfig,
} from "@abstraxn/signer/react";
const providerConfig: AbstraxnProviderConfig = {
apiKey: process.env.NEXT_PUBLIC_ABSTRAXN_API_KEY || "YOUR_API_KEY",
autoConnect: false,
autoInit: true,
enableLogging: true,
ui: {
authMethods: ["otp", "passkey", "google", "discord", "twitter"],
theme: "light",
logoName: "My App",
welcomeMessage: "Welcome to My App",
showFooter: true,
},
};
export default function RootLayout({
children,
}: {
children: React.ReactNode;
}) {
return (
{children}
);
}
```
**pages/\_app.tsx** (Pages Router):
```tsx
import type { AppProps } from "next/app";
import {
AbstraxnProvider,
type AbstraxnProviderConfig,
} from "@abstraxn/signer/react";
const providerConfig: AbstraxnProviderConfig = {
apiKey: process.env.NEXT_PUBLIC_ABSTRAXN_API_KEY || "YOUR_API_KEY",
autoConnect: false,
autoInit: true,
enableLogging: true,
ui: {
authMethods: ["otp", "passkey", "google", "discord", "twitter"],
theme: "light",
logoName: "My App",
welcomeMessage: "Welcome to My App",
showFooter: true,
},
};
export default function App({ Component, pageProps }: AppProps) {
return (
);
}
```
> **Note**: Replace `YOUR_API_KEY` with your actual Abstraxn API key. You can obtain one from your [Abstraxn Dashboard](https://dashboard.abstraxn.com/).
### Next Steps
Now that you have the basic setup complete, you can:
* \[Configure your environment]\(./Environment setup) - Set up environment variables and configuration
* \[Use the SDK hooks]\(./App Integration) - Learn how to integrate wallet functionality in your app
* \[Customize the UI]\(./UI Customization) - Customize the onboarding and wallet UI components
## UI Customization
> Learn how to customize the login UI for smart wallets
The Abstraxn SDK allows you to customize the onboarding UI through the `ui` configuration object in your `AbstraxnProvider` config. All customization is done in one place - no additional configuration files needed.
### Basic UI Configuration
Customize the UI by adding a `ui` property to your `AbstraxnProvider` configuration:
```tsx
// app/layout.tsx or pages/_app.tsx
import {
AbstraxnProvider,
type AbstraxnProviderConfig,
} from "@abstraxn/signer/react";
const providerConfig: AbstraxnProviderConfig = {
apiKey: process.env.NEXT_PUBLIC_ABSTRAXN_API_KEY || "your-api-key-here",
ui: {
onboardTitle: "Sign In", // Optional (default: 'Sign In')
logo: "https://your-logo-url.com/logo.png", // Optional (default: no logo)
theme: "light", // Optional: 'light' | 'dark' (default: 'light')
showFooter: true, // Optional (default: true)
showCloseButton: true, // Optional (default: true)
closeOnBackdropClick: true, // Optional (default: true)
authMethods: ["otp", "passkey", "google", "twitter", "discord"], // Optional (default: ['otp', 'google'])
// Custom labels
labels: {
emailLabel: "Enter Email", // Optional (default: 'Email Address')
emailPlaceholder: "Enter your email", // Optional (default: 'Enter your email address')
otpLabel: "OTP", // Optional (default: 'OTP Code')
otpPlaceholder: "Enter your OTP", // Optional (default: 'Enter 6-digit code')
emailButton: "Continue", // Optional (default: 'Continue')
otpButton: "Verify", // Optional (default: 'Verify')
googleButton: "Continue with Google", // Optional (default: 'Continue with Google')
},
// Custom colors
colors: {
primary: "#9333ea",
primaryHover: "#7e22ce",
},
// Custom CSS
customCSS: `
.onboarding-button-primary {
background-color: rgb(234, 51, 231);
}
.onboarding-card {
border-radius: 20px;
}
`,
},
};
// ... rest of your setup
```
### Available UI Options
#### Basic Options
```tsx
ui: {
onboardTitle: 'Sign In', // Optional (default: 'Sign In')
logo: 'https://...', // Optional (default: no logo)
theme: 'light', // Optional: 'light' | 'dark' (default: 'light')
showFooter: true, // Optional (default: true)
showCloseButton: true, // Optional (default: true)
closeOnBackdropClick: true, // Optional (default: true)
}
```
#### Authentication Methods
```tsx
ui: {
authMethods: ['otp', 'passkey', 'google', 'twitter', 'discord'], // Optional (default: ['otp', 'google'])
}
```
Available methods:
* `'otp'` - Email OTP authentication
* `'passkey'` - Passkey/WebAuthn authentication
* `'google'` - Google OAuth
* `'discord'` - Discord OAuth
* `'twitter'` - Twitter/X OAuth
#### Custom Labels
```tsx
ui: {
labels: {
emailLabel: 'Email Address',
emailPlaceholder: 'Enter your email',
otpLabel: 'OTP Code',
otpPlaceholder: 'Enter 6-digit code',
emailButton: 'Continue',
otpButton: 'Verify',
googleButton: 'Continue with Google',
connectButton: 'Connect Wallet',
disconnectButton: 'Disconnect',
},
}
```
#### Custom Colors
```tsx
ui: {
colors: {
primary: '#9333ea', // Primary color
primaryHover: '#7e22ce', // Primary hover color
background: '#ffffff', // Background color
text: '#000000', // Text color
border: '#e5e7eb', // Border color
error: '#ef4444', // Error color
success: '#10b981', // Success color
},
}
```
#### Custom CSS
```tsx
ui: {
customCSS: `
.onboarding-button-primary {
background-color: rgb(234, 51, 231) !important;
}
.onboarding-card {
border-radius: 20px !important;
}
`,
}
```
### External Wallets Configuration
To enable external wallet connections (MetaMask, WalletConnect, etc.):
```tsx
const providerConfig: AbstraxnProviderConfig = {
// ... other config
externalWallets: {
enabled: true,
walletConnectProjectId: "your-walletconnect-project-id",
connectors: ["injected", "metaMask", "walletConnect"],
},
};
```
### Complete Example
Here's a complete example with all customization options:
```tsx
const providerConfig: AbstraxnProviderConfig = {
apiKey: import.meta.env.VITE_ABSTRAXN_API_KEY || "your-api-key-here",
ui: {
onboardTitle: "Sign In",
logo: "https://your-logo-url.com/logo.png",
theme: "light",
showFooter: true,
showCloseButton: true,
closeOnBackdropClick: true,
authMethods: ["otp", "passkey", "google", "twitter", "discord"],
labels: {
emailLabel: "Enter Email",
emailPlaceholder: "Enter your email",
otpLabel: "OTP",
otpPlaceholder: "Enter your OTP",
emailButton: "Continue",
otpButton: "Verify",
googleButton: "Continue with Google",
},
colors: {
primary: "#9333ea",
primaryHover: "#7e22ce",
},
customCSS: `
.onboarding-button-primary {
background-color: rgb(234, 51, 231);
}
.onboarding-card {
border-radius: 20px;
}
`,
},
externalWallets: {
enabled: true,
walletConnectProjectId: "your-project-id",
connectors: ["injected", "metaMask", "walletConnect"],
},
};
```
## How to use a Dynamic signer with Abstraxn
Our comprehensive signer integration framework enables seamless custom signer deployment within the Abstraxn ecosystem. Dynamic represents a strategic embedded wallet provider that facilitates streamlined user onboarding workflows for decentralized applications. This implementation guide demonstrates how to leverage Dynamic as a sophisticated signer mechanism with Abstraxn, enabling comprehensive smart account creation, control, and transaction execution capabilities.
After extensive evaluation of multiple wallet integration architectures, our team determined that Dynamic's embedded approach offers superior user experience optimization while maintaining robust security standards within account abstraction workflows.
:::steps
#### Strategic Dependency Installation
Our comprehensive technical analysis identified the following dependencies as essential for optimal Dynamic integration within the Abstraxn platform:
```bash
npm i @dynamic-labs/sdk-react-core @dynamic-labs/wagmi-connector @dynamic-labs/ethereum permissionless viem wagmi
```
#### Dynamic Provider Architecture Implementation
Following Dynamic's established integration methodology, our framework requires strategic provider configuration within your application architecture. The DynamicWagmiConnector integration enables seamless Dynamic utilization as a signer mechanism with Abstraxn's account abstraction capabilities:
```ts
import {
DynamicContextProvider,
DynamicWidget,
} from "@dynamic-labs/sdk-react-core";
import { DynamicWagmiConnector } from "@dynamic-labs/wagmi-connector";
import { EthereumWalletConnectors } from "@dynamic-labs/ethereum";
export const App = () => {
return (
);
};
```
#### SmartAccountClient Architecture Development
Our deliberative process involved comprehensive analysis of smart account client configuration approaches. The Dynamic signer integration supports multiple implementation strategies including strategic account type selection and advanced paymaster logic configuration.
Note: DynamicWagmiConnector provides internal WagmiConfig setup, eliminating redundant configuration requirements. This implementation phase enables selection of preferred smart account architectures (Safe, Kernel, Biconomy, TrustWallet, SimpleAccount) and strategic paymaster integration approaches:
```ts
import { createSmartAccountClient } from "permissionless";
import { toSimpleSmartAccount } from "permissionless/accounts";
import { useWalletClient } from "wagmi";
import { createPublicClient, http, zeroAddress } from "viem";
import { createPaymasterClient } from 'viem/account-abstraction'
import { sepolia } from "viem/chains";
import { entryPoint07Address } from "viem/account-abstraction"
const {
data: walletClient
} = useWalletClient()
const publicClient = createPublicClient({
chain: sepolia, // or whatever chain you are using
transport: http()
})
const Abstraxn_Bundler_URL = `<_API_KEY>`
export const paymasterClient = createPaymasterClient({
transport: http('https://paymaster.abstraxn.com/api/v1/{CHAIN_ID}/?apikey={API_KEY}'),
})
const simpleSmartAccount = await toSimpleSmartAccount({
owner: walletClient,
client: publicClient,
entryPoint: {
address: entryPoint07Address,
version: "0.7"
}
})
const smartAccountClient = createSmartAccountClient({
account: simpleSmartAccount,
chain: sepolia,
bundlerTransport: http({Abstraxn_Bundler_URL}),
paymaster: paymasterClient,
userOperation: {
estimateFeesPerGas: async () => {
return (await bundlerClient.getUserOperationGasPrice()).fast
},
}
})
```
#### Strategic Transaction Execution
Our transaction execution framework provides comprehensive User Operation broadcasting with integrated custom paymaster logic. The research team developed sophisticated sponsorship mechanisms that apply strategic paymaster operations before transaction signing and network propagation:
```ts
const txHash = await smartAccountClient.sendTransaction({
to: zeroAddress,
data: "0x",
value: BigInt(0)
})
```
:::
The collaborative synthesis of Dynamic's embedded wallet capabilities with Abstraxn's account abstraction framework represents a strategic advancement in user onboarding and transaction management. Should additional integration requirements or architectural considerations emerge, we remain prepared to conduct further analysis and refine our Dynamic signer strategy to maintain optimal alignment with evolving ecosystem demands.
## How to use a Passkey (WebAuthn) signer
This comprehensive implementation guide demonstrates strategic Passkey (WebAuthn) signer integration with smart accounts within the Abstraxn ecosystem, featuring optimized user operation relay and sponsorship capabilities.
Our deliberative analysis of modern authentication methodologies has determined that Passkey integration represents the most compelling approach for biometric-enabled account management. This strategic framework enables users to authenticate through fingerprint, facial recognition, or other biometric modalities while maintaining robust security standards.
:::info
Passkey (WebAuthn) represents a strategic evolution in authentication technology, enabling users to authenticate with websites and applications through biometric information rather than traditional credential mechanisms. For comprehensive technical documentation on Passkey functionality, consult [the authentication specification](https://developer.mozilla.org/en-US/docs/Web/API/Web_Authentication_API).
:::
### Implementation Framework
::::steps
#### Strategic Package Installation
Our comprehensive evaluation identified the following dependencies as essential for optimal Passkey integration within the Abstraxn platform:
```bash
npm install viem permissionless
```
#### Credential Generation Architecture
The research team developed a sophisticated credential management approach that balances security with user experience optimization:
```tsx
import { useState } from "react"
import {
createWebAuthnCredential,
} from "viem/account-abstraction"
export function PasskeysDemo() {
const [credential, setCredential] = useState(() =>
JSON.parse(localStorage.getItem("credential"))
)
const createCredential = async () => {
const credential = await createWebAuthnCredential({
name: "Wallet"
})
localStorage.setItem("credential", JSON.stringify(credential))
setCredential(credential)
}
if (!credential)
return (
)
return (
Credential: {credential.id}
)
}
```
:::warning
Our strategic recommendation emphasizes utilizing dedicated passkey server infrastructure to enable seamless credential synchronization across multiple devices.
For comprehensive server implementation guidance, consult specialized documentation for passkey server deployment. Advanced implementation resources include [simplewebauthn](https://simplewebauthn.dev/docs/packages/server) for custom server development.
Alternative infrastructure providers offer managed passkey server solutions that can be integrated according to specific architectural requirements.
:::
#### Smart Account Architecture Integration
After comprehensive evaluation of multiple smart account architectures, our team determined that Kernel Smart Account integration provides superior compatibility with Passkey authentication mechanisms:
```tsx
import {
type SmartAccountClient,
createSmartAccountClient
} from "permissionless"
import {
type ToKernelSmartAccountReturnType,
toKernelSmartAccount
} from "permissionless/accounts"
import {
entryPoint07Address,
toWebAuthnAccount
} from "viem/account-abstraction"
const AbstraxnUrl = `https://paymaster.abstraxn.com/api/v1/{CHAIN_ID}/?apikey={PAYMASTER_URL}` // [!code focus]
export const paymasterClient = createPaymasterClient({ // [!code focus]
transport: http('https://paymaster.abstraxn.com/api/v1/{CHAIN_ID}/?apikey={API_KEY}'), // [!code focus]
}) // [!code focus]
export function PasskeysDemo() {
const [smartAccountClient, setSmartAccountClient] =// [!code focus]
React.useState// [!code focus]
>// [!code focus]
>()// [!code focus]
...
React.useEffect(() => { // [!code focus]
if (!credential) return // [!code focus]
toKernelSmartAccount({ // [!code focus]
client: publicClient, // [!code focus]
version: "0.3.1", // [!code focus]
owners: [toWebAuthnAccount({ credential })], // [!code focus]
entryPoint: { // [!code focus]
address: entryPoint07Address, // [!code focus]
version: "0.7" // [!code focus]
} // [!code focus]
}).then((account: ToKernelSmartAccountReturnType<"0.7">) => { // [!code focus]
setSmartAccountClient( // [!code focus]
createSmartAccountClient({ // [!code focus]
account, // [!code focus]
paymaster: paymasterClient, // [!code focus]
chain, // [!code focus]
userOperation: { // [!code focus]
estimateFeesPerGas: async () => // [!code focus]
(await paymasterClient.getUserOperationGasPrice()) // [!code focus]
.fast // [!code focus]
}, // [!code focus]
bundlerTransport: http(AbstraxnUrl) // [!code focus]
}) // [!code focus]
) // [!code focus]
}) // [!code focus]
}, [credential]) // [!code focus]
...
}
```
:::info
Our current technical architecture supports Passkey integration exclusively through kernel account implementations, representing the most robust foundation for biometric authentication workflows.
:::
#### Strategic Transaction Execution
Our transaction execution framework provides comprehensive User Operation broadcasting capabilities with integrated biometric authentication:
```tsx
export function PasskeysDemo() {
...
const [txHash, setTxHash] = React.useState() // [!code focus]
const sendUserOperation = async ( // [!code focus]
event: React.FormEvent // [!code focus]
) => { // [!code focus]
event.preventDefault() // [!code focus]
if (!smartAccountClient) return // [!code focus]
const formData = new FormData(event.currentTarget) // [!code focus]
const to = formData.get("to") as `0x${string}` // [!code focus]
const value = formData.get("value") as string // [!code focus]
const txHash = await smartAccountClient.sendTransaction({ // [!code focus]
calls: [ // [!code focus]
{ // [!code focus]
to, // [!code focus]
value: parseEther(value) // [!code focus]
} // [!code focus]
], // [!code focus]
}) // [!code focus]
setTxHash(txHash) // [!code focus]
} // [!code focus]
return ( // [!code focus]
<> // [!code focus]
// [!code focus]
)} // [!code focus]
// [!code focus]
) // [!code focus]
}
```
::::
Should additional authentication requirements or integration considerations emerge, we remain prepared to conduct further analysis and refine our Passkey integration strategy to maintain optimal alignment with evolving security standards and user experience expectations within the Abstraxn ecosystem.
## How to use Web3Auth with Abstraxn
Our comprehensive evaluation of embedded wallet providers has identified [Web3Auth](https://web3auth.io) as a strategic authentication solution that supports diverse login methodologies within the Abstraxn ecosystem. Web3Auth provides sophisticated native account abstraction capabilities, enabling streamlined user experience through social authentication, sponsored transaction mechanisms, and comprehensive transaction batching functionality.
### Strategic Configuration Framework
To enable Account Abstraction integration within your Web3Auth implementation, navigate to your [Web3Auth dashboard](https://dashboard.web3auth.io) and activate the Smart Accounts functionality through the sidebar interface. Once enabled, configure the Abstraxn bundler and paymaster endpoints according to your strategic infrastructure requirements.
Our deliberative analysis indicates that comprehensive dashboard configuration represents a critical foundation for optimal account abstraction performance within the platform ecosystem.
> Detailed configuration guidance can be referenced through specialized documentation resources for advanced implementation scenarios.
### Implementation Architecture
After establishing your Web3Auth project configuration, implement the following strategic modifications to your client-side application architecture.
#### Web3Auth Provider Architecture
Following Web3Auth's established integration methodology, you will obtain access to a `web3auth` object that can be strategically utilized as an owner parameter for `createSmartAccountClient` operations:
```typescript
import { WEB3AUTH_NETWORK, type Web3AuthOptions } from "@web3auth/modal"
import { QueryClient, QueryClientProvider } from "@tanstack/react-query"
import { WagmiProvider } from "@web3auth/modal/react/wagmi"
import { type ReactNode } from "react"
import { Web3AuthProvider } from "@web3auth/modal/react"
if (!process.env.NEXT_PUBLIC_WEB3AUTH_CLIENT_ID) {
// get from https://dashboard.web3auth.io
throw new Error("missing NEXT_PUBLIC_WEB3AUTH_CLIENT_ID env var")
}
const web3AuthOptions: Web3AuthOptions = {
clientId: process.env.NEXT_PUBLIC_WEB3AUTH_CLIENT_ID,
web3AuthNetwork: WEB3AUTH_NETWORK.SAPPHIRE_DEVNET
}
const web3authConfig = {
web3AuthOptions
}
const queryClient = new QueryClient()
export function AppProvider({ children }: { children: ReactNode }) {
return (
{children}
)
}
```
#### Application Provider Integration
Configure your application's entry point to utilize the previously established provider architecture:
```typescript
"use client"
import { Home } from "@/components/home"
import { AppProvider } from "@/components/provider"
export default function Main() {
return (
)
}
```
#### Web3Auth Authentication Component
Leverage Web3Auth's sophisticated authentication hooks for comprehensive session management. This component provides strategic authentication state handling, displaying login interfaces when disconnected and presenting smart contract wallet information when connected:
```typescript
import { useAccount } from "wagmi"
import {
useWeb3AuthConnect,
useWeb3AuthDisconnect
} from "@web3auth/modal/react"
export function Web3AuthConnect() {
const { connect, isConnected, connectorName } = useWeb3AuthConnect()
const { disconnect } = useWeb3AuthDisconnect()
const { address } = useAccount()
if (isConnected && address) {
return (
Connected to {connectorName}
Smart Contract Wallet: {address}
)
}
return (
)
}
```
#### Strategic User Operation Execution
Once authentication is established, you can execute User Operations through wagmi hooks integration. The smart account configuration from your Web3Auth dashboard will manage bundling operations and gas sponsorship mechanisms when paymaster integration is configured:
```typescript
import { useSendTransaction, useWaitForTransactionReceipt } from "wagmi"
import { zeroAddress } from "viem"
export function SendUserOperation() {
const {
data: hash,
error,
isPending,
sendTransaction
} = useSendTransaction()
const { isLoading: isConfirming, isSuccess: isConfirmed } =
useWaitForTransactionReceipt({ hash })
const handleSendTransaction = () => {
sendTransaction({
to: zeroAddress,
data: "0x",
value: BigInt(0)
})
}
return (
{hash && (
Transaction Hash:
{hash}
)}
{isConfirming &&
Waiting for confirmation...
}
{isConfirmed &&
Transaction confirmed
}
{error &&
Error: {error.message}
}
)
}
```
Our collaborative synthesis of Web3Auth's authentication capabilities with Abstraxn's account abstraction framework represents a strategic advancement in user onboarding and transaction management workflows.
For comprehensive implementation examples, reference specialized demonstration applications that showcase complete Web3Auth integration patterns within account abstraction environments.
## Paymaster Client Integration
### Understanding Paymasters in the EIP-7702 Ecosystem
Imagine being able to pay for someone else's gas fees on Ethereum, or even better, allowing users to interact with your application without needing ETH in their wallets at all. This is exactly what paymasters enable in the account abstraction world. Think of a paymaster as a benevolent sponsor that agrees to cover transaction costs under certain conditions, fundamentally transforming how users interact with blockchain applications.
When we talk about paymasters in the context of EIP-7702 transactions, we're discussing services that implement the ERC-7677 specification. This standard defines how paymasters communicate with bundlers and user operations, creating a standardized way to sponsor gas fees. The beauty of this system lies in its flexibility—you can sponsor transactions for specific users, certain types of operations, or even all interactions with your application.
The relationship between users, paymasters, and bundlers creates a powerful triangle of functionality. Users submit operations without worrying about gas fees, paymasters evaluate whether to sponsor these operations based on predefined rules, and bundlers coordinate the entire process to ensure smooth execution on the blockchain. Understanding this relationship helps clarify why we need specialized client tooling to interact with paymaster services effectively.
### The Role of Paymaster Clients
A Paymaster Client serves as your application's interface to paymaster services, handling the complex negotiations and data formatting required to sponsor user operations. While bundler clients focus on submitting and tracking user operations, paymaster clients specialize in the sponsorship aspect—determining eligibility, calculating costs, and providing the cryptographic proofs that bundlers need to include sponsored operations in their bundles.
Think of the Paymaster Client as a specialized diplomatic service. It speaks the language of both your application and the paymaster service, translating your sponsorship intentions into the technical formats that the ERC-7677 specification requires. This abstraction allows you to focus on your sponsorship business logic rather than worrying about the underlying protocol mechanics.
The client also provides crucial validation and safety features. It can verify that paymaster responses are properly formatted, ensure that gas estimates are reasonable, and provide feedback when sponsorship requests fail. These features become essential when building production applications that depend on reliable transaction sponsorship.
### Obtaining Paymaster URL & API Key
To begin, you’ll need a Bundler URL and API Key. Retrieve these from your Abstraxn Dashboard by following these steps:
* Visit [https://dashboard.abstraxn.com/](https://dashboard.abstraxn.com/)
* Log in or sign up
* Go to Apps → click Create New App → enter name, chain, description
* Within the app, navigate to Paymaster → click Add Paymaster, assign a name, select app
* Click View Details → copy your Paymaster URL and API Key
### Setting Up Your Paymaster Integration
Let's begin with the fundamental imports and understand how paymaster clients fit into the broader account abstraction ecosystem:
```javascript
import { http } from 'viem'
import {
createBundlerClient,
createPaymasterClient
} from 'viem/account-abstraction'
import { sepolia } from 'viem/chains'
```
Notice that we're importing both bundler and paymaster client creation functions. This reflects the collaborative nature of these services—while they serve different purposes, they work together to enable sponsored transactions. The separation allows you to use different service providers for bundling and payment sponsorship, giving you flexibility in choosing the best services for each function.
Let's create a basic paymaster client and understand each component:
```javascript
// Create the paymaster client with minimal configuration
const paymasterClient = createPaymasterClient({
transport: http('https://paymaster.abstraxn.com/v1/sepolia') // Dedicated paymaster service endpoint
})
// Integrate the paymaster with a bundler client for complete functionality
const bundlerClient = createBundlerClient({
chain: sepolia, // Specify the blockchain network for proper operation
paymaster: paymasterClient, // Delegate sponsorship decisions to the paymaster client
transport: http('https://bundler.abstraxn.com/v1/sepolia') // Separate endpoint for bundler operations
})
```
This configuration demonstrates the typical integration pattern where paymaster and bundler services work together but maintain separate responsibilities. The bundler client receives the paymaster client as a parameter, allowing it to consult the paymaster during user operation preparation and submission.
The separation of transports here is intentional and important. Paymaster services often have different performance characteristics, rate limits, and availability patterns compared to bundler services. By using separate transports, you can optimize each connection independently and implement different retry strategies or fallback mechanisms for each service type.
### Configuration Parameters and Their Strategic Impact
Understanding each configuration parameter helps you optimize your paymaster integration for specific use cases and operational requirements. Let's explore how each parameter affects your application's behavior and performance.
#### Client Identification and Management
The identification parameters might seem purely administrative, but they serve important operational purposes:
```javascript
const paymasterClient = createPaymasterClient({
key: 'abstraxn-premium-paymaster', // Used for internal client management and caching
name: 'Abstraxn Premium User Paymaster', // Human-readable identifier for logging and monitoring
transport: http('https://paymaster.abstraxn.com/v1/mainnet')
})
```
The `key` parameter affects how Viem manages client instances internally, particularly for caching and connection pooling. When you create multiple paymaster clients in your application, unique keys ensure that each client maintains its own connection state and cache. This becomes particularly valuable when you're working with multiple paymaster services or different configurations for different user tiers.
The `name` parameter appears in logs, error messages, and debugging output. Choosing descriptive names becomes crucial when troubleshooting issues in production environments. Consider including information about the paymaster's purpose or target audience in the name to make operational tasks easier.
#### Performance Tuning with Polling Intervals
The polling interval configuration affects how responsive your application feels to users while balancing resource consumption:
```javascript
const paymasterClient = createPaymasterClient({
pollingInterval: 2000, // Check sponsorship status every 2 seconds instead of default 4 seconds
transport: http('https://paymaster.abstraxn.com/v1/mainnet')
})
```
This setting becomes particularly important when your application needs to provide real-time feedback about sponsorship availability or when tracking the status of sponsored operations. Shorter intervals provide faster feedback but increase API usage and can strain both your application and the paymaster service.
Consider your application's user experience requirements when setting this value. Applications that display real-time sponsorship availability might benefit from shorter intervals, while batch processing applications might prefer longer intervals to reduce resource consumption. Remember that paymaster services often have rate limits, so aggressive polling can lead to request throttling.
#### Extended Functionality with Custom RPC Schemas
Many paymaster services provide additional functionality beyond the standard ERC-7677 specification. Custom RPC schemas allow you to access these features while maintaining type safety:
```javascript
import { rpcSchema } from 'viem'
// Define additional methods that your paymaster service supports
type EnhancedPaymasterSchema = [
{
Method: 'abstraxn_getSponsorshipQuota'
Parameters: [string] // User address
ReturnType: { remainingQuota: bigint, resetTime: number }
},
{
Method: 'abstraxn_estimateSponsorshipCost'
Parameters: [object] // User operation preview
ReturnType: { estimatedCost: bigint, confidence: number }
}
]
const paymasterClient = createPaymasterClient({
rpcSchema: rpcSchema(),
transport: http('https://paymaster.abstraxn.com/v1/mainnet')
})
// Now you can use extended functionality with full TypeScript support
const quota = await paymasterClient.request({
method: 'abstraxn_getSponsorshipQuota',
params: ['0x...'] // User address
})
```
This approach enables you to leverage provider-specific features such as quota management, cost estimation, or analytics while maintaining the benefits of TypeScript's type system. When working with paymaster services that offer sophisticated sponsorship logic, these extended methods often provide the visibility and control you need to implement complex user experience patterns.
### Transport Configuration and Resilience Strategies
The transport layer represents a critical component of paymaster integration because sponsorship decisions often happen in real-time during user interactions. Understanding transport configuration helps you build applications that remain responsive even when paymaster services experience issues:
```javascript
const paymasterClient = createPaymasterClient({
transport: http('https://paymaster.abstraxn.com/v1/mainnet', {
timeout: 15000, // 15 second timeout for sponsorship decisions
retryCount: 2, // Retry failed sponsorship requests up to 2 times
retryDelay: 500, // Wait 500ms between retries for quick recovery
})
})
```
These transport settings require careful consideration of the user experience implications. Sponsorship decisions often happen during user interface interactions where delays become immediately noticeable. The timeout setting should balance thoroughness with responsiveness—too short, and legitimate requests might fail during network congestion; too long, and users experience frustrating delays.
The retry configuration becomes particularly important for paymaster services because sponsorship decisions can fail for transient reasons such as temporary quota exhaustion or service overload. However, aggressive retry policies can exacerbate problems during service outages, so consider implementing exponential backoff or circuit breaker patterns for production deployments.
### Integration Patterns and Best Practices
Successful paymaster integration requires understanding common patterns and potential pitfalls that emerge when building production applications.
#### Graceful Degradation Strategies
Consider how your application behaves when paymaster services become unavailable:
```javascript
// Example of a resilient paymaster integration with fallback behavior
const createResilientPaymasterClient = () => {
try {
return createPaymasterClient({
name: 'Primary Paymaster',
transport: http('https://paymaster.abstraxn.com/v1/mainnet', {
timeout: 10000 // Shorter timeout for faster fallback detection
})
})
} catch (error) {
console.warn('Primary paymaster unavailable, falling back to self-pay mode')
return null // Indicates that users should pay their own gas fees
}
}
const paymasterClient = createResilientPaymasterClient()
const bundlerClient = createBundlerClient({
chain: mainnet,
paymaster: paymasterClient, // Will be null if paymaster is unavailable
transport: http('https://bundler.abstraxn.com/v1/mainnet')
})
```
This pattern ensures that your application remains functional even when paymaster services experience outages. Users might need to pay their own gas fees during service interruptions, but they can continue using your application rather than encountering complete failures.
#### Testing and Development Workflows
Developing applications with paymaster integration requires careful attention to testing strategies that account for the various states and failure modes your application might encounter:
```javascript
// Example development configuration with enhanced observability
const developmentPaymasterClient = createPaymasterClient({
name: 'Development Paymaster Client', // Clear identification in logs
pollingInterval: 5000, // Longer polling to reduce API usage during development
transport: http('https://paymaster.abstraxn.com/v1/sepolia', {
timeout: 30000, // Extended timeout for development environments
// Additional logging can be configured here for debugging
})
})
```
Development configurations should prioritize visibility and debugging capability over performance optimization. Extended timeouts reduce the likelihood of spurious failures during development, while descriptive naming helps distinguish between different client instances in logs and debugging output.
### Understanding Service Integration Dynamics
The relationship between bundler clients and paymaster clients creates interesting operational dynamics that become important when scaling your application.
When you configure a bundler client with a paymaster client, the bundler automatically consults the paymaster during user operation preparation. This consultation involves multiple round trips—first to get sponsorship eligibility and gas estimates, then to get final sponsorship data with signatures. Understanding this flow helps you optimize performance and implement appropriate error handling.
The paymaster consultation process can add significant latency to user operation submission, particularly when paymaster services need to perform complex eligibility checks or when network conditions cause delays. Consider implementing user interface patterns that communicate this processing time to users, such as progress indicators or estimated completion times.
Production deployments often benefit from monitoring the relationship between bundler and paymaster performance. High paymaster response times can create bottlenecks in user operation submission, while paymaster service outages can cause user experience degradation even when bundler services remain healthy. Implementing separate health checks and monitoring for each service type helps you diagnose issues more effectively.
The Paymaster Client provides the foundation for implementing sophisticated sponsorship strategies in your EIP-7702 applications, but successful deployment requires careful attention to the operational and user experience considerations that emerge when these services interact in production environments. By understanding both the technical integration patterns and the broader service dynamics, you can build applications that provide reliable sponsored transaction experiences even under challenging conditions.
## getPaymasterData
Our paymaster data methodology provides comprehensive sponsorship property retrieval and User Operation optimization within the Abstraxn platform. This analytical approach ensures complete paymaster integration while maintaining optimal performance for complex account abstraction workflows.
Internally leverages [ERC-7677's `pm_getPaymasterData` method](https://github.com/ethereum/ERCs/blob/master/ERCS/erc-7677.md#pm_getpaymasterdata) for standardized paymaster protocol compliance.
### Strategic Implementation Framework
After comprehensive evaluation of multiple paymaster integration architectures, our team has determined that direct property retrieval offers the most compelling advantages for the Abstraxn ecosystem. Our analysis prioritized sponsorship reliability, parameter optimization, and seamless developer experience.
:::code-group
```ts [example.ts]
import { paymasterClient } from './config'
const paymasterArgs = await paymasterClient.getPaymasterData({
callData: '0xb61d27f600000000000000000000000000000000000000000000000000000000000000000000000000000000000000000000000000000000000000000de0b6b3a764000000000000000000000000000000000000000000000000000000000000000000600000000000000000000000000000000000000000000000000000000000000000',
factory: '0xfb6dab6200b8958c2655c3747708f82243d3f32e',
factoryData: '0xf14ddffc000000000000000000000000f39fd6e51aad88f6f4ce6ab8827279cfffb922660000000000000000000000000000000000000000000000000000000000000000',
maxFeePerGas: 14510554812n,
maxPriorityFeePerGas: 2000000000n,
nonce: 0n,
sender: '0xE911628bF8428C23f179a07b081325cAe376DE1f',
signature: '0xfffffffffffffffffffffffffffffff0000000000000000000000000000000007aaaaaaaaaaaaaaaaaaaaaaaaaaaaaaaaaaaaaaaaaaaaaaaaaaaaaaaaaaaaaaa1c'
})
```
```ts [config.ts] filename="config.ts"
import { http } from 'viem'
import { createPaymasterClient } from 'viem/account-abstraction'
export const paymasterClient = createPaymasterClient({
transport: http('https://paymaster.abstraxn.com/api/v1/{CHAIN_ID}/?apikey={API_KEY}'),
})
```
:::
Key considerations in our decision-making process included:
* Minimizing sponsorship overhead while maximizing operational completeness
* Maintaining optimal paymaster integration flow
* Ensuring long-term ERC-7677 protocol adaptability
Our deliberative process involved rigorous analysis of alternative paymaster property mechanisms. While distributed retrieval architectures presented interesting perspectives, the direct integration approach demonstrated superior alignment with our strategic objectives regarding transaction efficiency and developer accessibility.
The research team provided nuanced insights, particularly highlighting the importance of flexible paymaster configuration across diverse sponsorship scenarios. Our recommendation represents a collaborative synthesis of technical expertise and strategic vision, designed to drive meaningful efficiency improvements in paymaster integration workflows.
Should additional sponsorship requirements or protocol considerations emerge, we remain prepared to conduct further analysis and refine our paymaster data strategy accordingly.
### API Key Configuration
To utilize the Abstraxn paymaster services, you must first obtain your API credentials through the Abstraxn Dashboard. Follow these steps to configure your paymaster integration:
#### Obtaining Your API Key
1. **Access the Dashboard**: Navigate to [https://dashboard.abstraxn.com/](https://dashboard.abstraxn.com/)
2. **Authentication**: Log in to your existing account or create a new account if you're a first-time user
3. **Application Setup**:
* Navigate to the **Apps** section
* Click the **"Create new app"** button located in the top-right corner
* Complete the required application details and configuration
4. **Paymaster Configuration**:
* Access the **Paymaster** section from your dashboard
* Click the **"App paymaster"** button in the top-right area of the screen
* Provide a descriptive name for your paymaster instance
* Select the application you created in the previous step
5. **Registration and Access**:
* Click **"Register"** to complete the paymaster setup process
* Once registration is complete, click **"View details"** to access your API key and paymaster URL
#### Integration
After obtaining your credentials, update your configuration file with the provided API key:
```ts [config.ts]
import { http } from 'viem'
import { createPaymasterClient } from 'viem/account-abstraction'
export const paymasterClient = createPaymasterClient({
transport: http('https://paymaster.abstraxn.com/api/v1/{CHAIN_ID}/?apikey={YOUR_API_KEY}'),
})
```
Replace `{YOUR_API_KEY}` with the API key obtained from the dashboard, and `{CHAIN_ID}` with the appropriate network identifier for your target blockchain.
### Response Architecture
The Abstraxn paymaster data framework returns comprehensive sponsorship configuration optimized for strategic User Operation execution:
```ts
{
paymaster: Address
paymasterData: Hex
paymasterVerificationGasLimit: bigint
paymasterPostOpGasLimit: bigint
}
```
This response structure represents our commitment to providing complete paymaster-related User Operation properties that enable seamless sponsored transaction execution across the platform ecosystem.
### Configuration Parameters
Our technical architecture supports nuanced paymaster data retrieval approaches, allowing developers to fine-tune sponsorship property assembly according to specific application requirements and strategic execution objectives.
#### callData
* **Type:** `Hex`
Strategic execution data for transmission to the sender during primary operation execution within the Abstraxn framework.
```ts
import { paymasterClient } from './config'
const paymasterArgs = await paymasterClient.getPaymasterData({
callData: '0xb61d27f600000000000000000000000000000000000000000000000000000000000000000000000000000000000000000000000000000000000000000de0b6b3a764000000000000000000000000000000000000000000000000000000000000000000600000000000000000000000000000000000000000000000000000000000000000', // [!code focus]
factory: '0xfb6dab6200b8958c2655c3747708f82243d3f32e',
factoryData: '0xf14ddffc000000000000000000000000f39fd6e51aad88f6f4ce6ab8827279cfffb922660000000000000000000000000000000000000000000000000000000000000000',
maxFeePerGas: 14510554812n,
maxPriorityFeePerGas: 2000000000n,
nonce: 0n,
sender: '0xE911628bF8428C23f179a07b081325cAe376DE1f',
signature: '0xfffffffffffffffffffffffffffffff0000000000000000000000000000000007aaaaaaaaaaaaaaaaaaaaaaaaaaaaaaaaaaaaaaaaaaaaaaaaaaaaaaaaaaaaaaa1c'
})
```
#### callGasLimit (optional)
* **Type:** `bigint`
Precision resource allocation for primary execution logic, enabling strategic optimization of computational requirements during paymaster evaluation.
```ts
import { paymasterClient } from './config'
const paymasterArgs = await paymasterClient.getPaymasterData({
callData: '0xb61d27f600000000000000000000000000000000000000000000000000000000000000000000000000000000000000000000000000000000000000000de0b6b3a764000000000000000000000000000000000000000000000000000000000000000000600000000000000000000000000000000000000000000000000000000000000000',
callGasLimit: 69420n, // [!code focus]
factory: '0xfb6dab6200b8958c2655c3747708f82243d3f32e',
factoryData: '0xf14ddffc000000000000000000000000f39fd6e51aad88f6f4ce6ab8827279cfffb922660000000000000000000000000000000000000000000000000000000000000000',
maxFeePerGas: 14510554812n,
maxPriorityFeePerGas: 2000000000n,
nonce: 0n,
sender: '0xE911628bF8428C23f179a07b081325cAe376DE1f',
signature: '0xfffffffffffffffffffffffffffffff0000000000000000000000000000000007aaaaaaaaaaaaaaaaaaaaaaaaaaaaaaaaaaaaaaaaaaaaaaaaaaaaaaaaaaaaaaa1c'
})
```
#### chainId
* **Type:** `number`
Strategic chain identification for targeted paymaster operations within the Abstraxn multi-network ecosystem.
```ts
import { paymasterClient } from './config'
const paymasterArgs = await paymasterClient.getPaymasterData({
callData: '0xb61d27f600000000000000000000000000000000000000000000000000000000000000000000000000000000000000000000000000000000000000000de0b6b3a764000000000000000000000000000000000000000000000000000000000000000000600000000000000000000000000000000000000000000000000000000000000000',
callGasLimit: 69420n,
chainId: 1, // [!code focus]
factory: '0xfb6dab6200b8958c2655c3747708f82243d3f32e',
factoryData: '0xf14ddffc000000000000000000000000f39fd6e51aad88f6f4ce6ab8827279cfffb922660000000000000000000000000000000000000000000000000000000000000000',
maxFeePerGas: 14510554812n,
maxPriorityFeePerGas: 2000000000n,
nonce: 0n,
sender: '0xE911628bF8428C23f179a07b081325cAe376DE1f',
signature: '0xfffffffffffffffffffffffffffffff0000000000000000000000000000000007aaaaaaaaaaaaaaaaaaaaaaaaaaaaaaaaaaaaaaaaaaaaaaaaaaaaaaaaaaaaaaa1c'
})
```
#### context (optional)
##### Verifying Paymaster (Sponsored)
* **Type:** `unknown`
Configuration parameters for Verifying paymaster integration scenarios within the platform.
```ts
import { paymasterClient } from './config'
const paymasterArgs = await paymasterClient.getPaymasterData({
callData: '0xb61d27f600000000000000000000000000000000000000000000000000000000000000000000000000000000000000000000000000000000000000000de0b6b3a764000000000000000000000000000000000000000000000000000000000000000000600000000000000000000000000000000000000000000000000000000000000000',
callGasLimit: 69420n,
paymaster: paymasterClient,
paymasterContext: { // [!code focus]
mode: "sponsor" // [!code focus]
}, // [!code focus]
factory: '0xfb6dab6200b8958c2655c3747708f82243d3f32e',
factoryData: '0xf14ddffc000000000000000000000000f39fd6e51aad88f6f4ce6ab8827279cfffb922660000000000000000000000000000000000000000000000000000000000000000',
maxFeePerGas: 14510554812n,
maxPriorityFeePerGas: 2000000000n,
nonce: 0n,
sender: '0xE911628bF8428C23f179a07b081325cAe376DE1f',
signature: '0xfffffffffffffffffffffffffffffff0000000000000000000000000000000007aaaaaaaaaaaaaaaaaaaaaaaaaaaaaaaaaaaaaaaaaaaaaaaaaaaaaaaaaaaaaaa1c'
})
```
##### Token Paymaster
* **Type:** `unknown`
Configuration parameters for Token paymaster integration scenarios within the platform.
```ts
import { paymasterClient } from './config'
const paymasterArgs = await paymasterClient.getPaymasterData({
callData: '0xb61d27f600000000000000000000000000000000000000000000000000000000000000000000000000000000000000000000000000000000000000000de0b6b3a764000000000000000000000000000000000000000000000000000000000000000000600000000000000000000000000000000000000000000000000000000000000000',
callGasLimit: 69420n,
paymaster: paymasterClient,
paymasterContext: { // [!code focus]
mode: "token", // [!code focus]
supportedTokens: {"USDT","USDC","SHIBA","TOKEN1"}, // [!code focus]
tokenAddress: {TOKEN_ADDRESSES_IN_PRIORITY_ORDER}, // [!code focus]
}, // [!code focus]
factory: '0xfb6dab6200b8958c2655c3747708f82243d3f32e',
factoryData: '0xf14ddffc000000000000000000000000f39fd6e51aad88f6f4ce6ab8827279cfffb922660000000000000000000000000000000000000000000000000000000000000000',
maxFeePerGas: 14510554812n,
maxPriorityFeePerGas: 2000000000n,
nonce: 0n,
sender: '0xE911628bF8428C23f179a07b081325cAe376DE1f',
signature: '0xfffffffffffffffffffffffffffffff0000000000000000000000000000000007aaaaaaaaaaaaaaaaaaaaaaaaaaaaaaaaaaaaaaaaaaaaaaaaaaaaaaaaaaaaaaa1c'
})
```
#### entryPointAddress
* **Type:** `Address`
Strategic EntryPoint targeting for paymaster protocol compliance within the Abstraxn execution framework.
```ts
import { paymasterClient } from './config'
const paymasterArgs = await paymasterClient.getPaymasterData({
callData: '0xb61d27f600000000000000000000000000000000000000000000000000000000000000000000000000000000000000000000000000000000000000000de0b6b3a764000000000000000000000000000000000000000000000000000000000000000000600000000000000000000000000000000000000000000000000000000000000000',
callGasLimit: 69420n,
chainId: 1,
entryPointAddress: '0x0000000071727De22E5E9d8BAf0edAc6f37da032', // [!code focus]
factory: '0xfb6dab6200b8958c2655c3747708f82243d3f32e',
factoryData: '0xf14ddffc000000000000000000000000f39fd6e51aad88f6f4ce6ab8827279cfffb922660000000000000000000000000000000000000000000000000000000000000000',
maxFeePerGas: 14510554812n,
maxPriorityFeePerGas: 2000000000n,
nonce: 0n,
sender: '0xE911628bF8428C23f179a07b081325cAe376DE1f',
signature: '0xfffffffffffffffffffffffffffffff0000000000000000000000000000000007aaaaaaaaaaaaaaaaaaaaaaaaaaaaaaaaaaaaaaaaaaaaaaaaaaaaaaaaaaaaaaa1c'
})
```
#### factory (optional)
* **Type:** `Address`
Strategic account factory configuration for deployment scenarios within the Abstraxn infrastructure.
:::warning
This configuration parameter should be utilized exclusively during initial Smart Account deployment phases, ensuring optimal resource management.
:::
```ts
import { paymasterClient } from './config'
const paymasterArgs = await paymasterClient.getPaymasterData({
callData: '0xb61d27f600000000000000000000000000000000000000000000000000000000000000000000000000000000000000000000000000000000000000000de0b6b3a764000000000000000000000000000000000000000000000000000000000000000000600000000000000000000000000000000000000000000000000000000000000000',
callGasLimit: 69420n,
factory: '0xfb6dab6200b8958c2655c3747708f82243d3f32e', // [!code focus]
factoryData: '0xf14ddffc000000000000000000000000f39fd6e51aad88f6f4ce6ab8827279cfffb922660000000000000000000000000000000000000000000000000000000000000000',
maxFeePerGas: 14510554812n,
maxPriorityFeePerGas: 2000000000n,
nonce: 0n,
sender: '0xE911628bF8428C23f179a07b081325cAe376DE1f',
signature: '0xfffffffffffffffffffffffffffffff0000000000000000000000000000000007aaaaaaaaaaaaaaaaaaaaaaaaaaaaaaaaaaaaaaaaaaaaaaaaaaaaaaaaaaaaaaa1c'
})
```
#### factoryData (optional)
* **Type:** `Hex`
Structured deployment instructions for Smart Account initialization through factory contracts.
:::warning
This parameter maintains strategic relevance only during pre-deployment phases, supporting efficient account creation workflows.
:::
```ts
import { paymasterClient } from './config'
const paymasterArgs = await paymasterClient.getPaymasterData({
callData: '0xb61d27f600000000000000000000000000000000000000000000000000000000000000000000000000000000000000000000000000000000000000000de0b6b3a764000000000000000000000000000000000000000000000000000000000000000000600000000000000000000000000000000000000000000000000000000000000000',
callGasLimit: 69420n,
factory: '0xfb6dab6200b8958c2655c3747708f82243d3f32e',
factoryData: '0xf14ddffc000000000000000000000000f39fd6e51aad88f6f4ce6ab8827279cfffb922660000000000000000000000000000000000000000000000000000000000000000', // [!code focus]
maxFeePerGas: 14510554812n,
maxPriorityFeePerGas: 2000000000n,
nonce: 0n,
sender: '0xE911628bF8428C23f179a07b081325cAe376DE1f',
signature: '0xfffffffffffffffffffffffffffffff0000000000000000000000000000000007aaaaaaaaaaaaaaaaaaaaaaaaaaaaaaaaaaaaaaaaaaaaaaaaaaaaaaaaaaaaaaa1c'
})
```
#### maxFeePerGas (optional)
* **Type:** `bigint`
Strategic fee ceiling configuration for User Operation execution, enabling predictable cost management within the Abstraxn platform.
```ts
import { paymasterClient } from './config'
const paymasterArgs = await paymasterClient.getPaymasterData({
callData: '0xb61d27f600000000000000000000000000000000000000000000000000000000000000000000000000000000000000000000000000000000000000000de0b6b3a764000000000000000000000000000000000000000000000000000000000000000000600000000000000000000000000000000000000000000000000000000000000000',
callGasLimit: 69420n,
factory: '0xfb6dab6200b8958c2655c3747708f82243d3f32e',
factoryData: '0xf14ddffc000000000000000000000000f39fd6e51aad88f6f4ce6ab8827279cfffb922660000000000000000000000000000000000000000000000000000000000000000',
maxFeePerGas: 14510554812n, // [!code focus]
maxPriorityFeePerGas: 2000000000n,
nonce: 0n,
sender: '0xE911628bF8428C23f179a07b081325cAe376DE1f',
signature: '0xfffffffffffffffffffffffffffffff0000000000000000000000000000000007aaaaaaaaaaaaaaaaaaaaaaaaaaaaaaaaaaaaaaaaaaaaaaaaaaaaaaaaaaaaaaa1c'
})
```
#### maxPriorityFeePerGas (optional)
* **Type:** `bigint`
Advanced priority fee optimization for enhanced transaction processing efficiency during paymaster evaluation.
```ts
import { paymasterClient } from './config'
const paymasterArgs = await paymasterClient.getPaymasterData({
callData: '0xb61d27f600000000000000000000000000000000000000000000000000000000000000000000000000000000000000000000000000000000000000000de0b6b3a764000000000000000000000000000000000000000000000000000000000000000000600000000000000000000000000000000000000000000000000000000000000000',
callGasLimit: 69420n,
factory: '0xfb6dab6200b8958c2655c3747708f82243d3f32e',
factoryData: '0xf14ddffc000000000000000000000000f39fd6e51aad88f6f4ce6ab8827279cfffb922660000000000000000000000000000000000000000000000000000000000000000',
maxFeePerGas: 14510554812n,
maxPriorityFeePerGas: 2000000000n, // [!code focus]
nonce: 0n,
sender: '0xE911628bF8428C23f179a07b081325cAe376DE1f',
signature: '0xfffffffffffffffffffffffffffffff0000000000000000000000000000000007aaaaaaaaaaaaaaaaaaaaaaaaaaaaaaaaaaaaaaaaaaaaaaaaaaaaaaaaaaaaaaa1c'
})
```
#### nonce
* **Type:** `bigint`
Sequential operation identifier ensuring transaction ordering integrity within the Abstraxn ecosystem.
```ts
import { paymasterClient } from './config'
const paymasterArgs = await paymasterClient.getPaymasterData({
callData: '0xb61d27f600000000000000000000000000000000000000000000000000000000000000000000000000000000000000000000000000000000000000000de0b6b3a764000000000000000000000000000000000000000000000000000000000000000000600000000000000000000000000000000000000000000000000000000000000000',
callGasLimit: 69420n,
factory: '0xfb6dab6200b8958c2655c3747708f82243d3f32e',
factoryData: '0xf14ddffc000000000000000000000000f39fd6e51aad88f6f4ce6ab8827279cfffb922660000000000000000000000000000000000000000000000000000000000000000',
maxFeePerGas: 14510554812n,
maxPriorityFeePerGas: 2000000000n,
nonce: 0n, // [!code focus]
sender: '0xE911628bF8428C23f179a07b081325cAe376DE1f',
signature: '0xfffffffffffffffffffffffffffffff0000000000000000000000000000000007aaaaaaaaaaaaaaaaaaaaaaaaaaaaaaaaaaaaaaaaaaaaaaaaaaaaaaaaaaaaaaa1c'
})
```
#### preVerificationGas (optional)
* **Type:** `bigint`
Strategic bundler compensation configuration, ensuring sustainable operation within the Abstraxn ecosystem during paymaster processing.
```ts
import { paymasterClient } from './config'
const paymasterArgs = await paymasterClient.getPaymasterData({
callData: '0xb61d27f600000000000000000000000000000000000000000000000000000000000000000000000000000000000000000000000000000000000000000de0b6b3a764000000000000000000000000000000000000000000000000000000000000000000600000000000000000000000000000000000000000000000000000000000000000',
callGasLimit: 69420n,
factory: '0xfb6dab6200b8958c2655c3747708f82243d3f32e',
factoryData: '0xf14ddffc000000000000000000000000f39fd6e51aad88f6f4ce6ab8827279cfffb922660000000000000000000000000000000000000000000000000000000000000000',
maxFeePerGas: 14510554812n,
maxPriorityFeePerGas: 2000000000n,
nonce: 0n,
preVerificationGas: 69420n, // [!code focus]
sender: '0xE911628bF8428C23f179a07b081325cAe376DE1f',
signature: '0xfffffffffffffffffffffffffffffff0000000000000000000000000000000007aaaaaaaaaaaaaaaaaaaaaaaaaaaaaaaaaaaaaaaaaaaaaaaaaaaaaaaaaaaaaaa1c'
})
```
#### sender
* **Type:** `Address`
Strategic sender identification for User Operation execution within the Abstraxn paymaster framework.
```ts
import { paymasterClient } from './config'
const paymasterArgs = await paymasterClient.getPaymasterData({
callData: '0xb61d27f600000000000000000000000000000000000000000000000000000000000000000000000000000000000000000000000000000000000000000de0b6b3a764000000000000000000000000000000000000000000000000000000000000000000600000000000000000000000000000000000000000000000000000000000000000',
callGasLimit: 69420n,
factory: '0xfb6dab6200b8958c2655c3747708f82243d3f32e',
factoryData: '0xf14ddffc000000000000000000000000f39fd6e51aad88f6f4ce6ab8827279cfffb922660000000000000000000000000000000000000000000000000000000000000000',
maxFeePerGas: 14510554812n,
maxPriorityFeePerGas: 2000000000n,
nonce: 0n,
preVerificationGas: 69420n,
sender: '0xE911628bF8428C23f179a07b081325cAe376DE1f', // [!code focus]
signature: '0xfffffffffffffffffffffffffffffff0000000000000000000000000000000007aaaaaaaaaaaaaaaaaaaaaaaaaaaaaaaaaaaaaaaaaaaaaaaaaaaaaaaaaaaaaaa1c'
})
```
#### signature
* **Type:** `Hex`
Authentication signature for User Operation validation, supporting secure paymaster data retrieval.
```ts
import { paymasterClient } from './config'
const paymasterArgs = await paymasterClient.getPaymasterData({
callData: '0xb61d27f600000000000000000000000000000000000000000000000000000000000000000000000000000000000000000000000000000000000000000de0b6b3a764000000000000000000000000000000000000000000000000000000000000000000600000000000000000000000000000000000000000000000000000000000000000',
callGasLimit: 69420n,
factory: '0xfb6dab6200b8958c2655c3747708f82243d3f32e',
factoryData: '0xf14ddffc000000000000000000000000f39fd6e51aad88f6f4ce6ab8827279cfffb922660000000000000000000000000000000000000000000000000000000000000000',
maxFeePerGas: 14510554812n,
maxPriorityFeePerGas: 2000000000n,
nonce: 0n,
preVerificationGas: 69420n,
sender: '0xE911628bF8428C23f179a07b081325cAe376DE1f',
signature: '0xfffffffffffffffffffffffffffffff0000000000000000000000000000000007aaaaaaaaaaaaaaaaaaaaaaaaaaaaaaaaaaaaaaaaaaaaaaaaaaaaaaaaaaaaaaa1c' // [!code focus]
})
```
#### verificationGasLimit (optional)
* **Type:** `bigint`
Strategic resource allocation for comprehensive verification procedures, ensuring robust security within paymaster evaluation workflows.
```ts
import { paymasterClient } from './config'
const paymasterArgs = await paymasterClient.getPaymasterData({
callData: '0xb61d27f600000000000000000000000000000000000000000000000000000000000000000000000000000000000000000000000000000000000000000de0b6b3a764000000000000000000000000000000000000000000000000000000000000000000600000000000000000000000000000000000000000000000000000000000000000',
callGasLimit: 69420n,
factory: '0xfb6dab6200b8958c2655c3747708f82243d3f32e',
factoryData: '0xf14ddffc000000000000000000000000f39fd6e51aad88f6f4ce6ab8827279cfffb922660000000000000000000000000000000000000000000000000000000000000000',
maxFeePerGas: 14510554812n,
maxPriorityFeePerGas: 2000000000n,
nonce: 0n,
sender: '0xE911628bF8428C23f179a07b081325cAe376DE1f',
signature: '0xfffffffffffffffffffffffffffffff0000000000000000000000000000000007aaaaaaaaaaaaaaaaaaaaaaaaaaaaaaaaaaaaaaaaaaaaaaaaaaaaaaaaaaaaaaa1c',
verificationGasLimit: 69420n, // [!code focus]
})
```
## getPaymasterStubData
Our paymaster stub data methodology provides comprehensive sponsorship property retrieval specifically optimized for User Operation gas estimation within the Abstraxn platform. This strategic approach ensures accurate cost prediction while maintaining optimal performance for complex account abstraction workflows.
Internally leverages [ERC-7677's `pm_getPaymasterStubData` method](https://github.com/ethereum/ERCs/blob/master/ERCS/erc-7677.md#pm_getpaymasterstubdata) for standardized paymaster estimation protocol compliance.
### Strategic Estimation Framework
After comprehensive evaluation of multiple paymaster estimation architectures, our team has determined that stub-based property retrieval offers the most compelling advantages for gas optimization within the Abstraxn ecosystem. Our analysis prioritized estimation accuracy, computational efficiency, and seamless developer experience.
:::code-group
```ts [example.ts]
import { paymasterClient } from './config'
const paymasterArgs = await paymasterClient.getPaymasterStubData({
callData: '0xb61d27f600000000000000000000000000000000000000000000000000000000000000000000000000000000000000000000000000000000000000000de0b6b3a764000000000000000000000000000000000000000000000000000000000000000000600000000000000000000000000000000000000000000000000000000000000000',
factory: '0xfb6dab6200b8958c2655c3747708f82243d3f32e',
factoryData: '0xf14ddffc000000000000000000000000f39fd6e51aad88f6f4ce6ab8827279cfffb922660000000000000000000000000000000000000000000000000000000000000000',
maxFeePerGas: 14510554812n,
maxPriorityFeePerGas: 2000000000n,
nonce: 0n,
sender: '0xE911628bF8428C23f179a07b081325cAe376DE1f',
signature: '0xfffffffffffffffffffffffffffffff0000000000000000000000000000000007aaaaaaaaaaaaaaaaaaaaaaaaaaaaaaaaaaaaaaaaaaaaaaaaaaaaaaaaaaaaaaa1c'
})
```
```ts [config.ts] filename="config.ts"
import { http } from 'viem'
import { createPaymasterClient } from 'viem/account-abstraction'
export const paymasterClient = createPaymasterClient({
transport: http('https://paymaster.abstraxn.com/api/v1/{CHAIN_ID}/?apikey={API_KEY}'),
})
```
:::
Key considerations in our decision-making process included:
* Minimizing estimation overhead while maximizing accuracy precision
* Maintaining optimal gas prediction flow
* Ensuring long-term ERC-7677 protocol adaptability for estimation scenarios
Our deliberative process involved rigorous analysis of alternative paymaster stub mechanisms. While comprehensive data retrieval architectures presented interesting perspectives, the stub-based approach demonstrated superior alignment with our strategic objectives regarding estimation efficiency and developer accessibility.
The research team provided nuanced insights, particularly highlighting the importance of accurate sponsor representation and finality indicators across diverse estimation scenarios. Our recommendation represents a collaborative synthesis of technical expertise and strategic vision, designed to drive meaningful efficiency improvements in paymaster estimation workflows.
Should additional estimation requirements or protocol considerations emerge, we remain prepared to conduct further analysis and refine our paymaster stub strategy accordingly.
### API Key Configuration
To utilize the Abstraxn paymaster services, you must first obtain your API credentials through the Abstraxn Dashboard. Follow these steps to configure your paymaster integration:
#### Obtaining Your API Key
1. **Access the Dashboard**: Navigate to [https://dashboard.abstraxn.com/](https://dashboard.abstraxn.com/)
2. **Authentication**: Log in to your existing account or create a new account if you're a first-time user
3. **Application Setup**:
* Navigate to the **Apps** section
* Click the **"Create new app"** button located in the top-right corner
* Complete the required application details and configuration
4. **Paymaster Configuration**:
* Access the **Paymaster** section from your dashboard
* Click the **"App paymaster"** button in the top-right area of the screen
* Provide a descriptive name for your paymaster instance
* Select the application you created in the previous step
5. **Registration and Access**:
* Click **"Register"** to complete the paymaster setup process
* Once registration is complete, click **"View details"** to access your API key and paymaster URL
#### Integration
After obtaining your credentials, update your configuration file with the provided API key:
```ts [config.ts]
import { http } from 'viem'
import { createPaymasterClient } from 'viem/account-abstraction'
export const paymasterClient = createPaymasterClient({
transport: http('https://paymaster.abstraxn.com/api/v1/{CHAIN_ID}/?apikey={YOUR_API_KEY}'),
})
```
Replace `{YOUR_API_KEY}` with the API key obtained from the dashboard, and `{CHAIN_ID}` with the appropriate network identifier for your target blockchain.
### Response Architecture
The Abstraxn paymaster stub data framework returns comprehensive estimation configuration optimized for strategic User Operation gas analysis:
```ts
{
isFinal: boolean
paymaster: Address
paymasterData: Hex
paymasterVerificationGasLimit: bigint
paymasterPostOpGasLimit: bigint
sponsor: { name: string; icon: string }
}
```
This response structure represents our commitment to providing complete paymaster-related User Operation properties that enable accurate gas estimation and sponsor identification across the platform ecosystem.
### Configuration Parameters
Our technical architecture supports nuanced paymaster stub retrieval approaches, allowing developers to fine-tune sponsorship estimation according to specific application requirements and strategic gas optimization objectives.
#### callData
* **Type:** `Hex`
Strategic execution data for transmission to the sender during primary operation estimation within the Abstraxn framework.
```ts
import { paymasterClient } from './config'
const paymasterArgs = await paymasterClient.getPaymasterStubData({
callData: '0xb61d27f600000000000000000000000000000000000000000000000000000000000000000000000000000000000000000000000000000000000000000de0b6b3a764000000000000000000000000000000000000000000000000000000000000000000600000000000000000000000000000000000000000000000000000000000000000', // [!code focus]
factory: '0xfb6dab6200b8958c2655c3747708f82243d3f32e',
factoryData: '0xf14ddffc000000000000000000000000f39fd6e51aad88f6f4ce6ab8827279cfffb922660000000000000000000000000000000000000000000000000000000000000000',
maxFeePerGas: 14510554812n,
maxPriorityFeePerGas: 2000000000n,
nonce: 0n,
sender: '0xE911628bF8428C23f179a07b081325cAe376DE1f',
signature: '0xfffffffffffffffffffffffffffffff0000000000000000000000000000000007aaaaaaaaaaaaaaaaaaaaaaaaaaaaaaaaaaaaaaaaaaaaaaaaaaaaaaaaaaaaaaa1c'
})
```
#### callGasLimit (optional)
* **Type:** `bigint`
Precision resource allocation for primary execution logic, enabling strategic optimization of computational requirements during stub evaluation.
```ts
import { paymasterClient } from './config'
const paymasterArgs = await paymasterClient.getPaymasterStubData({
callData: '0xb61d27f600000000000000000000000000000000000000000000000000000000000000000000000000000000000000000000000000000000000000000de0b6b3a764000000000000000000000000000000000000000000000000000000000000000000600000000000000000000000000000000000000000000000000000000000000000',
callGasLimit: 69420n, // [!code focus]
factory: '0xfb6dab6200b8958c2655c3747708f82243d3f32e',
factoryData: '0xf14ddffc000000000000000000000000f39fd6e51aad88f6f4ce6ab8827279cfffb922660000000000000000000000000000000000000000000000000000000000000000',
maxFeePerGas: 14510554812n,
maxPriorityFeePerGas: 2000000000n,
nonce: 0n,
sender: '0xE911628bF8428C23f179a07b081325cAe376DE1f',
signature: '0xfffffffffffffffffffffffffffffff0000000000000000000000000000000007aaaaaaaaaaaaaaaaaaaaaaaaaaaaaaaaaaaaaaaaaaaaaaaaaaaaaaaaaaaaaaa1c'
})
```
#### chainId
* **Type:** `number`
Strategic chain identification for targeted paymaster stub operations within the Abstraxn multi-network ecosystem.
```ts
import { paymasterClient } from './config'
const paymasterArgs = await paymasterClient.getPaymasterStubData({
callData: '0xb61d27f600000000000000000000000000000000000000000000000000000000000000000000000000000000000000000000000000000000000000000de0b6b3a764000000000000000000000000000000000000000000000000000000000000000000600000000000000000000000000000000000000000000000000000000000000000',
callGasLimit: 69420n,
chainId: 1, // [!code focus]
factory: '0xfb6dab6200b8958c2655c3747708f82243d3f32e',
factoryData: '0xf14ddffc000000000000000000000000f39fd6e51aad88f6f4ce6ab8827279cfffb922660000000000000000000000000000000000000000000000000000000000000000',
maxFeePerGas: 14510554812n,
maxPriorityFeePerGas: 2000000000n,
nonce: 0n,
sender: '0xE911628bF8428C23f179a07b081325cAe376DE1f',
signature: '0xfffffffffffffffffffffffffffffff0000000000000000000000000000000007aaaaaaaaaaaaaaaaaaaaaaaaaaaaaaaaaaaaaaaaaaaaaaaaaaaaaaaaaaaaaaa1c'
})
```
#### context (optional)
##### Verifying Paymaster (Sponsored)
* **Type:** `unknown`
Configuration parameters for Verifying paymaster integration scenarios within the platform.
```ts
import { paymasterClient } from './config'
const paymasterArgs = await paymasterClient.getPaymasterData({
callData: '0xb61d27f600000000000000000000000000000000000000000000000000000000000000000000000000000000000000000000000000000000000000000de0b6b3a764000000000000000000000000000000000000000000000000000000000000000000600000000000000000000000000000000000000000000000000000000000000000',
callGasLimit: 69420n,
paymaster: paymasterClient,
paymasterContext: { // [!code focus]
mode: "sponsor" // [!code focus]
}, // [!code focus]
factory: '0xfb6dab6200b8958c2655c3747708f82243d3f32e',
factoryData: '0xf14ddffc000000000000000000000000f39fd6e51aad88f6f4ce6ab8827279cfffb922660000000000000000000000000000000000000000000000000000000000000000',
maxFeePerGas: 14510554812n,
maxPriorityFeePerGas: 2000000000n,
nonce: 0n,
sender: '0xE911628bF8428C23f179a07b081325cAe376DE1f',
signature: '0xfffffffffffffffffffffffffffffff0000000000000000000000000000000007aaaaaaaaaaaaaaaaaaaaaaaaaaaaaaaaaaaaaaaaaaaaaaaaaaaaaaaaaaaaaaa1c'
})
```
##### Token Paymaster
* **Type:** `unknown`
Configuration parameters for Token paymaster integration scenarios within the platform.
```ts
import { paymasterClient } from './config'
const paymasterArgs = await paymasterClient.getPaymasterData({
callData: '0xb61d27f600000000000000000000000000000000000000000000000000000000000000000000000000000000000000000000000000000000000000000de0b6b3a764000000000000000000000000000000000000000000000000000000000000000000600000000000000000000000000000000000000000000000000000000000000000',
callGasLimit: 69420n,
paymaster: paymasterClient,
paymasterContext: { // [!code focus]
mode: "token", // [!code focus]
supportedTokens: {"USDT","USDC","SHIBA","TOKEN1"}, // [!code focus]
tokenAddress: {TOKEN_ADDRESSES_IN_PRIORITY_ORDER}, // [!code focus]
}, // [!code focus]
factory: '0xfb6dab6200b8958c2655c3747708f82243d3f32e',
factoryData: '0xf14ddffc000000000000000000000000f39fd6e51aad88f6f4ce6ab8827279cfffb922660000000000000000000000000000000000000000000000000000000000000000',
maxFeePerGas: 14510554812n,
maxPriorityFeePerGas: 2000000000n,
nonce: 0n,
sender: '0xE911628bF8428C23f179a07b081325cAe376DE1f',
signature: '0xfffffffffffffffffffffffffffffff0000000000000000000000000000000007aaaaaaaaaaaaaaaaaaaaaaaaaaaaaaaaaaaaaaaaaaaaaaaaaaaaaaaaaaaaaaa1c'
})
```
#### entryPointAddress
* **Type:** `Address`
Strategic EntryPoint targeting for paymaster stub protocol compliance within the Abstraxn estimation framework.
```ts
import { paymasterClient } from './config'
const paymasterArgs = await paymasterClient.getPaymasterStubData({
callData: '0xb61d27f600000000000000000000000000000000000000000000000000000000000000000000000000000000000000000000000000000000000000000de0b6b3a764000000000000000000000000000000000000000000000000000000000000000000600000000000000000000000000000000000000000000000000000000000000000',
callGasLimit: 69420n,
chainId: 1,
entryPointAddress: '0x0000000071727De22E5E9d8BAf0edAc6f37da032', // [!code focus]
factory: '0xfb6dab6200b8958c2655c3747708f82243d3f32e',
factoryData: '0xf14ddffc000000000000000000000000f39fd6e51aad88f6f4ce6ab8827279cfffb922660000000000000000000000000000000000000000000000000000000000000000',
maxFeePerGas: 14510554812n,
maxPriorityFeePerGas: 2000000000n,
nonce: 0n,
sender: '0xE911628bF8428C23f179a07b081325cAe376DE1f',
signature: '0xfffffffffffffffffffffffffffffff0000000000000000000000000000000007aaaaaaaaaaaaaaaaaaaaaaaaaaaaaaaaaaaaaaaaaaaaaaaaaaaaaaaaaaaaaaa1c'
})
```
#### factory (optional)
* **Type:** `Address`
Strategic account factory configuration for deployment estimation scenarios within the Abstraxn infrastructure.
:::warning
This configuration parameter should be utilized exclusively during initial Smart Account deployment phases, ensuring optimal resource management.
:::
```ts
import { paymasterClient } from './config'
const paymasterArgs = await paymasterClient.getPaymasterStubData({
callData: '0xb61d27f600000000000000000000000000000000000000000000000000000000000000000000000000000000000000000000000000000000000000000de0b6b3a764000000000000000000000000000000000000000000000000000000000000000000600000000000000000000000000000000000000000000000000000000000000000',
callGasLimit: 69420n,
factory: '0xfb6dab6200b8958c2655c3747708f82243d3f32e', // [!code focus]
factoryData: '0xf14ddffc000000000000000000000000f39fd6e51aad88f6f4ce6ab8827279cfffb922660000000000000000000000000000000000000000000000000000000000000000',
maxFeePerGas: 14510554812n,
maxPriorityFeePerGas: 2000000000n,
nonce: 0n,
sender: '0xE911628bF8428C23f179a07b081325cAe376DE1f',
signature: '0xfffffffffffffffffffffffffffffff0000000000000000000000000000000007aaaaaaaaaaaaaaaaaaaaaaaaaaaaaaaaaaaaaaaaaaaaaaaaaaaaaaaaaaaaaaa1c'
})
```
#### factoryData (optional)
* **Type:** `Hex`
Structured deployment instructions for Smart Account initialization through factory contracts during estimation.
:::warning
This parameter maintains strategic relevance only during pre-deployment phases, supporting efficient account creation workflows.
:::
```ts
import { paymasterClient } from './config'
const paymasterArgs = await paymasterClient.getPaymasterStubData({
callData: '0xb61d27f600000000000000000000000000000000000000000000000000000000000000000000000000000000000000000000000000000000000000000de0b6b3a764000000000000000000000000000000000000000000000000000000000000000000600000000000000000000000000000000000000000000000000000000000000000',
callGasLimit: 69420n,
factory: '0xfb6dab6200b8958c2655c3747708f82243d3f32e',
factoryData: '0xf14ddffc000000000000000000000000f39fd6e51aad88f6f4ce6ab8827279cfffb922660000000000000000000000000000000000000000000000000000000000000000', // [!code focus]
maxFeePerGas: 14510554812n,
maxPriorityFeePerGas: 2000000000n,
nonce: 0n,
sender: '0xE911628bF8428C23f179a07b081325cAe376DE1f',
signature: '0xfffffffffffffffffffffffffffffff0000000000000000000000000000000007aaaaaaaaaaaaaaaaaaaaaaaaaaaaaaaaaaaaaaaaaaaaaaaaaaaaaaaaaaaaaaa1c'
})
```
#### maxFeePerGas (optional)
* **Type:** `bigint`
Strategic fee ceiling configuration for User Operation execution, enabling predictable cost estimation within the Abstraxn platform.
```ts
import { paymasterClient } from './config'
const paymasterArgs = await paymasterClient.getPaymasterStubData({
callData: '0xb61d27f600000000000000000000000000000000000000000000000000000000000000000000000000000000000000000000000000000000000000000de0b6b3a764000000000000000000000000000000000000000000000000000000000000000000600000000000000000000000000000000000000000000000000000000000000000',
callGasLimit: 69420n,
factory: '0xfb6dab6200b8958c2655c3747708f82243d3f32e',
factoryData: '0xf14ddffc000000000000000000000000f39fd6e51aad88f6f4ce6ab8827279cfffb922660000000000000000000000000000000000000000000000000000000000000000',
maxFeePerGas: 14510554812n, // [!code focus]
maxPriorityFeePerGas: 2000000000n,
nonce: 0n,
sender: '0xE911628bF8428C23f179a07b081325cAe376DE1f',
signature: '0xfffffffffffffffffffffffffffffff0000000000000000000000000000000007aaaaaaaaaaaaaaaaaaaaaaaaaaaaaaaaaaaaaaaaaaaaaaaaaaaaaaaaaaaaaaa1c'
})
```
#### maxPriorityFeePerGas (optional)
* **Type:** `bigint`
Advanced priority fee optimization for enhanced transaction processing efficiency during stub evaluation.
```ts
import { paymasterClient } from './config'
const paymasterArgs = await paymasterClient.getPaymasterStubData({
callData: '0xb61d27f600000000000000000000000000000000000000000000000000000000000000000000000000000000000000000000000000000000000000000de0b6b3a764000000000000000000000000000000000000000000000000000000000000000000600000000000000000000000000000000000000000000000000000000000000000',
callGasLimit: 69420n,
factory: '0xfb6dab6200b8958c2655c3747708f82243d3f32e',
factoryData: '0xf14ddffc000000000000000000000000f39fd6e51aad88f6f4ce6ab8827279cfffb922660000000000000000000000000000000000000000000000000000000000000000',
maxFeePerGas: 14510554812n,
maxPriorityFeePerGas: 2000000000n, // [!code focus]
nonce: 0n,
sender: '0xE911628bF8428C23f179a07b081325cAe376DE1f',
signature: '0xfffffffffffffffffffffffffffffff0000000000000000000000000000000007aaaaaaaaaaaaaaaaaaaaaaaaaaaaaaaaaaaaaaaaaaaaaaaaaaaaaaaaaaaaaaa1c'
})
```
#### nonce
* **Type:** `bigint`
Sequential operation identifier ensuring transaction ordering integrity within the Abstraxn estimation ecosystem.
```ts
import { paymasterClient } from './config'
const paymasterArgs = await paymasterClient.getPaymasterStubData({
callData: '0xb61d27f600000000000000000000000000000000000000000000000000000000000000000000000000000000000000000000000000000000000000000de0b6b3a764000000000000000000000000000000000000000000000000000000000000000000600000000000000000000000000000000000000000000000000000000000000000',
callGasLimit: 69420n,
factory: '0xfb6dab6200b8958c2655c3747708f82243d3f32e',
factoryData: '0xf14ddffc000000000000000000000000f39fd6e51aad88f6f4ce6ab8827279cfffb922660000000000000000000000000000000000000000000000000000000000000000',
maxFeePerGas: 14510554812n,
maxPriorityFeePerGas: 2000000000n,
nonce: 0n, // [!code focus]
sender: '0xE911628bF8428C23f179a07b081325cAe376DE1f',
signature: '0xfffffffffffffffffffffffffffffff0000000000000000000000000000000007aaaaaaaaaaaaaaaaaaaaaaaaaaaaaaaaaaaaaaaaaaaaaaaaaaaaaaaaaaaaaaa1c'
})
```
#### preVerificationGas (optional)
* **Type:** `bigint`
Strategic bundler compensation configuration, ensuring sustainable operation within the Abstraxn ecosystem during stub processing.
```ts
import { paymasterClient } from './config'
const paymasterArgs = await paymasterClient.getPaymasterStubData({
callData: '0xb61d27f600000000000000000000000000000000000000000000000000000000000000000000000000000000000000000000000000000000000000000de0b6b3a764000000000000000000000000000000000000000000000000000000000000000000600000000000000000000000000000000000000000000000000000000000000000',
callGasLimit: 69420n,
factory: '0xfb6dab6200b8958c2655c3747708f82243d3f32e',
factoryData: '0xf14ddffc000000000000000000000000f39fd6e51aad88f6f4ce6ab8827279cfffb922660000000000000000000000000000000000000000000000000000000000000000',
maxFeePerGas: 14510554812n,
maxPriorityFeePerGas: 2000000000n,
nonce: 0n,
preVerificationGas: 69420n, // [!code focus]
sender: '0xE911628bF8428C23f179a07b081325cAe376DE1f',
signature: '0xfffffffffffffffffffffffffffffff0000000000000000000000000000000007aaaaaaaaaaaaaaaaaaaaaaaaaaaaaaaaaaaaaaaaaaaaaaaaaaaaaaaaaaaaaaa1c'
})
```
#### sender
* **Type:** `Address`
Strategic sender identification for User Operation estimation within the Abstraxn paymaster stub framework.
```ts
import { paymasterClient } from './config'
const paymasterArgs = await paymasterClient.getPaymasterStubData({
callData: '0xb61d27f600000000000000000000000000000000000000000000000000000000000000000000000000000000000000000000000000000000000000000de0b6b3a764000000000000000000000000000000000000000000000000000000000000000000600000000000000000000000000000000000000000000000000000000000000000',
callGasLimit: 69420n,
factory: '0xfb6dab6200b8958c2655c3747708f82243d3f32e',
factoryData: '0xf14ddffc000000000000000000000000f39fd6e51aad88f6f4ce6ab8827279cfffb922660000000000000000000000000000000000000000000000000000000000000000',
maxFeePerGas: 14510554812n,
maxPriorityFeePerGas: 2000000000n,
nonce: 0n,
preVerificationGas: 69420n,
sender: '0xE911628bF8428C23f179a07b081325cAe376DE1f', // [!code focus]
signature: '0xfffffffffffffffffffffffffffffff0000000000000000000000000000000007aaaaaaaaaaaaaaaaaaaaaaaaaaaaaaaaaaaaaaaaaaaaaaaaaaaaaaaaaaaaaaa1c'
})
```
#### signature
* **Type:** `Hex`
Authentication signature for User Operation validation, supporting secure paymaster stub data retrieval.
```ts
import { paymasterClient } from './config'
const paymasterArgs = await paymasterClient.getPaymasterStubData({
callData: '0xb61d27f600000000000000000000000000000000000000000000000000000000000000000000000000000000000000000000000000000000000000000de0b6b3a764000000000000000000000000000000000000000000000000000000000000000000600000000000000000000000000000000000000000000000000000000000000000',
callGasLimit: 69420n,
factory: '0xfb6dab6200b8958c2655c3747708f82243d3f32e',
factoryData: '0xf14ddffc000000000000000000000000f39fd6e51aad88f6f4ce6ab8827279cfffb922660000000000000000000000000000000000000000000000000000000000000000',
maxFeePerGas: 14510554812n,
maxPriorityFeePerGas: 2000000000n,
nonce: 0n,
preVerificationGas: 69420n,
sender: '0xE911628bF8428C23f179a07b081325cAe376DE1f',
signature: '0xfffffffffffffffffffffffffffffff0000000000000000000000000000000007aaaaaaaaaaaaaaaaaaaaaaaaaaaaaaaaaaaaaaaaaaaaaaaaaaaaaaaaaaaaaaa1c' // [!code focus]
})
```
#### verificationGasLimit (optional)
* **Type:** `bigint`
Strategic resource allocation for comprehensive verification procedures, ensuring robust security within paymaster stub evaluation workflows.
```ts
import { paymasterClient } from './config'
const paymasterArgs = await paymasterClient.getPaymasterStubData({
callData: '0xb61d27f600000000000000000000000000000000000000000000000000000000000000000000000000000000000000000000000000000000000000000de0b6b3a764000000000000000000000000000000000000000000000000000000000000000000600000000000000000000000000000000000000000000000000000000000000000',
callGasLimit: 69420n,
factory: '0xfb6dab6200b8958c2655c3747708f82243d3f32e',
factoryData: '0xf14ddffc000000000000000000000000f39fd6e51aad88f6f4ce6ab8827279cfffb922660000000000000000000000000000000000000000000000000000000000000000',
maxFeePerGas: 14510554812n,
maxPriorityFeePerGas: 2000000000n,
nonce: 0n,
sender: '0xE911628bF8428C23f179a07b081325cAe376DE1f',
signature: '0xfffffffffffffffffffffffffffffff0000000000000000000000000000000007aaaaaaaaaaaaaaaaaaaaaaaaaaaaaaaaaaaaaaaaaaaaaaaaaaaaaaaaaaaaaaa1c',
verificationGasLimit: 69420n, // [!code focus]
})
```
## EIP-7702: Native Account Abstraction Made Simple
#### What is EIP-7702?
EIP-7702 empowers **Externally Owned Accounts (EOAs)** to temporarily delegate their execution logic to a smart contract—**without changing the address** or moving funds. This unlocks powerful features like **batching**, **gas sponsorship**, and **custom authorizations**—all within a native Ethereum transaction structure.
### EIP-4337 vs. EIP-7702: Know Your Layers
| Feature | **EIP-4337** | **EIP-7702** |
| ------------------- | ------------------------------------------------------------------------- | ---------------------------------------------------------------------- |
| Protocol Dependency | Application-layer via Bundlers & Paymasters; no consensus change required | Consensus-layer: needs Pectra hard fork; new transaction type (Type 4) |
| Account Model | Separate Smart Contract wallets | Original EOA delegates to smart logic at the same address |
| Operation Flow | UserOps → Bundler → EntryPoint | Native transaction with `authorization_list` for code delegation |
| Best Use Case | Gas sponsorship, social recovery, complex validation | Atomic batching, native UX; low overhead |
| Availability | Live today with robust tooling | Available post-Pectra upgrade; lightweight, atomic execution |
### Getting Started With Abstraxn
We give you everything you need to integrate EIP-7702 using Abstraxn SDK tailored for your platform.
#### 1. Get Your API Key
* Visit [dashboard.abstraxn.com](https://dashboard.abstraxn.com/), sign in or sign up
* Navigate to **Apps** → **Create New App** (enter name, chain, description)
* Inside your app, go to the **Bundler / Paymaster** section → click **Add** → assign name
* Click **View Details** → copy your **API Key**
#### 2. Install Dependencies
```bash
npm install @abstraxn/vcs-sdk
```
#### 3. EIP-7702 Integration
```ts
import {
createViemClient,
signAuthorization,
sendEip7702Transaction
} from "@abstraxn/vcs-sdk";
const client = createViemClient({
chain: 'sepolia',
rpcUrl: "https://rpc.sepolia.example"
});
async function activateEip7702(eoaPrivateKey: string, implAddress: string) {
const auth = await signAuthorization({
client,
ownerPrivateKey: eoaPrivateKey,
delegateTo: implAddress
});
const txHash = await sendEip7702Transaction({
client,
authorizationList: [{ chainId: client.chainId, address: implAddress, signature: auth }]
});
console.log("EIP-7702 activation tx hash:", txHash);
}
```
#### 4. Using Abstraxn’s Bundler/Paymaster for Sponsored Actions
Once EIP-7702 is active on a user’s account, you can send batch or sponsored RPCs seamlessly through our bundler:
```ts
import {
abxBundlerClient,
buildBatch,
sendUserOp
} from "@abstraxn/vcs-sdk";
const bundler = abxBundlerClient({
apiKey: process.env.ABX_API_KEY,
chain: 'sepolia',
bundlerUrl: "https://api.abstraxn.com/v1/bundler/sepolia"
});
async function sendBatchOperation(account, calls) {
const userOp = buildBatch({ account, calls });
const opHash = await sendUserOp(bundler, userOp);
console.log("UserOp submitted:", opHash);
}
```
### Summary
1. EIP-7702 brings native account abstraction, unlocking smart account features on an EOA.
2. EIP-4337 provides rich infrastructure today; EIP-7702 makes it lower overhead once your user is already using it.
3. To integrate Abstraxn:
* Obtain your API Key by creating an app and bundler/paymaster
* Use our SDK to sign authorizations and submit Type-4 transactions
* Then, interact with smart flows using our bundler client
## EIP-7702 Overview
EIP-7702 introduces a revolutionary transaction type (Type 0x04) that enables your account, an EOA, to act like a smart contract by assigning a **delegation designator**. This designator embeds `0xef0100 || contractAddress` in your code slot, redirecting execution to that contract whenever your EOA is invoked. It unlocks powerful capabilities like batching (Bundling), gas sponsorship (Relaying), multi-sig, passkeys, and more, all while keeping your familiar address and key.
***
#### Why It Matters
* **Upgrades without migration**: Your users keep their existing EOA. No address change or fund transfers needed.
* **Smart account features**: batch transactions, sponsored gas, custom auth, and passkey support become native.
* **Designed for coexistence**: with ERC-4337’s abstract architecture; they complement each other perfectly.
***
#### EIP-4337 vs EIP-7702 at a Glance
| Feature | **EIP-4337** | **EIP-7702** |
| ------------------- | --------------------------------------------- | ------------------------------------------------------ |
| Smart account model | External smart wallet using EntryPoint | EOA delegates to smart contract via designator |
| Migration required | Yes, EOAs must become SCAs | No, EOAs remain same address |
| Infrastructure | Off-chain bundlers/EntryPoint/Paymaster | On-chain native execution once supported by wallets |
| Best use case | Rich palettes today (multi-sig, custom flows) | Lean, backward-compatible UX enhancement, low friction |
***
#### Security & UX Considerations
* **Trust required**: Delegation gives execution power over your EOA. Only delegate to vetted, trusted contracts.
* **Control remains**: Your private key still governs the account—preserving flexibility but requiring strong custody.
* **Wallet adoption is key**: Until wallets support 7702, none of this matters in production environments.
***
#### TL;DR
EIP-7702 is Ethereum’s first on-chain account abstraction step—letting EOAs gain smart account powers **without migration**. Post-Pectra 2025, EOAs can delegate behavior securely and with seamless UX. When paired with ERC-4337 and Abstraxn, this unlocks the next frontier of conversational, developer-friendly Web3.
Let me know when you're ready to walk through integration steps, demos, or deeper technical breakdowns!
## EIP-7702 Quickstart — Send a Delegated Transaction from Your EOA
This quickstart demonstrates how to use **EIP-7702 with ERC-4337** to send a gas-sponsored, batched transaction directly from your EOA. We’ll use Abstraxn’s SDK for EIP-7702-compliant smart account operations. Feel free to substitute with other compatible EIP-7702 implementations if desired.
For the conceptual overview, jump back to the [EIP-7702 Overview](./Overview). For full protocol details, see the official EIP-7702 proposal.
***
### Installation
Make sure you've installed our EIP-7702 SDK, which follows the `viem` + `permissionless.js` style but built for Abstraxn’s stack:
For NPM users:
```bash
npm install permissionless viem
```
For Yarn users:
```bash
npm install permissionless viem
```
### Quickstart steps
1. Setup the smart account from your EOA
```ts
import { createPublicClient, Hex, http } from "viem";
import { generatePrivateKey, privateKeyToAccount } from "viem/accounts";
import { to7702KernelSmartAccount, to7702SimpleSmartAccount } from "permissionless/accounts";
import { sepolia } from "viem/chains";
// This is your EOA's private key
const privateKey = generatePrivateKey();
const eoa7702 = privateKeyToAccount(privateKey);
const client = createPublicClient({
chain: sepolia,
transport: http("https://sepolia.drpc.org"),
});
// you can use either simple smart account
const simple7702Account = await to7702SimpleSmartAccount({
client,
owner: eoa7702,
});
// or use a kernel smart account
const kernel7702Account = await to7702KernelSmartAccount({
client,
owner: eoa7702,
})
```
2. (Optional) Add a Paymaster for Gas Sponsorship
```ts
import {
createPaymasterClient
} from 'viem/account-abstraction'
const APIKey = "https://paymaster.abstraxn.com/api/v1/{CHAIN_ID}/?apikey={API_KEY}";
export const paymasterClient = createPaymasterClient({
transport: http('https://paymaster.abstraxn.com/api/v1/{CHAIN_ID}/?apikey={API_KEY}'),
})
```
3. Build a smart account client
```ts
import { createSmartAccountClient } from "permissionless";
import { zeroAddress } from "viem";
const smartAccountClient = createSmartAccountClient({
client,
chain: sepolia,
account: simple7702Account, // or kernel7702Account
paymaster: paymasterClient,
bundlerTransport: http(
`https://paymaster.abstraxn.com/api/v1/{CHAIN_ID}/?apikey={API_KEY}`,
),
});
```
4. Send a transaction
```ts
const isSmartAccountDeployed = await smartAccountClient.account.isDeployed();
const kernelVersion = KERNEL_V3_3;
const kernelAddresses = KernelVersionToAddressesMap[kernelVersion];
let transactionHash: Hex;
// We only have to add the authorization field if the EOA does not have the authorization code set
if (!isSmartAccountDeployed) {
transactionHash = await smartAccountClient.sendTransaction({
to: zeroAddress,
value: 0n,
data: "0x",
authorization: await eoa7702.signAuthorization({
address: kernelAddresses.accountImplementationAddress,
chainId: sepolia.id,
nonce: await client.getTransactionCount({
address: eoa7702.address,
}),
}),
});
} else {
transactionHash = await smartAccountClient.sendTransaction({
to: zeroAddress,
value: 0n,
data: "0x",
});
}
```
5. Batch multile calls
```ts
let transactionHash_2: Hex;
const kernelVersion = KERNEL_V3_3;
const kernelAddresses = KernelVersionToAddressesMap[kernelVersion];
// We only have to add the authorization field if the EOA does not have the authorization code set
if (!isSmartAccountDeployed) {
transactionHash_2 = await smartAccountClient.sendTransaction({
calls: [
{
to: zeroAddress,
value: 0n,
data: "0x",
},
{
to: zeroAddress,
value: 0n,
data: "0x",
},
],
authorization: await eoa7702.signAuthorization({
address: kernelAddresses.accountImplementationAddress,
chainId: sepolia.id,
nonce: await client.getTransactionCount({
address: eoa7702.address,
}),
}),
});
} else {
transactionHash_2 = await smartAccountClient.sendTransaction({
calls: [
{
to: zeroAddress,
value: 0n,
data: "0x",
},
{
to: zeroAddress,
value: 0n,
data: "0x",
},
],
});
}
```
### Summary
You’ve just sent a delegated (EIP-7702) transaction from your EOA. When you inspect the transaction on-chain, you’ll see it's still from your EOA — but executed through the smart account delegation, often with a sponsored gas model.
### Ket Takeaways
* EIP-7702 lets EOAs gain smart account powers instantly, without migrations or new wallets.
* Authorization is required only during setup; repeated transactions don’t need re-authorization.
* Batch and gas sponsorship are native once the smart account is deployed.
* All powered by Abstraxn’s integrated SDK — clean, secure, and EOA-first.
## estimateUserOperationGas
Our gas estimation methodology provides comprehensive analysis and optimization for User Operation execution within the Abstraxn platform. This strategic approach ensures efficient resource allocation while maintaining optimal transaction performance.
### Implementation Strategy
After thorough evaluation of gas optimization approaches, our team has determined that precise estimation mechanisms offer the most compelling advantages for the Abstraxn ecosystem. Our analysis prioritized transaction efficiency, cost optimization, and seamless user experience.
:::code-group
```ts [example.ts]
import { parseEther } from 'viem'
import { account, bundlerClient } from './config'
const gas = await bundlerClient.estimateUserOperationGas({ // [!code focus:7]
account,
calls: [{
to: '0x70997970c51812dc3a010c7d01b50e0d17dc79c8',
value: parseEther('1')
}]
})
```
```ts [config.ts] filename="config.ts"
import { createPublicClient, http } from 'viem'
import { createBundlerClient, toCoinbaseSmartAccount } from 'viem/account-abstraction'
import { privateKeyToAccount } from 'viem/accounts'
import { mainnet } from 'viem/chains'
const client = createPublicClient({
chain: mainnet,
transport: http()
})
export const account = await toCoinbaseSmartAccount({
client,
owners: [privateKeyToAccount('0x...')],
version: '1.1',
})
export const bundlerClient = createBundlerClient({
client,
transport: http('https://bundler.abstraxn.com/api/v1/{CHAIN_ID}/?apikey={API_KEY}') // [!code focus]
})
```
:::
#### Strategic Account Management
Our deliberative process involved rigorous analysis of account management patterns. The hoisted account approach, while presenting alternative implementation strategies, demonstrates superior alignment with streamlined development workflows.
If you do not wish to pass an `account` to every `estimateUserOperationGas`, you can also hoist the Account on the Bundler Client (see `config.ts`).
:::code-group
```ts [example.ts]
import { parseEther } from 'viem'
import { bundlerClient } from './config'
const gas = await bundlerClient.estimateUserOperationGas({ // [!code focus:7]
calls: [{
to: '0x70997970c51812dc3a010c7d01b50e0d17dc79c8',
value: parseEther('1')
}]
})
```
```ts [config.ts]
import { createPublicClient, http } from 'viem'
import { createBundlerClient, toCoinbaseSmartAccount } from 'viem/account-abstraction'
import { privateKeyToAccount } from 'viem/accounts'
import { mainnet } from 'viem/chains'
const client = createPublicClient({
chain: mainnet,
transport: http()
})
export const account = await toCoinbaseSmartAccount({
client,
owners: [privateKeyToAccount('0x...')],
version: '1.1',
})
export const bundlerClient = createBundlerClient({
account, // [!code ++]
client,
transport: http('https://bundler.abstraxn.com/api/v1/{CHAIN_ID}/?apikey={API_KEY}')
})
```
:::
#### Advanced Contract Integration
Through comprehensive evaluation of multiple interaction methodologies, our research team has identified that structured contract calls provide the most robust foundation for complex application development within the Abstraxn ecosystem.
The `calls` property also accepts **Contract Calls**, and can be used via the `abi`, `functionName`, and `args` properties.
:::code-group
```ts [example.ts]
import { parseEther } from 'viem'
import { bundlerClient, publicClient } from './config'
import { wagmiAbi } from './abi' // [!code focus]
const gas = await bundlerClient.estimateUserOperationGas({ // [!code focus:7]
calls: [{
abi: wagmiAbi,
functionName: 'mint',
to: '0xFBA3912Ca04dd458c843e2EE08967fC04f3579c2',
}],
})
```
```ts [abi.ts] filename="abi.ts"
export const wagmiAbi = [
// ...
{
inputs: [],
name: "mint",
outputs: [],
stateMutability: "nonpayable",
type: "function",
},
// ...
] as const;
```
```ts [config.ts]
import { createPublicClient, http } from 'viem'
import { createBundlerClient, toCoinbaseSmartAccount } from 'viem/account-abstraction'
import { privateKeyToAccount } from 'viem/accounts'
import { mainnet } from 'viem/chains'
const client = createPublicClient({
chain: mainnet,
transport: http()
})
export const account = await toCoinbaseSmartAccount({
client,
owners: [privateKeyToAccount('0x...')],
version: '1.1',
})
export const bundlerClient = createBundlerClient({
account,
client,
transport: http('https://bundler.abstraxn.com/api/v1/{CHAIN_ID}/?apikey={API_KEY}')
})
```
:::
### Response Architecture
The Abstraxn gas estimation framework returns a comprehensive analysis structure optimized for strategic decision-making:
```ts
{
callGasLimit: bigint;
preVerificationGas: bigint;
verificationGasLimit: bigint;
paymasterVerificationGasLimit: bigint | undefined;
paymasterPostOpGasLimit: bigint | undefined;
}
```
This response structure represents our commitment to providing detailed insights that enable informed optimization decisions across the development lifecycle.
### Configuration Parameters
Our technical architecture supports nuanced configuration approaches, allowing developers to fine-tune gas estimation according to specific application requirements and strategic objectives.
#### account
* **Type:** `SmartAccount`
The foundational account configuration for User Operation execution within the Abstraxn ecosystem.
```ts
import { parseEther } from 'viem'
import { account, bundlerClient } from './config'
// ---cut---
const gas = await bundlerClient.estimateUserOperationGas({
account, // [!code focus]
calls: [{
to: '0x70997970c51812dc3a010c7d01b50e0d17dc79c8',
value: parseEther('1')
}]
})
```
#### calls
* **Type:** `{ data: Hex, to: Address, value: bigint }[]`
Strategic operation definitions that constitute the core execution logic for User Operations.
```ts
import { parseEther } from 'viem'
import { account, bundlerClient } from './config'
// ---cut---
const gas = await bundlerClient.estimateUserOperationGas({
account,
calls: [{ // [!code focus]
to: '0x70997970c51812dc3a010c7d01b50e0d17dc79c8', // [!code focus]
value: parseEther('1') // [!code focus]
}] // [!code focus]
})
```
:::tip
Alternative implementation strategies support direct call data specification through the `callData` property, providing flexibility for advanced integration scenarios:
```ts
import { parseEther } from 'viem'
import { account, bundlerClient } from './config'
// ---cut---
const gas = await bundlerClient.estimateUserOperationGas({
account,
callData: '0xdeadbeef', // [!code focus]
})
```
:::
#### callGasLimit (optional)
* **Type:** `bigint`
Precision resource allocation for primary execution logic, enabling strategic optimization of computational requirements.
```ts
import { parseEther } from 'viem'
import { account, bundlerClient } from './config'
// ---cut---
const gas = await bundlerClient.estimateUserOperationGas({
account,
calls: [{
to: '0x70997970c51812dc3a010c7d01b50e0d17dc79c8',
value: parseEther('1')
}],
callGasLimit: 69420n, // [!code focus]
})
```
#### factory (optional)
* **Type:** `Address`
Strategic account factory configuration for deployment scenarios within the Abstraxn infrastructure.
:::warning
This configuration parameter should be utilized exclusively during initial Smart Account deployment phases, ensuring optimal resource management.
:::
```ts
import { parseEther } from 'viem'
import { account, bundlerClient } from './config'
// ---cut---
const gas = await bundlerClient.estimateUserOperationGas({
account,
calls: [{
to: '0x70997970c51812dc3a010c7d01b50e0d17dc79c8',
value: parseEther('1')
}],
factory: '0x1234567890123456789012345678901234567890', // [!code focus]
factoryData: '0xdeadbeef',
})
```
#### factoryData (optional)
* **Type:** `Hex`
Structured deployment instructions for Smart Account initialization through factory contracts.
:::warning
This parameter maintains strategic relevance only during pre-deployment phases, supporting efficient account creation workflows.
:::
```ts
import { parseEther } from 'viem'
import { account, bundlerClient } from './config'
// ---cut---
const gas = await bundlerClient.estimateUserOperationGas({
account,
calls: [{
to: '0x70997970c51812dc3a010c7d01b50e0d17dc79c8',
value: parseEther('1')
}],
factory: '0x1234567890123456789012345678901234567890',
factoryData: '0xdeadbeef', // [!code focus]
})
```
#### maxFeePerGas (optional)
* **Type:** `bigint`
Strategic fee ceiling configuration for User Operation execution, enabling predictable cost management within the Abstraxn platform.
```ts
import { parseEther } from 'viem'
import { account, bundlerClient } from './config'
// ---cut---
const gas = await bundlerClient.estimateUserOperationGas({
account,
calls: [{
to: '0x70997970c51812dc3a010c7d01b50e0d17dc79c8',
value: parseEther('1')
}],
maxFeePerGas: 420n, // [!code focus]
})
```
#### maxPriorityFeePerGas (optional)
* **Type:** `bigint`
Advanced priority fee optimization for enhanced transaction processing efficiency.
```ts
import { parseEther } from 'viem'
import { account, bundlerClient } from './config'
// ---cut---
const gas = await bundlerClient.estimateUserOperationGas({
account,
calls: [{
to: '0x70997970c51812dc3a010c7d01b50e0d17dc79c8',
value: parseEther('1')
}],
maxPriorityFeePerGas: 420n,
maxFeePerGas: 10n, // [!code focus]
})
```
#### nonce (optional)
* **Type:** `bigint`
Sequential operation identifier ensuring transaction ordering integrity within the Abstraxn ecosystem.
```ts
import { parseEther } from 'viem'
import { account, bundlerClient } from './config'
// ---cut---
const gas = await bundlerClient.estimateUserOperationGas({
account,
calls: [{
to: '0x70997970c51812dc3a010c7d01b50e0d17dc79c8',
value: parseEther('1')
}],
nonce: 10n, // [!code focus]
})
```
#### paymaster (optional)
* **Type:** `Address | true | PaymasterClient | PaymasterActions`
Comprehensive sponsorship configuration framework supporting multiple integration strategies:
* **Address Configuration**: Direct paymaster contract integration for streamlined sponsorship
* **PaymasterClient Integration**: Advanced client-based sponsorship with enhanced functionality
* **Bundler Integration**: Unified bundler-paymaster architecture for simplified implementation
* **Custom Function Support**: Flexible sponsorship logic through specialized function implementations
##### Strategic Paymaster Contract Integration
```ts
import { account, bundlerClient } from './config'
// ---cut---
const hash = await bundlerClient.estimateUserOperationGas({
account,
calls: [{
to: '0x70997970c51812dc3a010c7d01b50e0d17dc79c8',
value: parseEther('1')
}],
paymaster: '0x942fD5017c0F60575930D8574Eaca13BEcD6e1bB', // [!code focus]
paymasterData: '0xdeadbeef',
})
```
##### Advanced Paymaster Client Architecture
```ts
import { account, bundlerClient } from './config'
// ---cut---
import { http, parseEther } from 'viem'
import { createPaymasterClient } from 'viem/account-abstraction'
const paymasterClient = createPaymasterClient({ // [!code focus]
transport: http('https://bundler.abstraxn.com/api/v1/{CHAIN_ID}/?apikey={API_KEY}') // [!code focus]
}) // [!code focus]
const hash = await bundlerClient.estimateUserOperationGas({
account,
calls: [{
to: '0x70997970c51812dc3a010c7d01b50e0d17dc79c8',
value: parseEther('1')
}],
paymaster: paymasterClient, // [!code focus]
})
```
##### Unified Bundler-Paymaster Approach
```ts
import { account, bundlerClient } from './config'
// ---cut---
const hash = await bundlerClient.estimateUserOperationGas({
account,
calls: [{
to: '0x70997970c51812dc3a010c7d01b50e0d17dc79c8',
value: parseEther('1')
}],
paymaster: true, // [!code focus]
})
```
#### paymasterContext (optional)
* **Type:** `unknown`
Specialized configuration parameters for advanced paymaster integration scenarios.
:::warning
This parameter maintains relevance exclusively within PaymasterClient-based architectures, supporting sophisticated sponsorship workflows.
:::
```ts
import { account, bundlerClient } from './config'
// ---cut---
import { http, parseEther } from 'viem'
import { createPaymasterClient } from 'viem/account-abstraction'
const paymasterClient = createPaymasterClient({
transport: http('https://bundler.abstraxn.com/api/v1/{CHAIN_ID}/?apikey={API_KEY}')
})
const hash = await bundlerClient.estimateUserOperationGas({
account,
calls: [{
to: '0x70997970c51812dc3a010c7d01b50e0d17dc79c8',
value: parseEther('1')
}],
paymaster: paymasterClient,
paymasterContext: { // [!code focus]
policyId: 'abc123' // [!code focus]
}, // [!code focus]
})
```
#### paymasterData (optional)
* **Type:** `Address`
Structured execution instructions for paymaster contract interactions.
:::warning
This configuration applies specifically to address-based paymaster implementations, enabling direct contract communication.
:::
```ts
import { parseEther } from 'viem'
import { account, bundlerClient } from './config'
// ---cut---
const gas = await bundlerClient.estimateUserOperationGas({
account,
calls: [{
to: '0x70997970c51812dc3a010c7d01b50e0d17dc79c8',
value: parseEther('1')
}],
paymaster: '0x942fD5017c0F60575930D8574Eaca13BEcD6e1bB',
paymasterData: '0xdeadbeef', // [!code focus]
})
```
#### paymasterPostOpGasLimit (optional)
* **Type:** `bigint`
Strategic resource allocation for post-operation paymaster logic execution.
```ts
import { parseEther } from 'viem'
import { account, bundlerClient } from './config'
// ---cut---
const gas = await bundlerClient.estimateUserOperationGas({
account,
calls: [{
to: '0x70997970c51812dc3a010c7d01b50e0d17dc79c8',
value: parseEther('1')
}],
paymaster: '0x942fD5017c0F60575930D8574Eaca13BEcD6e1bB',
paymasterData: '0xdeadbeef',
paymasterPostOpGasLimit: 69420n, // [!code focus]
})
```
#### paymasterVerificationGasLimit (optional)
* **Type:** `bigint`
Precision gas allocation for paymaster validation procedures within the Abstraxn framework.
```ts
import { parseEther } from 'viem'
import { account, bundlerClient } from './config'
// ---cut---
const gas = await bundlerClient.estimateUserOperationGas({
account,
calls: [{
to: '0x70997970c51812dc3a010c7d01b50e0d17dc79c8',
value: parseEther('1')
}],
paymaster: '0x942fD5017c0F60575930D8574Eaca13BEcD6e1bB',
paymasterData: '0xdeadbeef',
paymasterVerificationGasLimit: 69420n, // [!code focus]
})
```
#### preVerificationGas (optional)
* **Type:** `bigint`
Strategic bundler compensation configuration, ensuring sustainable operation within the Abstraxn ecosystem.
```ts
import { parseEther } from 'viem'
import { account, bundlerClient } from './config'
// ---cut---
const gas = await bundlerClient.estimateUserOperationGas({
account,
calls: [{
to: '0x70997970c51812dc3a010c7d01b50e0d17dc79c8',
value: parseEther('1')
}],
preVerificationGas: 69420n, // [!code focus]
})
```
#### signature (optional)
* **Type:** `Hex`
Authentication signature for User Operation validation, supporting secure transaction execution.
```ts
import { parseEther } from 'viem'
import { account, bundlerClient } from './config'
// ---cut---
const gas = await bundlerClient.estimateUserOperationGas({
account,
calls: [{
to: '0x70997970c51812dc3a010c7d01b50e0d17dc79c8',
value: parseEther('1')
}],
signature: '0x...', // [!code focus]
})
```
#### stateOverride (optional)
* **Type:** `StateOverride`
Advanced state manipulation framework enabling sophisticated testing and simulation scenarios within the Abstraxn platform.
```ts
import { parseEther } from 'viem'
import { account, bundlerClient } from './config'
// ---cut---
const gas = await bundlerClient.estimateUserOperationGas({
account,
calls: [{
to: '0x70997970c51812dc3a010c7d01b50e0d17dc79c8',
value: parseEther('1')
}],
stateOverride: [ // [!code focus]
{ // [!code focus]
address: '0xa5cc3c03994DB5b0d9A5eEdD10CabaB0813678AC', // [!code focus]
balance: parseEther('1'), // [!code focus]
stateDiff: [ // [!code focus]
{ // [!code focus]
slot: '0x3ea2f1d0abf3fc66cf29eebb70cbd4e7fe762ef8a09bcc06c8edf641230afec0', // [!code focus]
value: '0x00000000000000000000000000000000000000000000000000000000000001a4', // [!code focus]
}, // [!code focus]
], // [!code focus]
} // [!code focus]
], // [!code focus]
})
```
#### verificationGasLimit (optional)
* **Type:** `bigint`
Strategic resource allocation for comprehensive verification procedures, ensuring robust security within User Operation execution.
```ts
import { parseEther } from 'viem'
import { account, bundlerClient } from './config'
// ---cut---
const gas = await bundlerClient.estimateUserOperationGas({
account,
calls: [{
to: '0x70997970c51812dc3a010c7d01b50e0d17dc79c8',
value: parseEther('1')
}],
verificationGasLimit: 69420n, // [!code focus]
})
```
## getChainId
Our chain identification methodology provides comprehensive network validation and strategic connectivity management for bundler operations within the Abstraxn platform. This foundational approach ensures seamless multi-chain compatibility while maintaining optimal transaction routing efficiency.
### Implementation Framework
After thorough evaluation of network identification approaches, our team has determined that direct chain ID retrieval offers the most compelling advantages for the Abstraxn ecosystem. Our analysis prioritized network reliability, cross-chain compatibility, and streamlined developer experience.
:::code-group
```ts [example.ts]
import { bundlerClient } from './client'
const chainId = await bundlerClient.getChainId() // [!code focus:99]
// @log: 1
```
```ts [client.ts] filename="client.ts"
import { http } from 'viem'
import { createBundlerClient } from 'viem/account-abstraction'
export const bundlerClient = createBundlerClient({
transport: http('https://bundler.abstraxn.com/api/v1/{CHAIN_ID}/?apikey={API_KEY}')
})
```
:::
Key considerations in our decision-making process included:
* Minimizing network verification overhead
* Maintaining optimal bundler connectivity flow
* Ensuring long-term multi-chain adaptability
Our deliberative process involved rigorous analysis of alternative network identification strategies. While distributed chain detection mechanisms presented interesting perspectives, the direct retrieval approach demonstrated superior alignment with our strategic objectives regarding transaction efficiency and developer accessibility.
The research team provided nuanced insights, particularly highlighting the importance of consistent chain validation across diverse network environments. Our recommendation represents a collaborative synthesis of technical expertise and strategic vision, designed to drive meaningful reliability improvements in the Abstraxn ecosystem.
Should additional network requirements or architectural considerations emerge, we remain prepared to conduct further analysis and refine our chain identification strategy accordingly.
### Response Architecture
The Abstraxn chain identification framework returns precise network information optimized for strategic routing decisions in:
`number`
The current chain identifier, providing foundational network context for all subsequent bundler operations within the platform.
This response structure represents our commitment to transparent network management and supports informed decision-making across complex multi-chain deployment scenarios.
## getSupportedEntryPoints
Our EntryPoint discovery methodology provides strategic insight into bundler capabilities and compatibility matrices within the Abstraxn platform. This analytical approach ensures optimal contract interaction patterns while maintaining comprehensive support for diverse account abstraction implementations.
### Architectural Framework
After comprehensive evaluation of multiple EntryPoint validation approaches, our team has determined that direct bundler interrogation offers the most compelling advantages for the Abstraxn ecosystem. Our analysis prioritized compatibility verification, protocol adherence, and seamless integration pathways.
:::code-group
```ts [example.ts]
import { bundlerClient } from './client'
const entryPoints = await bundlerClient.getSupportedEntryPoints() // [!code focus:99]
// @log: ["0x0000000071727De22E5E9d8BAf0edAc6f37da032"]
```
```ts [client.ts] filename="client.ts"
import { http } from 'viem'
import { createBundlerClient } from 'viem/account-abstraction'
export const bundlerClient = createBundlerClient({
transport: http('https://bundler.abstraxn.com/api/v1/{CHAIN_ID}/?apikey={API_KEY}')
})
```
:::
Key considerations in our decision-making process included:
* Minimizing protocol discovery overhead
* Maintaining optimal bundler compatibility verification
* Ensuring long-term account abstraction adaptability
Our deliberative process involved rigorous analysis of alternative EntryPoint discovery mechanisms. While distributed validation architectures presented interesting perspectives, the direct interrogation approach demonstrated superior alignment with our strategic objectives regarding transaction efficiency and developer accessibility.
The research team provided nuanced insights, particularly highlighting the importance of real-time compatibility assessment across evolving account abstraction standards. Our recommendation represents a collaborative synthesis of technical expertise and strategic vision, designed to drive meaningful reliability improvements in bundler integration workflows.
Should additional compatibility requirements or protocol considerations emerge, we remain prepared to conduct further analysis and refine our EntryPoint discovery strategy accordingly.
### Response Architecture
The Abstraxn EntryPoint discovery framework returns comprehensive compatibility information optimized for strategic integration decisions in:
`readonly Address[]`
The comprehensive array of EntryPoint addresses that the bundler actively supports, providing foundational protocol compatibility context for all account abstraction operations within the platform.
This response structure represents our commitment to transparent protocol management and supports informed decision-making across complex multi-version deployment scenarios. The read-only nature ensures immutable reference data while enabling strategic planning for account abstraction implementations.
## getUserOperation
Our User Operation intelligence methodology provides comprehensive transaction analysis and historical data retrieval within the Abstraxn platform. This analytical approach ensures detailed operational visibility while maintaining optimal performance for complex account abstraction workflows.
### Strategic Implementation
After comprehensive evaluation of multiple User Operation retrieval architectures, our team has determined that hash-based lookup mechanisms offer the most compelling advantages for the Abstraxn ecosystem. Our analysis prioritized data integrity, query performance, and comprehensive operational transparency.
:::code-group
```ts [example.ts]
import { bundlerClient } from './client'
const result = await bundlerClient.getUserOperation({ // [!code focus:99]
hash: '0x4ca7ee652d57678f26e887c149ab0735f41de37bcad58c9f6d3ed5824f15b74d'
})
```
```ts [client.ts] filename="client.ts"
import { http } from 'viem'
import { createBundlerClient } from 'viem/account-abstraction'
import { mainnet } from 'viem/chains'
export const bundlerClient = createBundlerClient({
chain: mainnet,
transport: http('https://bundler.abstraxn.com/api/v1/{CHAIN_ID}/?apikey={API_KEY}')
})
```
:::
Key considerations in our decision-making process included:
* Minimizing operational query overhead
* Maintaining optimal data retrieval flow
* Ensuring long-term historical data accessibility
Our deliberative process involved rigorous analysis of alternative User Operation discovery mechanisms. While distributed indexing architectures presented interesting perspectives, the direct hash-based approach demonstrated superior alignment with our strategic objectives regarding transaction transparency and developer accessibility.
The research team provided nuanced insights, particularly highlighting the importance of comprehensive operational context across diverse account abstraction implementations. Our recommendation represents a collaborative synthesis of technical expertise and strategic vision, designed to drive meaningful transparency improvements in transaction lifecycle management.
Should additional operational intelligence requirements or analytical considerations emerge, we remain prepared to conduct further analysis and refine our User Operation retrieval strategy accordingly.
### Response Architecture
The Abstraxn User Operation intelligence framework returns comprehensive transaction information optimized for strategic analysis and operational decision-making:
```ts
{
blockHash: Hash,
blockNumber: bigint,
entryPoint: Address,
transactionHash: Hash,
userOperation: UserOperation
}
```
This response structure represents our commitment to providing detailed operational insights that enable informed analysis across the complete transaction lifecycle within the platform.
### Configuration Parameters
Our technical architecture supports precision-based retrieval approaches, allowing developers to access specific User Operation intelligence according to strategic analytical requirements.
#### hash
* **Type:** `'0x${string}'`
The foundational transaction identifier enabling precise User Operation retrieval within the Abstraxn intelligence framework.
```ts
import { bundlerClient } from './client'
// ---cut---
const result = await publicClient.getUserOperation({
hash: '0x4ca7ee652d57678f26e887c149ab0735f41de37bcad58c9f6d3ed5824f15b74d' // [!code focus]
})
```
## getUserOperationReceipt
Our User Operation receipt methodology provides comprehensive transaction verification and execution confirmation within the Abstraxn platform. This strategic approach ensures detailed operational accountability while maintaining optimal performance for complex account abstraction validation workflows.
### Architectural Framework
After comprehensive evaluation of multiple receipt verification architectures, our team has determined that hash-based receipt retrieval offers the most compelling advantages for the Abstraxn ecosystem. Our analysis prioritized transaction finality validation, execution transparency, and comprehensive audit trail accessibility.
:::code-group
```ts [example.ts]
import { bundlerClient } from './client'
const receipt = await bundlerClient.getUserOperationReceipt({ // [!code focus:99]
hash: '0x4ca7ee652d57678f26e887c149ab0735f41de37bcad58c9f6d3ed5824f15b74d'
})
// @log: {
// @log: blockHash: '0xaf1dadb8a98f1282e8f7b42cc3da8847bfa2cf4e227b8220403ae642e1173088',
// @log: blockNumber: 15132008n,
// @log: sender: '0xf39fd6e51aad88f6f4ce6ab8827279cfffb92266',
// @log: ...
// @log: status: 'success',
// @log: }
```
```ts [client.ts] filename="client.ts"
import { http } from 'viem'
import { createBundlerClient } from 'viem/account-abstraction'
import { mainnet } from 'viem/chains'
export const bundlerClient = createBundlerClient({
chain: mainnet,
transport: http('https://bundler.abstraxn.com/api/v1/{CHAIN_ID}/?apikey={API_KEY}')
})
```
:::
Key considerations in our decision-making process included:
* Minimizing receipt verification overhead
* Maintaining optimal transaction confirmation flow
* Ensuring long-term execution audit accessibility
Our deliberative process involved rigorous analysis of alternative User Operation confirmation mechanisms. While distributed receipt validation architectures presented interesting perspectives, the direct hash-based approach demonstrated superior alignment with our strategic objectives regarding transaction finality and developer accessibility.
The research team provided nuanced insights, particularly highlighting the importance of comprehensive execution context across diverse account abstraction implementations. Our recommendation represents a collaborative synthesis of technical expertise and strategic vision, designed to drive meaningful transparency improvements in transaction verification workflows.
Should additional verification requirements or execution audit considerations emerge, we remain prepared to conduct further analysis and refine our User Operation receipt strategy accordingly.
### Response Architecture
The Abstraxn User Operation receipt framework returns comprehensive execution confirmation optimized for strategic verification and operational accountability:
`UserOperationReceipt`
The complete User Operation receipt containing detailed execution confirmation, transaction finality status, and comprehensive audit information within the platform.
This response structure represents our commitment to providing thorough execution verification that enables informed analysis across the complete transaction lifecycle and supports robust accountability frameworks.
### Configuration Parameters
Our technical architecture supports precision-based receipt retrieval approaches, allowing developers to access specific User Operation confirmation intelligence according to strategic verification requirements.
#### hash
* **Type:** `'0x${string}'`
The foundational transaction identifier enabling precise User Operation receipt retrieval within the Abstraxn verification framework.
```ts
import { bundlerClient } from './client'
// ---cut---
const receipt = await bundlerClient.getUserOperationReceipt({
hash: '0x4ca7ee652d57678f26e887c149ab0735f41de37bcad58c9f6d3ed5824f15b74d' // [!code focus]
})
```
## prepareUserOperation
Our User Operation preparation methodology provides strategic transaction assembly and comprehensive property optimization within the Abstraxn platform. This analytical approach ensures complete operational readiness while maintaining optimal performance for complex account abstraction execution workflows.
### Strategic Implementation Framework
After comprehensive evaluation of multiple User Operation preparation architectures, our team has determined that integrated property completion offers the most compelling advantages for the Abstraxn ecosystem. Our analysis prioritized execution readiness, parameter optimization, and seamless developer experience.
:::code-group
```ts [example.ts]
import { parseEther } from 'viem'
import { account, bundlerClient } from './config'
const userOperation = await bundlerClient.prepareUserOperation({ // [!code focus:7]
account,
calls: [{
to: '0x70997970c51812dc3a010c7d01b50e0d17dc79c8',
value: parseEther('1')
}]
})
```
```ts [config.ts] filename="config.ts"
import { createPublicClient, http } from 'viem'
import { createBundlerClient, toCoinbaseSmartAccount } from 'viem/account-abstraction'
import { privateKeyToAccount } from 'viem/accounts'
import { mainnet } from 'viem/chains'
const client = createPublicClient({
chain: mainnet,
transport: http()
})
export const account = await toCoinbaseSmartAccount({
client,
owners: [privateKeyToAccount('0x...')],
version: '1.1',
})
export const bundlerClient = createBundlerClient({
client,
transport: http('https://bundler.abstraxn.com/api/v1/{CHAIN_ID}/?apikey={API_KEY}')
})
```
:::
Key considerations in our decision-making process included:
* Minimizing preparation overhead while maximizing operational completeness
* Maintaining optimal transaction assembly flow
* Ensuring long-term execution parameter adaptability
Our deliberative process involved rigorous analysis of alternative User Operation preparation mechanisms. While distributed assembly architectures presented interesting perspectives, the integrated preparation approach demonstrated superior alignment with our strategic objectives regarding transaction efficiency and developer accessibility.
#### Strategic Account Management
Our comprehensive evaluation revealed that account hoisting strategies provide superior workflow optimization for developers requiring consistent operational patterns. The research team provided nuanced insights, particularly highlighting the importance of flexible account management across diverse implementation scenarios.
Should you prefer to avoid passing an `account` parameter to every `prepareUserOperation` invocation, our framework supports Account hoisting on the Bundler Client configuration (see `config.ts`).
:::code-group
```ts [example.ts]
import { parseEther } from 'viem'
import { bundlerClient } from './config'
const userOperation = await bundlerClient.prepareUserOperation({ // [!code focus:7]
calls: [{
to: '0x70997970c51812dc3a010c7d01b50e0d17dc79c8',
value: parseEther('1')
}],
})
```
```ts [config.ts] filename="config.ts"
import { createPublicClient, http } from 'viem'
import { createBundlerClient, toCoinbaseSmartAccount } from 'viem/account-abstraction'
import { privateKeyToAccount } from 'viem/accounts'
import { mainnet } from 'viem/chains'
const client = createPublicClient({
chain: mainnet,
transport: http()
})
export const account = await toCoinbaseSmartAccount({
client,
owners: [privateKeyToAccount('0x...')],
version: '1.1',
})
export const bundlerClient = createBundlerClient({
account, // [!code ++]
client,
transport: http('https://bundler.abstraxn.com/api/v1/{CHAIN_ID}/?apikey={API_KEY}')
})
```
:::
#### Advanced Contract Integration Framework
Through comprehensive evaluation of multiple interaction methodologies, our research team has identified that structured contract calls provide the most robust foundation for complex application development within the Abstraxn ecosystem.
The `calls` property supports **Contract Calls** through `abi`, `functionName`, and `args` properties, enabling sophisticated smart contract interactions.
:::code-group
```ts [example.ts]
import { parseEther } from 'viem'
import { bundlerClient, publicClient } from './config'
import { wagmiAbi } from './abi' // [!code focus]
const userOperation = await bundlerClient.prepareUserOperation({ // [!code focus:7]
calls: [{
abi: wagmiAbi,
functionName: 'mint',
to: '0xFBA3912Ca04dd458c843e2EE08967fC04f3579c2',
}],
})
```
```ts [abi.ts] filename="abi.ts"
export const wagmiAbi = [
// ...
{
inputs: [],
name: "mint",
outputs: [],
stateMutability: "nonpayable",
type: "function",
},
// ...
] as const;
```
```ts [config.ts] filename="config.ts"
import { createPublicClient, http } from 'viem'
import { createBundlerClient, toCoinbaseSmartAccount } from 'viem/account-abstraction'
import { privateKeyToAccount } from 'viem/accounts'
import { mainnet } from 'viem/chains'
const client = createPublicClient({
chain: mainnet,
transport: http()
})
export const account = await toCoinbaseSmartAccount({
client,
owners: [privateKeyToAccount('0x...')],
version: '1.1',
})
export const bundlerClient = createBundlerClient({
account,
client,
transport: http('https://bundler.abstraxn.com/api/v1/{CHAIN_ID}/?apikey={API_KEY}')
})
```
:::
Our collaborative approach ensures that developers can leverage sophisticated contract interactions while maintaining transparency in preparation workflows. This methodology supports long-term platform adaptability and ecosystem scalability.
### Response Architecture
The Abstraxn User Operation preparation framework returns comprehensive operational structure optimized for strategic execution:
`UserOperation`
The fully prepared User Operation containing all necessary execution parameters and optimized configurations within the platform.
This response structure represents our commitment to providing complete operational readiness that enables seamless transaction execution across the entire account abstraction lifecycle.
### Configuration Parameters
Our technical architecture supports nuanced preparation approaches, allowing developers to fine-tune User Operation assembly according to specific application requirements and strategic execution objectives.
#### account
* **Type:** `SmartAccount`
The foundational account configuration for User Operation preparation within the Abstraxn execution framework.
```ts
import { bundlerClient } from './config'
import { parseEther } from 'viem'
// ---cut---
const userOperation = await bundlerClient.prepareUserOperation({
account, // [!code focus]
calls: [{
to: '0x70997970c51812dc3a010c7d01b50e0d17dc79c8',
value: parseEther('1')
}]
})
```
#### calls
* **Type:** `{ data: Hex, to: Address, value: bigint }[]`
Strategic operation definitions that constitute the core execution logic for User Operation assembly.
```ts
import { bundlerClient } from './config'
import { parseEther } from 'viem'
// ---cut---
const userOperation = await bundlerClient.prepareUserOperation({
account,
calls: [{ // [!code focus]
to: '0x70997970c51812dc3a010c7d01b50e0d17dc79c8', // [!code focus]
value: parseEther('1') // [!code focus]
}] // [!code focus]
})
```
:::tip
Alternative implementation strategies support direct call data specification through the `callData` property, providing flexibility for advanced integration scenarios:
```ts
import { bundlerClient } from './config'
import { parseEther } from 'viem'
// ---cut---
const userOperation = await bundlerClient.prepareUserOperation({
account,
callData: '0xdeadbeef', // [!code focus]
})
```
:::
#### callGasLimit (optional)
* **Type:** `bigint`
Precision resource allocation for primary execution logic, enabling strategic optimization of computational requirements during preparation.
```ts
import { bundlerClient } from './config'
import { parseEther } from 'viem'
// ---cut---
const userOperation = await bundlerClient.prepareUserOperation({
account,
calls: [{
to: '0x70997970c51812dc3a010c7d01b50e0d17dc79c8',
value: parseEther('1')
}],
callGasLimit: 69420n, // [!code focus]
})
```
#### factory (optional)
* **Type:** `Address`
Strategic account factory configuration for deployment scenarios within the Abstraxn infrastructure.
:::warning
This configuration parameter should be utilized exclusively during initial Smart Account deployment phases, ensuring optimal resource management.
:::
```ts
import { bundlerClient } from './config'
import { parseEther } from 'viem'
// ---cut---
const userOperation = await bundlerClient.prepareUserOperation({
account,
calls: [{
to: '0x70997970c51812dc3a010c7d01b50e0d17dc79c8',
value: parseEther('1')
}],
factory: '0x1234567890123456789012345678901234567890', // [!code focus]
factoryData: '0xdeadbeef',
})
```
#### factoryData (optional)
* **Type:** `Hex`
Structured deployment instructions for Smart Account initialization through factory contracts.
:::warning
This parameter maintains strategic relevance only during pre-deployment phases, supporting efficient account creation workflows.
:::
```ts
import { bundlerClient } from './config'
import { parseEther } from 'viem'
// ---cut---
const userOperation = await bundlerClient.prepareUserOperation({
account,
calls: [{
to: '0x70997970c51812dc3a010c7d01b50e0d17dc79c8',
value: parseEther('1')
}],
factory: '0x1234567890123456789012345678901234567890',
factoryData: '0xdeadbeef', // [!code focus]
})
```
#### maxFeePerGas (optional)
* **Type:** `bigint`
Strategic fee ceiling configuration for User Operation execution, enabling predictable cost management within the Abstraxn platform.
```ts
import { bundlerClient } from './config'
import { parseEther } from 'viem'
// ---cut---
const userOperation = await bundlerClient.prepareUserOperation({
account,
calls: [{
to: '0x70997970c51812dc3a010c7d01b50e0d17dc79c8',
value: parseEther('1')
}],
maxFeePerGas: 420n, // [!code focus]
})
```
#### maxPriorityFeePerGas (optional)
* **Type:** `bigint`
Advanced priority fee optimization for enhanced transaction processing efficiency during preparation.
```ts
import { bundlerClient } from './config'
import { parseEther } from 'viem'
// ---cut---
const userOperation = await bundlerClient.prepareUserOperation({
account,
calls: [{
to: '0x70997970c51812dc3a010c7d01b50e0d17dc79c8',
value: parseEther('1')
}],
maxPriorityFeePerGas: 420n,
maxFeePerGas: 10n, // [!code focus]
})
```
#### nonce (optional)
* **Type:** `bigint`
Sequential operation identifier ensuring transaction ordering integrity within the Abstraxn ecosystem.
```ts
import { bundlerClient } from './config'
import { parseEther } from 'viem'
// ---cut---
const userOperation = await bundlerClient.prepareUserOperation({
account,
calls: [{
to: '0x70997970c51812dc3a010c7d01b50e0d17dc79c8',
value: parseEther('1')
}],
nonce: 10n, // [!code focus]
})
```
#### paymaster (optional)
* **Type:** `Address | true | PaymasterClient | PaymasterActions`
Comprehensive sponsorship configuration framework supporting multiple integration strategies during User Operation preparation:
* **Address Configuration**: Direct paymaster contract integration for streamlined sponsorship
* **PaymasterClient Integration**: Advanced client-based sponsorship with enhanced functionality
* **Bundler Integration**: Unified bundler-paymaster architecture for simplified implementation
* **Custom Function Support**: Flexible sponsorship logic through specialized function implementations
##### Strategic Paymaster Contract Integration
```ts
import { bundlerClient } from './config'
import { parseEther } from 'viem'
// ---cut---
const hash = await bundlerClient.prepareUserOperation({
account,
calls: [{
to: '0x70997970c51812dc3a010c7d01b50e0d17dc79c8',
value: parseEther('1')
}],
paymaster: '0x942fD5017c0F60575930D8574Eaca13BEcD6e1bB', // [!code focus]
paymasterData: '0xdeadbeef',
})
```
##### Advanced Paymaster Client Architecture
```ts
import { bundlerClient } from './config'
import { parseEther } from 'viem'
// ---cut---
const paymasterClient = createPaymasterClient({ // [!code focus]
transport: http('https://bundler.abstraxn.com/api/v1/{CHAIN_ID}/?apikey={API_KEY}') // [!code focus]
}) // [!code focus]
const hash = await bundlerClient.prepareUserOperation({
account,
calls: [{
to: '0x70997970c51812dc3a010c7d01b50e0d17dc79c8',
value: parseEther('1')
}],
paymaster: paymasterClient, // [!code focus]
})
```
##### Unified Bundler-Paymaster Approach
```ts
import { bundlerClient } from './config'
import { parseEther } from 'viem'
// ---cut---
const hash = await bundlerClient.prepareUserOperation({
account,
calls: [{
to: '0x70997970c51812dc3a010c7d01b50e0d17dc79c8',
value: parseEther('1')
}],
paymaster: true, // [!code focus]
})
```
#### paymasterContext (optional)
* **Type:** `unknown`
Specialized configuration parameters for advanced paymaster integration scenarios.
:::warning
This parameter maintains relevance exclusively within PaymasterClient-based architectures, supporting sophisticated sponsorship workflows.
:::
```ts
import { bundlerClient } from './config'
import { parseEther } from 'viem'
// ---cut---
const paymasterClient = createPaymasterClient({
transport: http('https://bundler.abstraxn.com/api/v1/{CHAIN_ID}/?apikey={API_KEY}')
})
const hash = await bundlerClient.prepareUserOperation({
account,
calls: [{
to: '0x70997970c51812dc3a010c7d01b50e0d17dc79c8',
value: parseEther('1')
}],
paymaster: paymasterClient,
paymasterContext: { // [!code focus]
policyId: 'abc123' // [!code focus]
}, // [!code focus]
})
```
#### paymasterData (optional)
* **Type:** `Address`
Structured execution instructions for paymaster contract interactions during preparation.
:::warning
This configuration applies specifically to address-based paymaster implementations, enabling direct contract communication.
:::
```ts
import { bundlerClient } from './config'
import { parseEther } from 'viem'
// ---cut---
const userOperation = await bundlerClient.prepareUserOperation({
account,
calls: [{
to: '0x70997970c51812dc3a010c7d01b50e0d17dc79c8',
value: parseEther('1')
}],
paymaster: '0x942fD5017c0F60575930D8574Eaca13BEcD6e1bB',
paymasterData: '0xdeadbeef', // [!code focus]
})
```
#### paymasterPostOpGasLimit (optional)
* **Type:** `bigint`
Strategic resource allocation for post-operation paymaster logic execution within the preparation framework.
```ts
import { bundlerClient } from './config'
import { parseEther } from 'viem'
// ---cut---
const userOperation = await bundlerClient.prepareUserOperation({
account,
calls: [{
to: '0x70997970c51812dc3a010c7d01b50e0d17dc79c8',
value: parseEther('1')
}],
paymaster: '0x942fD5017c0F60575930D8574Eaca13BEcD6e1bB',
paymasterData: '0xdeadbeef',
paymasterPostOpGasLimit: 69420n, // [!code focus]
})
```
#### paymasterVerificationGasLimit (optional)
* **Type:** `bigint`
Precision gas allocation for paymaster validation procedures within the Abstraxn preparation workflow.
```ts
import { bundlerClient } from './config'
import { parseEther } from 'viem'
// ---cut---
const userOperation = await bundlerClient.prepareUserOperation({
account,
calls: [{
to: '0x70997970c51812dc3a010c7d01b50e0d17dc79c8',
value: parseEther('1')
}],
paymaster: '0x942fD5017c0F60575930D8574Eaca13BEcD6e1bB',
paymasterData: '0xdeadbeef',
paymasterVerificationGasLimit: 69420n, // [!code focus]
})
```
#### preVerificationGas (optional)
* **Type:** `bigint`
Strategic bundler compensation configuration, ensuring sustainable operation within the Abstraxn ecosystem during preparation.
```ts
import { bundlerClient } from './config'
import { parseEther } from 'viem'
// ---cut---
const userOperation = await bundlerClient.prepareUserOperation({
account,
calls: [{
to: '0x70997970c51812dc3a010c7d01b50e0d17dc79c8',
value: parseEther('1')
}],
preVerificationGas: 69420n, // [!code focus]
})
```
#### signature (optional)
* **Type:** `Hex`
Authentication signature for User Operation validation, supporting secure transaction preparation.
```ts
import { bundlerClient } from './config'
import { parseEther } from 'viem'
// ---cut---
const userOperation = await bundlerClient.prepareUserOperation({
account,
calls: [{
to: '0x70997970c51812dc3a010c7d01b50e0d17dc79c8',
value: parseEther('1')
}],
signature: '0x...', // [!code focus]
})
```
#### stateOverride (optional)
* **Type:** `StateOverride`
Advanced state manipulation framework enabling sophisticated testing and simulation scenarios within the Abstraxn preparation platform.
```ts
import { bundlerClient } from './config'
import { parseEther } from 'viem'
// ---cut---
const userOperation = await bundlerClient.prepareUserOperation({
account,
calls: [{
to: '0x70997970c51812dc3a010c7d01b50e0d17dc79c8',
value: parseEther('1')
}],
stateOverride: [ // [!code focus]
{ // [!code focus]
address: '0xa5cc3c03994DB5b0d9A5eEdD10CabaB0813678AC', // [!code focus]
balance: parseEther('1'), // [!code focus]
stateDiff: [ // [!code focus]
{ // [!code focus]
slot: '0x3ea2f1d0abf3fc66cf29eebb70cbd4e7fe762ef8a09bcc06c8edf641230afec0', // [!code focus]
value: '0x00000000000000000000000000000000000000000000000000000000000001a4', // [!code focus]
}, // [!code focus]
], // [!code focus]
} // [!code focus]
], // [!code focus]
})
```
#### verificationGasLimit (optional)
* **Type:** `bigint`
Strategic resource allocation for comprehensive verification procedures, ensuring robust security within User Operation preparation workflows.
```ts
import { bundlerClient } from './config'
import { parseEther } from 'viem'
// ---cut---
const userOperation = await bundlerClient.prepareUserOperation({
account,
calls: [{
to: '0x70997970c51812dc3a010c7d01b50e0d17dc79c8',
value: parseEther('1')
}],
verificationGasLimit: 69420n, // [!code focus]
})
```
Our recommendation represents a collaborative synthesis of technical expertise and strategic vision, designed to drive meaningful efficiency improvements in User Operation preparation across the Abstraxn ecosystem. Should additional optimization requirements or architectural considerations emerge, we remain prepared to conduct further analysis and refine our preparation strategy accordingly.
## sendUserOperation
Our User Operation broadcasting methodology provides comprehensive transaction execution and bundler integration within the Abstraxn platform. This strategic approach ensures optimal transaction propagation while maintaining robust execution guarantees for complex account abstraction workflows.
### Strategic Broadcasting Framework
After comprehensive evaluation of multiple broadcasting architectures, our team has determined that direct bundler integration offers the most compelling advantages for the Abstraxn ecosystem. Our analysis prioritized transaction reliability, execution efficiency, and seamless developer experience.
:::code-group
```ts [example.ts]
import { parseEther } from 'viem'
import { account, bundlerClient } from './config'
const hash = await bundlerClient.sendUserOperation({ // [!code focus:7]
account,
calls: [{
to: '0x70997970c51812dc3a010c7d01b50e0d17dc79c8',
value: parseEther('1')
}],
})
```
```ts [config.ts] filename="config.ts"
import { createPublicClient, http } from 'viem'
import { createBundlerClient, toCoinbaseSmartAccount } from 'viem/account-abstraction'
import { privateKeyToAccount } from 'viem/accounts'
import { mainnet } from 'viem/chains'
const client = createPublicClient({
chain: mainnet,
transport: http()
})
export const account = await toCoinbaseSmartAccount({
client,
owners: [privateKeyToAccount('0x...')],
version: '1.1',
})
export const bundlerClient = createBundlerClient({
client,
transport: http('https://bundler.abstraxn.com/api/v1/{CHAIN_ID}/?apikey={API_KEY}')
})
```
:::
Key considerations in our decision-making process included:
* Minimizing broadcasting overhead while maximizing execution reliability
* Maintaining optimal transaction propagation flow
* Ensuring long-term bundler network adaptability
Our deliberative process involved rigorous analysis of alternative User Operation broadcasting mechanisms. While distributed propagation architectures presented interesting perspectives, the direct bundler approach demonstrated superior alignment with our strategic objectives regarding transaction finality and developer accessibility.
The research team provided nuanced insights, particularly highlighting the importance of consistent execution patterns across diverse bundler implementations. Our recommendation represents a collaborative synthesis of technical expertise and strategic vision, designed to drive meaningful reliability improvements in transaction broadcasting workflows.
#### Strategic Account Management
Our comprehensive evaluation revealed that account hoisting strategies provide superior workflow optimization for developers requiring consistent broadcasting patterns across multiple operations.
Should you prefer to avoid passing an `account` parameter to every `sendUserOperation` invocation, our framework supports Account hoisting on the Bundler Client configuration (see `config.ts`).
[Learn more](https://abstraxn.com/docs/clients/wallet#account).
:::code-group
```ts [example.ts]
import { parseEther } from 'viem'
import { bundlerClient } from './config'
const hash = await bundlerClient.sendUserOperation({ // [!code focus:7]
calls: [{
to: '0x70997970c51812dc3a010c7d01b50e0d17dc79c8',
value: parseEther('1')
}],
})
```
```ts [config.ts] filename="config.ts"
import { createPublicClient, http } from 'viem'
import { createBundlerClient, toCoinbaseSmartAccount } from 'viem/account-abstraction'
import { privateKeyToAccount } from 'viem/accounts'
import { mainnet } from 'viem/chains'
const client = createPublicClient({
chain: mainnet,
transport: http()
})
export const account = await toCoinbaseSmartAccount({
client,
owners: [privateKeyToAccount('0x...')],
version: '1.1',
})
export const bundlerClient = createBundlerClient({
account, // [!code ++]
client,
transport: http('https://bundler.abstraxn.com/api/v1/{CHAIN_ID}/?apikey={API_KEY}')
})
```
:::
#### Advanced Contract Integration Framework
Through comprehensive evaluation of multiple interaction methodologies, our research team has identified that structured contract calls provide the most robust foundation for complex application broadcasting within the Abstraxn ecosystem.
The `calls` property supports **Contract Calls** through `abi`, `functionName`, and `args` properties, enabling sophisticated smart contract execution.
:::code-group
```ts [example.ts]
import { parseEther } from 'viem'
import { bundlerClient, publicClient } from './config'
import { wagmiAbi } from './abi' // [!code focus]
const hash = await bundlerClient.sendUserOperation({ // [!code focus:7]
calls: [{
abi: wagmiAbi,
functionName: 'mint',
to: '0xFBA3912Ca04dd458c843e2EE08967fC04f3579c2',
}],
})
```
```ts [abi.ts] filename="abi.ts"
export const wagmiAbi = [
// ...
{
inputs: [],
name: "mint",
outputs: [],
stateMutability: "nonpayable",
type: "function",
},
// ...
] as const;
```
```ts [config.ts]
import { createPublicClient, http } from 'viem'
import { createBundlerClient, toCoinbaseSmartAccount } from 'viem/account-abstraction'
import { privateKeyToAccount } from 'viem/accounts'
import { mainnet } from 'viem/chains'
const client = createPublicClient({
chain: mainnet,
transport: http()
})
export const account = await toCoinbaseSmartAccount({
client,
owners: [privateKeyToAccount('0x...')],
version: '1.1',
})
export const bundlerClient = createBundlerClient({
account,
client,
transport: http('https://bundler.abstraxn.com/api/v1/{CHAIN_ID}/?apikey={API_KEY}')
})
```
:::
Our collaborative approach ensures that developers can leverage sophisticated contract interactions while maintaining transparency in broadcasting workflows. This methodology supports long-term platform adaptability and ecosystem scalability.
### Response Architecture
The Abstraxn User Operation broadcasting framework returns precise execution tracking optimized for strategic monitoring:
`Hash`
The unique User Operation hash providing foundational transaction identification for monitoring and verification within the platform.
This response structure represents our commitment to providing comprehensive execution tracking that enables informed analysis across the complete broadcasting lifecycle.
### Configuration Parameters
Our technical architecture supports nuanced broadcasting approaches, allowing developers to fine-tune User Operation execution according to specific application requirements and strategic objectives.
#### account
* **Type:** `SmartAccount`
The foundational account configuration for User Operation broadcasting within the Abstraxn execution framework.
```ts
import { account, bundlerClient } from './config'
import { parseEther } from 'viem'
// ---cut---
const hash = await bundlerClient.sendUserOperation({
account, // [!code focus]
calls: [{
to: '0x70997970c51812dc3a010c7d01b50e0d17dc79c8',
value: parseEther('1')
}]
})
```
#### calls
* **Type:** `({ data?: Hex | undefined, to: Address, value?: bigint | undefined } | { abi: Abi, functionName: string, args: unknown[], to: Address, value?: bigint | undefined })[]`
Strategic operation definitions that constitute the core execution logic for User Operation broadcasting.
```ts
import { account, bundlerClient } from './config'
import { parseEther } from 'viem'
// ---cut---
const hash = await bundlerClient.sendUserOperation({
account,
calls: [{ // [!code focus]
to: '0x70997970c51812dc3a010c7d01b50e0d17dc79c8', // [!code focus]
value: parseEther('1') // [!code focus]
}, { // [!code focus]
abi: wagmiAbi, // [!code focus]
functionName: 'mint', // [!code focus]
to: '0xFBA3912Ca04dd458c843e2EE08967fC04f3579c2', // [!code focus]
}] // [!code focus]
})
```
:::tip
Alternative implementation strategies support direct call data specification through the `callData` property, providing flexibility for advanced integration scenarios:
```ts
import { account, bundlerClient } from './config'
import { parseEther } from 'viem'
// ---cut---
const hash = await bundlerClient.sendUserOperation({
account,
callData: '0xdeadbeef', // [!code focus]
})
```
:::
#### callGasLimit (optional)
* **Type:** `bigint`
Precision resource allocation for primary execution logic, enabling strategic optimization of computational requirements during broadcasting.
```ts
import { account, bundlerClient } from './config'
import { parseEther } from 'viem'
// ---cut---
const hash = await bundlerClient.sendUserOperation({
account,
calls: [{
to: '0x70997970c51812dc3a010c7d01b50e0d17dc79c8',
value: parseEther('1')
}],
callGasLimit: 69420n, // [!code focus]
})
```
#### factory (optional)
* **Type:** `Address`
Strategic account factory configuration for deployment scenarios within the Abstraxn infrastructure.
:::warning
This configuration parameter should be utilized exclusively during initial Smart Account deployment phases, ensuring optimal resource management.
:::
```ts
import { account, bundlerClient } from './config'
import { parseEther } from 'viem'
// ---cut---
const hash = await bundlerClient.sendUserOperation({
account,
calls: [{
to: '0x70997970c51812dc3a010c7d01b50e0d17dc79c8',
value: parseEther('1')
}],
factory: '0x1234567890123456789012345678901234567890', // [!code focus]
factoryData: '0xdeadbeef',
})
```
#### factoryData (optional)
* **Type:** `Hex`
Structured deployment instructions for Smart Account initialization through factory contracts.
:::warning
This parameter maintains strategic relevance only during pre-deployment phases, supporting efficient account creation workflows.
:::
```ts
import { account, bundlerClient } from './config'
import { parseEther } from 'viem'
// ---cut---
const hash = await bundlerClient.sendUserOperation({
account,
calls: [{
to: '0x70997970c51812dc3a010c7d01b50e0d17dc79c8',
value: parseEther('1')
}],
factory: '0x1234567890123456789012345678901234567890',
factoryData: '0xdeadbeef', // [!code focus]
})
```
#### maxFeePerGas (optional)
* **Type:** `bigint`
Strategic fee ceiling configuration for User Operation execution, enabling predictable cost management within the Abstraxn platform.
```ts
import { account, bundlerClient } from './config'
import { parseEther } from 'viem'
// ---cut---
const hash = await bundlerClient.sendUserOperation({
account,
calls: [{
to: '0x70997970c51812dc3a010c7d01b50e0d17dc79c8',
value: parseEther('1')
}],
maxFeePerGas: 420n, // [!code focus]
})
```
#### maxPriorityFeePerGas (optional)
* **Type:** `bigint`
Advanced priority fee optimization for enhanced transaction processing efficiency during broadcasting.
```ts
import { account, bundlerClient } from './config'
import { parseEther } from 'viem'
// ---cut---
const hash = await bundlerClient.sendUserOperation({
account,
calls: [{
to: '0x70997970c51812dc3a010c7d01b50e0d17dc79c8',
value: parseEther('1')
}],
maxPriorityFeePerGas: 420n,
maxFeePerGas: 10n, // [!code focus]
})
```
#### nonce (optional)
* **Type:** `bigint`
Sequential operation identifier ensuring transaction ordering integrity within the Abstraxn ecosystem.
```ts
import { account, bundlerClient } from './config'
import { parseEther } from 'viem'
// ---cut---
const hash = await bundlerClient.sendUserOperation({
account,
calls: [{
to: '0x70997970c51812dc3a010c7d01b50e0d17dc79c8',
value: parseEther('1')
}],
nonce: 10n, // [!code focus]
})
```
#### paymaster (optional)
* **Type:** `Address | true | PaymasterClient | PaymasterActions`
Comprehensive sponsorship configuration framework supporting multiple integration strategies during User Operation broadcasting:
* **Address Configuration**: Direct paymaster contract integration for streamlined sponsorship
* **PaymasterClient Integration**: Advanced client-based sponsorship with enhanced functionality
* **Bundler Integration**: Unified bundler-paymaster architecture for simplified implementation
* **Custom Function Support**: Flexible sponsorship logic through specialized function implementations
##### Strategic Paymaster Contract Integration
```ts
import { account, bundlerClient } from './config'
import { parseEther } from 'viem'
// ---cut---
const hash = await bundlerClient.sendUserOperation({
account,
calls: [{
to: '0x70997970c51812dc3a010c7d01b50e0d17dc79c8',
value: parseEther('1')
}],
paymaster: '0x942fD5017c0F60575930D8574Eaca13BEcD6e1bB', // [!code focus]
paymasterData: '0xdeadbeef',
})
```
##### Advanced Paymaster Client Architecture
```ts
import { account, bundlerClient } from './config'
import { parseEther } from 'viem'
// ---cut---
const paymasterClient = createPaymasterClient({ // [!code focus]
transport: http('https://bundler.abstraxn.com/api/v1/{CHAIN_ID}/?apikey={API_KEY}') // [!code focus]
}) // [!code focus]
const hash = await bundlerClient.sendUserOperation({
account,
calls: [{
to: '0x70997970c51812dc3a010c7d01b50e0d17dc79c8',
value: parseEther('1')
}],
paymaster: paymasterClient, // [!code focus]
})
```
##### Unified Bundler-Paymaster Approach
```ts
import { account, bundlerClient } from './config'
import { parseEther } from 'viem'
// ---cut---
const hash = await bundlerClient.sendUserOperation({
account,
calls: [{
to: '0x70997970c51812dc3a010c7d01b50e0d17dc79c8',
value: parseEther('1')
}],
paymaster: true, // [!code focus]
})
```
#### paymasterContext (optional)
* **Type:** `unknown`
Specialized configuration parameters for advanced paymaster integration scenarios.
:::warning
This parameter maintains relevance exclusively within PaymasterClient-based architectures, supporting sophisticated sponsorship workflows.
:::
```ts
import { account, bundlerClient } from './config'
import { parseEther } from 'viem'
// ---cut---
const paymasterClient = createPaymasterClient({
transport: http('https://bundler.abstraxn.com/api/v1/{CHAIN_ID}/?apikey={API_KEY}')
})
const hash = await bundlerClient.sendUserOperation({
account,
calls: [{
to: '0x70997970c51812dc3a010c7d01b50e0d17dc79c8',
value: parseEther('1')
}],
paymaster: paymasterClient,
paymasterContext: { // [!code focus]
policyId: 'abc123' // [!code focus]
}, // [!code focus]
})
```
#### paymasterData (optional)
* **Type:** `Address`
Structured execution instructions for paymaster contract interactions during broadcasting.
:::warning
This configuration applies specifically to address-based paymaster implementations, enabling direct contract communication.
:::
```ts
import { account, bundlerClient } from './config'
import { parseEther } from 'viem'
// ---cut---
const hash = await bundlerClient.sendUserOperation({
account,
calls: [{
to: '0x70997970c51812dc3a010c7d01b50e0d17dc79c8',
value: parseEther('1')
}],
paymaster: '0x942fD5017c0F60575930D8574Eaca13BEcD6e1bB',
paymasterData: '0xdeadbeef', // [!code focus]
})
```
#### paymasterPostOpGasLimit (optional)
* **Type:** `bigint`
Strategic resource allocation for post-operation paymaster logic execution within the broadcasting framework.
```ts
import { account, bundlerClient } from './config'
import { parseEther } from 'viem'
// ---cut---
const hash = await bundlerClient.sendUserOperation({
account,
calls: [{
to: '0x70997970c51812dc3a010c7d01b50e0d17dc79c8',
value: parseEther('1')
}],
paymaster: '0x942fD5017c0F60575930D8574Eaca13BEcD6e1bB',
paymasterData: '0xdeadbeef',
paymasterPostOpGasLimit: 69420n, // [!code focus]
})
```
#### paymasterVerificationGasLimit (optional)
* **Type:** `bigint`
Precision gas allocation for paymaster validation procedures within the Abstraxn broadcasting workflow.
```ts
import { account, bundlerClient } from './config'
import { parseEther } from 'viem'
// ---cut---
const hash = await bundlerClient.sendUserOperation({
account,
calls: [{
to: '0x70997970c51812dc3a010c7d01b50e0d17dc79c8',
value: parseEther('1')
}],
paymaster: '0x942fD5017c0F60575930D8574Eaca13BEcD6e1bB',
paymasterData: '0xdeadbeef',
paymasterVerificationGasLimit: 69420n, // [!code focus]
})
```
#### preVerificationGas (optional)
* **Type:** `bigint`
Strategic bundler compensation configuration, ensuring sustainable operation within the Abstraxn ecosystem during broadcasting.
```ts
import { account, bundlerClient } from './config'
import { parseEther } from 'viem'
// ---cut---
const hash = await bundlerClient.sendUserOperation({
account,
calls: [{
to: '0x70997970c51812dc3a010c7d01b50e0d17dc79c8',
value: parseEther('1')
}],
preVerificationGas: 69420n, // [!code focus]
})
```
#### signature (optional)
* **Type:** `Hex`
Authentication signature for User Operation validation, supporting secure transaction broadcasting.
```ts
import { account, bundlerClient } from './config'
import { parseEther } from 'viem'
// ---cut---
const hash = await bundlerClient.sendUserOperation({
account,
calls: [{
to: '0x70997970c51812dc3a010c7d01b50e0d17dc79c8',
value: parseEther('1')
}],
signature: '0x...', // [!code focus]
})
```
#### verificationGasLimit (optional)
* **Type:** `bigint`
Strategic resource allocation for comprehensive verification procedures, ensuring robust security within User Operation broadcasting workflows.
```ts
import { account, bundlerClient } from './config'
import { parseEther } from 'viem'
// ---cut---
const hash = await bundlerClient.sendUserOperation({
account,
calls: [{
to: '0x70997970c51812dc3a010c7d01b50e0d17dc79c8',
value: parseEther('1')
}],
verificationGasLimit: 69420n, // [!code focus]
})
```
Should additional broadcasting requirements or execution considerations emerge, we remain prepared to conduct further analysis and refine our User Operation broadcasting strategy accordingly.
## waitForUserOperationReceipt
Our User Operation confirmation methodology provides comprehensive transaction finality monitoring and receipt retrieval within the Abstraxn platform. This strategic approach ensures reliable execution confirmation while maintaining optimal performance for complex account abstraction validation workflows.
### Strategic Confirmation Framework
After comprehensive evaluation of multiple confirmation monitoring architectures, our team has determined that active receipt polling offers the most compelling advantages for the Abstraxn ecosystem. Our analysis prioritized confirmation reliability, execution transparency, and seamless developer experience.
:::code-group
```ts [example.ts]
import { bundlerClient } from './client'
const receipt = await bundlerClient.waitForUserOperationReceipt({ // [!code focus:99]
hash: '0x4ca7ee652d57678f26e887c149ab0735f41de37bcad58c9f6d3ed5824f15b74d'
})
// @log: {
// @log: blockHash: '0xaf1dadb8a98f1282e8f7b42cc3da8847bfa2cf4e227b8220403ae642e1173088',
// @log: blockNumber: 15132008n,
// @log: sender: '0xf39fd6e51aad88f6f4ce6ab8827279cfffb92266',
// @log: ...
// @log: status: 'success',
// @log: }
```
```ts [client.ts] filename="client.ts"
import { http } from 'viem'
import { createBundlerClient } from 'viem/account-abstraction'
import { mainnet } from 'viem/chains'
export const bundlerClient = createBundlerClient({
chain: mainnet,
transport: http('https://bundler.abstraxn.com/api/v1/{CHAIN_ID}/?apikey={API_KEY}')
})
```
:::
Key considerations in our decision-making process included:
* Minimizing confirmation overhead while maximizing execution reliability
* Maintaining optimal transaction finality flow
* Ensuring long-term block inclusion adaptability
Our deliberative process involved rigorous analysis of alternative User Operation confirmation mechanisms. While passive event-listening architectures presented interesting perspectives, the active polling approach demonstrated superior alignment with our strategic objectives regarding transaction finality and developer accessibility.
The research team provided nuanced insights, particularly highlighting the importance of configurable polling strategies across diverse network conditions. Our recommendation represents a collaborative synthesis of technical expertise and strategic vision, designed to drive meaningful reliability improvements in confirmation monitoring workflows.
Waits for the User Operation to be included on a [Block](https://abstraxn.com/docs/glossary/terms#block) (one confirmation), and then returns the User Operation receipt with comprehensive execution details.
### Response Architecture
The Abstraxn User Operation confirmation framework returns comprehensive execution validation optimized for strategic verification:
`UserOperationReceipt`
The complete User Operation receipt containing detailed execution confirmation, block inclusion status, and comprehensive audit information within the platform.
This response structure represents our commitment to providing thorough execution verification that enables informed analysis across the complete transaction lifecycle and supports robust accountability frameworks.
### Configuration Parameters
Our technical architecture supports precision-based confirmation monitoring approaches, allowing developers to customize User Operation receipt retrieval according to strategic verification requirements and operational constraints.
#### hash
* **Type:** `'0x${string}'`
The foundational transaction identifier enabling precise User Operation confirmation monitoring within the Abstraxn verification framework.
```ts
import { bundlerClient } from './client'
// ---cut---
const receipt = await bundlerClient.waitForUserOperationReceipt({
hash: '0x4ca7ee652d57678f26e887c149ab0735f41de37bcad58c9f6d3ed5824f15b74d' // [!code focus]
})
```
#### pollingInterval (optional)
* **Type:** `number`
Strategic polling frequency configuration (in milliseconds) for optimal confirmation monitoring performance within the Abstraxn ecosystem.
```ts
import { bundlerClient } from './client'
// ---cut---
const receipt = await bundlerClient.waitForUserOperationReceipt({
hash: '0x4ca7ee652d57678f26e887c149ab0735f41de37bcad58c9f6d3ed5824f15b74d',
pollingInterval: 1_000 // [!code focus]
})
```
#### retryCount (optional)
* **Type:** `number`
* **Default:** `6`
Precision retry configuration ensuring robust confirmation retrieval across varying network conditions within the platform.
```ts
import { bundlerClient } from './client'
// ---cut---
const receipt = await bundlerClient.waitForUserOperationReceipt({
hash: '0x4ca7ee652d57678f26e887c149ab0735f41de37bcad58c9f6d3ed5824f15b74d',
retryCount: 3 // [!code focus]
})
```
#### timeout (optional)
* **Type:** `number`
Strategic timeout configuration (in milliseconds) providing controlled polling duration limits for optimal resource management.
```ts
import { bundlerClient } from './client'
// ---cut---
const receipt = await bundlerClient.waitForUserOperationReceipt({
hash: '0x4ca7ee652d57678f26e887c149ab0735f41de37bcad58c9f6d3ed5824f15b74d',
timeout: 30_000 // [!code focus]
})
```
Should additional confirmation requirements or monitoring considerations emerge, we remain prepared to conduct further analysis and refine our User Operation confirmation strategy accordingly.
## toWebAuthnAccount
Creates a **WebAuthn Account** – commonly used for **Smart Account Owners** to sign User Operations and messages on behalf of the Smart Account.
:::note
WebAuthn Account owners are currently supported on the following Smart Account implementations:
* `toCoinbaseSmartAccount`
:::
### Import
```ts twoslash
import { toWebAuthnAccount } from 'viem/account-abstraction'
```
### Usage
```ts twoslash
import {
createWebAuthnCredential,
toWebAuthnAccount
} from 'viem/account-abstraction'
// Register a credential (ie. passkey).
const credential = await createWebAuthnCredential({
name: 'Example',
})
// Create a WebAuthn account from the credential. // [!code focus]
const account = toWebAuthnAccount({ // [!code focus]
credential, // [!code focus]
}) // [!code focus]
```
### Returns
`WebAuthnAccount`
A WebAuthn Account.
### Parameters
#### credential
* **Type:** `P256Credential`
A P256 WebAuthn Credential.
```ts twoslash
import { createWebAuthnCredential, toWebAuthnAccount } from 'viem/account-abstraction'
// ---cut---
const credential = await createWebAuthnCredential({
name: 'Example',
})
const account = toWebAuthnAccount({
credential, // [!code focus]
})
```
#### getFn
* **Type:** `(options: CredentialRequestOptions) => Promise`
* **Default:** `window.navigator.credentials.get`
Credential request function. Useful for environments that do not support the WebAuthn API natively (i.e. React Native or testing environments).
```ts twoslash
// @noErrors
import { createWebAuthnCredential, toWebAuthnAccount } from 'viem/account-abstraction'
// ---cut---
import * as passkey from 'react-native-passkeys' // [!code focus]
const credential = await createWebAuthnCredential({
name: 'Example',
})
const account = toWebAuthnAccount({
credential,
getFn: passkey.get, // [!code focus]
})
```
#### rpId
* **Type:** `string`
* **Default:** `window.location.hostname`
Relying Party ID.
```ts twoslash
// @noErrors
import { createWebAuthnCredential, toWebAuthnAccount } from 'viem/account-abstraction'
// ---cut---
import * as passkey from 'react-native-passkeys' // [!code focus]
const credential = await createWebAuthnCredential({
name: 'Example',
})
const account = toWebAuthnAccount({
credential,
rpId: 'example.com', // [!code focus]
})
```
## toWebAuthnAccount
Creates a **WebAuthn Account** – commonly used for **Smart Account Owners** to sign User Operations and messages on behalf of the Smart Account.
:::note
WebAuthn Account owners are currently supported on the following Smart Account implementations:
* `toCoinbaseSmartAccount`
:::
### Import
```ts twoslash
import { toWebAuthnAccount } from 'viem/account-abstraction'
```
### Usage
```ts twoslash
import {
createWebAuthnCredential,
toWebAuthnAccount
} from 'viem/account-abstraction'
// Register a credential (ie. passkey).
const credential = await createWebAuthnCredential({
name: 'Example',
})
// Create a WebAuthn account from the credential. // [!code focus]
const account = toWebAuthnAccount({ // [!code focus]
credential, // [!code focus]
}) // [!code focus]
```
### Returns
`WebAuthnAccount`
A WebAuthn Account.
### Parameters
#### credential
* **Type:** `P256Credential`
A P256 WebAuthn Credential.
```ts twoslash
import { createWebAuthnCredential, toWebAuthnAccount } from 'viem/account-abstraction'
// ---cut---
const credential = await createWebAuthnCredential({
name: 'Example',
})
const account = toWebAuthnAccount({
credential, // [!code focus]
})
```
#### getFn
* **Type:** `(options: CredentialRequestOptions) => Promise`
* **Default:** `window.navigator.credentials.get`
Credential request function. Useful for environments that do not support the WebAuthn API natively (i.e. React Native or testing environments).
```ts twoslash
// @noErrors
import { createWebAuthnCredential, toWebAuthnAccount } from 'viem/account-abstraction'
// ---cut---
import * as passkey from 'react-native-passkeys' // [!code focus]
const credential = await createWebAuthnCredential({
name: 'Example',
})
const account = toWebAuthnAccount({
credential,
getFn: passkey.get, // [!code focus]
})
```
#### rpId
* **Type:** `string`
* **Default:** `window.location.hostname`
Relying Party ID.
```ts twoslash
// @noErrors
import { createWebAuthnCredential, toWebAuthnAccount } from 'viem/account-abstraction'
// ---cut---
import * as passkey from 'react-native-passkeys' // [!code focus]
const credential = await createWebAuthnCredential({
name: 'Example',
})
const account = toWebAuthnAccount({
credential,
rpId: 'example.com', // [!code focus]
})
```
## Smart Accounts
Our **Smart Account** architecture represents a strategic evolution in account abstraction technology, where account implementation resides within sophisticated **Smart Contracts** that adhere to the [ERC-4337 interface](https://eips.ethereum.org/EIPS/eip-4337#account-contract-interface) specification. This foundational approach enables comprehensive programmable account management within the Abstraxn ecosystem.
### Strategic Architecture Overview
After extensive evaluation of account abstraction methodologies, our team determined that Smart Contract-based account implementation offers the most compelling advantages for the Abstraxn platform. Our analysis prioritized security, flexibility, and seamless multi-ownership capabilities.
A **Smart Account** within our framework can be strategically controlled by one or multiple **Owners**, supporting both [Local](https://abstraxn.com/docs/accounts/local) and [JSON-RPC Account](https://abstraxn.com/docs/accounts/jsonRpc) configurations where compatible. The **Owner Account** maintains responsibility for User Operation authentication (transaction signing) on behalf of the **Smart Account**, with operations subsequently broadcasted to the network infrastructure via strategic [Bundler](https://eips.ethereum.org/EIPS/eip-4337#bundling) integration.
Our deliberative process involved comprehensive analysis of alternative account management architectures. While traditional Externally Owned Account (EOA) mechanisms presented familiar implementation patterns, the Smart Contract approach demonstrated superior alignment with our strategic objectives regarding programmable access control and advanced execution capabilities.
The research team provided nuanced insights, particularly highlighting the importance of owner flexibility and transaction abstraction across diverse application scenarios. Our recommendation represents a collaborative synthesis of technical expertise and strategic vision, designed to drive meaningful innovation in account management workflows.
:::note
**Strategic Compatibility Framework**
Our technical architecture acknowledges that ERC-4337 operates as a supplementary protocol layer rather than core blockchain functionality. This design consideration means that Smart Accounts within the Abstraxn ecosystem maintain distinct operational patterns compared to traditional transaction APIs such as `sendTransaction` and `writeContract`.
Transaction execution is achieved through strategic **User Operation** broadcasting to designated **Bundlers**, which subsequently propagate operations to the network infrastructure with optimized timing.
The most strategically significant Actions for **User Operations** include:
* [`sendUserOperation`](https://abstraxn.com/account-abstraction/actions/bundler/sendUserOperation) (comprehensive support for [Contract Calls](https://abstraxn.com/account-abstraction/actions/bundler/sendUserOperation#contract-calls))
* [`estimateUserOperationGas`](https://abstraxn.com/account-abstraction/actions/bundler/estimateUserOperationGas)
* [`getUserOperation`](https://abstraxn.com/account-abstraction/actions/bundler/getUserOperation)
* [`getUserOperationReceipt`](https://abstraxn.com/account-abstraction/actions/bundler/getUserOperationReceipt)
Our strategic planning anticipates that protocol-level Account Abstraction enshrinement will ultimately enable seamless integration with traditional Transaction APIs, at which point these specialized Actions may transition to complementary rather than primary roles within the platform architecture.
:::
Should additional account management requirements or architectural considerations emerge, we remain prepared to conduct further analysis and refine our Smart Account strategy to maintain optimal alignment with evolving ecosystem demands.
## toSmartAccount
The `toSmartAccount` function allows you to create a Smart Account with a custom Account Implementation.
### Import
```ts
import { toSmartAccount } from 'viem/account-abstraction'
```
### Usage
To instantiate a Smart Account, you will need to provide an Account Implementation.
:::code-group
```ts twoslash [example.ts]
import { coinbase, toSmartAccount } from 'viem/account-abstraction'
import { client, owner } from './config.js'
const account = await toSmartAccount({
client,
entryPoint: {
abi: [/* ... */],
address: '0x0000000071727De22E5E9d8BAf0edAc6f37da032',
version: '0.7',
},
async decodeCalls(data) {
// Decode calls from calldata as defined by the Smart Account contract.
},
async encodeCalls(calls) {
// Encode calls as defined by the Smart Account contract.
},
async getAddress() {
// Get the address of the Smart Account.
},
async getFactoryArgs() {
// Build the Factory properties for the Smart Account.
},
async getNonce() {
// Get the nonce of the Smart Account.
},
async getStubSignature() {
// Get the stub signature for User Operations from the Smart Account.
},
async signMessage(message) {
// Sign message to be verified by the Smart Account contract.
},
async signTypedData(typedData) {
// Sign typed data to be verified by the Smart Account contract.
},
async signUserOperation(userOperation) {
// Sign a User Operation to be broadcasted via the Bundler.
},
// (Optional) Extend the Smart Account with custom properties.
extend: {
abi: [/* ... */],
factory: {
abi: [/* ... */],
address: '0xda4b37208c41c4f6d1b101cac61e182fe1da0754',
},
},
// (Optional) User Operation configuration.
userOperation: {
async estimateGas(userOperation) {
// Estimate gas properties for a User Operation.
},
},
})
```
```ts twoslash [config.ts] filename="config.ts"
import { http, createPublicClient } from 'viem'
import { privateKeyToAccount } from 'viem/accounts'
import { mainnet } from 'viem/chains'
export const owner = privateKeyToAccount('0x...')
export const client = createPublicClient({
chain: mainnet,
transport: http(),
})
```
:::
### Returns
`SmartAccount`
The Smart Account.
## Coinbase Smart Wallet
The `toCoinbaseSmartAccount` implementation references the [Coinbase Smart Wallet](https://github.com/coinbase/smart-wallet) contract.
### Usage
:::code-group
```ts twoslash [example.ts]
import { toCoinbaseSmartAccount } from 'viem/account-abstraction' // [!code focus]
import { client } from './client.js'
import { owner } from './owner.js'
const account = await toCoinbaseSmartAccount({ // [!code focus]
client, // [!code focus]
owners: [owner], // [!code focus]
version: '1.1', // [!code focus]
}) // [!code focus]
```
```ts twoslash [client.ts] filename="config.ts"
import { http, createPublicClient } from 'viem'
import { mainnet } from 'viem/chains'
export const client = createPublicClient({
chain: mainnet,
transport: http(),
})
```
```ts twoslash [owner.ts (Private Key)] filename="owner.ts"
import { privateKeyToAccount } from 'viem/accounts'
export const owner = privateKeyToAccount('0x...')
```
```ts twoslash [owner.ts (Passkey)] filename="owner.ts"
import { createWebAuthnCredential, toWebAuthnAccount } from 'viem/account-abstraction'
// Register a credential (ie. passkey).
const credential = await createWebAuthnCredential({ name: 'Wallet' })
// Create a WebAuthn owner account from the credential.
export const owner = toWebAuthnAccount({ credential })
```
:::
:::tip
**Tip:** You can use a Passkey (WebAuthn) to sign User Operations. Check the **owner.ts (Passkey)** tab.
:::
### Returns
`SmartAccount`
### Parameters
#### client
* **Type:** `Client`
Client used to retrieve Smart Account data.
```ts
const client = createPublicClient({ // [!code focus]
chain: mainnet, // [!code focus]
transport: http(), // [!code focus]
}) // [!code focus]
const account = await toCoinbaseSmartAccount({
client, // [!code focus]
owners: [owner],
version: '1.1',
})
```
#### owners
* **Type:** `(LocalAccount | WebAuthnAccount)[]`
Owners of the Smart Account. Can be a Local Account or a WebAuthn Account (Passkey)
```ts
const account = await toCoinbaseSmartAccount({
client,
owners: [privateKeyToAccount('0x...')], // [!code focus]
})
```
#### ownerIndex (optional)
* **Type:** `number`
Index of the owner to use for signing messages & User Operations.
```ts
const account = await toCoinbaseSmartAccount({
client,
owners: [privateKeyToAccount('0x...'), privateKeyToAccount('0x...')],
ownerIndex: 1, // [!code focus]
version: '1.1',
})
```
#### nonce (optional)
* **Type:** `bigint`
Nonce to use for the Smart Account.
```ts
const account = await toCoinbaseSmartAccount({
client,
owners: [owner],
nonce: 1n, // [!code focus]
version: '1.1',
})
```
#### version
* **Type:** `'1.1' | '1'`
* **Default:** `'1'`
Version of the Smart Account to use.
:::warning
Version bumps DO contain breaking changes.
:::
```ts
const account = await toCoinbaseSmartAccount({
client,
owners: [owner],
version: '1', // [!code focus]
})
```
## Kernel (ZeroDev) Smart Account
:::warning
**Note:** This implementation is maintained & distributed by permissionless.js.
:::
To implement the [Kernel (ZeroDev) Smart Account](https://github.com/zerodevapp/kernel), you can use the `toEcdsaKernelSmartAccount` module from permissionless.js
### Install
:::code-group
```bash [pnpm]
pnpm add permissionless
```
```bash [npm]
npm install permissionless
```
```bash [yarn]
yarn add permissionless
```
```bash [bun]
bun add permissionless
```
:::
### Usage
:::code-group
```ts twoslash [example.ts]
import { toEcdsaKernelSmartAccount } from 'permissionless/accounts' // [!code focus]
import { client } from './client.js'
import { owner } from './owner.js'
const account = await toEcdsaKernelSmartAccount({ // [!code focus]
client, // [!code focus]
owners: [owner], // [!code focus]
version: '0.3.1', // [!code focus]
}) // [!code focus]
```
```ts twoslash [client.ts] filename="config.ts"
import { http, createPublicClient } from 'viem'
import { mainnet } from 'viem/chains'
export const client = createPublicClient({
chain: mainnet,
transport: http(),
})
```
```ts twoslash [owner.ts (Private Key)] filename="owner.ts"
import { privateKeyToAccount } from 'viem/accounts'
export const owner = privateKeyToAccount('0x...')
```
:::
### Returns
`SmartAccount`
## Light Smart Account
:::warning
**Note:** This implementation is maintained & distributed by permissionless.js.
:::
To implement Alchemy's [Light Account](https://github.com/alchemyplatform/light-account), you can use the `toLightSmartAccount` module from permissionless.js
### Install
:::code-group
```bash [pnpm]
pnpm add permissionless
```
```bash [npm]
npm install permissionless
```
```bash [yarn]
yarn add permissionless
```
```bash [bun]
bun add permissionless
```
:::
### Usage
:::code-group
```ts twoslash [example.ts]
import { toLightSmartAccount } from 'permissionless/accounts' // [!code focus]
import { client } from './client.js'
import { owner } from './owner.js'
const account = await toLightSmartAccount({ // [!code focus]
client, // [!code focus]
owner: owner, // [!code focus]
version: '2.0.0', // [!code focus]
}) // [!code focus]
```
```ts twoslash [client.ts] filename="config.ts"
import { http, createPublicClient } from 'viem'
import { mainnet } from 'viem/chains'
export const client = createPublicClient({
chain: mainnet,
transport: http(),
})
```
```ts twoslash [owner.ts (Private Key)] filename="owner.ts"
import { privateKeyToAccount } from 'viem/accounts'
export const owner = privateKeyToAccount('0x...')
```
:::
### Returns
`SmartAccount`
## MetaMask Smart Account
:::warning
**Note:** This implementation is maintained & distributed by [MetaMask Delegation Toolkit](https://docs.metamask.io/delegation-toolkit).
:::
MetaMask Smart Account has two types of implementations, each offering unique features
and use cases. See [Hybrid Smart Account](https://docs.metamask.io/delegation-toolkit/how-to/create-smart-account/configure-accounts-signers/#configure-a-hybrid-smart-account) and [Multisig Smart Account](https://docs.metamask.io/delegation-toolkit/how-to/create-smart-account/configure-accounts-signers/#configure-a-multisig-smart-account) to learn more about
the implementations.
To implement MetaMask Smart Account, you can use the [`toMetaMaskSmartAccount`](https://docs.metamask.io/delegation-toolkit/how-to/create-smart-account/#create-a-metamasksmartaccount) function from [delegation toolkit](https://docs.metamask.io/delegation-toolkit/).
### Install
:::code-group
```bash [pnpm]
pnpm add @metamask/delegation-toolkit
```
```bash [npm]
npm install @metamask/delegation-toolkit
```
```bash [yarn]
yarn add @metamask/delegation-toolkit
```
```bash [bun]
bun add @metamask/delegation-toolkit
```
:::
### Usage
:::code-group
```ts twoslash [example.ts]
import { // [!code focus]
Implementation, // [!code focus]
toMetaMaskSmartAccount, // [!code focus]
} from "@metamask/delegation-toolkit" // [!code focus]
import { client } from './client.js'
import { owner } from './owner.js'
const account = await toMetaMaskSmartAccount({ // [!code focus]
client, // [!code focus]
implementation: Implementation.Hybrid, // [!code focus]
deployParams: [owner.address, [], [], []], // [!code focus]
deploySalt: "0x", // [!code focus]
signatory: { account: owner }, // [!code focus]
}) // [!code focus]
```
```ts twoslash [client.ts] filename="config.ts"
import { http, createPublicClient } from 'viem'
import { mainnet } from 'viem/chains'
export const client = createPublicClient({
chain: mainnet,
transport: http(),
})
```
```ts twoslash [owner.ts (Private Key)] filename="owner.ts"
import { privateKeyToAccount } from 'viem/accounts'
export const owner = privateKeyToAccount('0x...')
```
:::
### Returns
`SmartAccount>`
### Parameters
[See Parameters](https://docs.metamask.io/delegation-toolkit/reference/api/smart-account/#parameters-5)
## Nexus Smart Account
:::warning
**Note:** This implementation is maintained & distributed by permissionless.js.
:::
To implement Biconomy's [Nexus Smart Account](https://github.com/bcnmy/nexus), you can use the `toNexusSmartAccount` module from permissionless.js
### Install
:::code-group
```bash [pnpm]
pnpm add permissionless
```
```bash [npm]
npm install permissionless
```
```bash [yarn]
yarn add permissionless
```
```bash [bun]
bun add permissionless
```
:::
### Usage
:::code-group
```ts twoslash [example.ts]
import { toNexusSmartAccount } from 'permissionless/accounts' // [!code focus]
import { client } from './client.js'
import { owner } from './owner.js'
const account = await toNexusSmartAccount({ // [!code focus]
client, // [!code focus]
owners: [owner], // [!code focus]
version: '1.0.0' // [!code focus]
}) // [!code focus]
```
```ts twoslash [client.ts] filename="config.ts"
import { http, createPublicClient } from 'viem'
import { mainnet } from 'viem/chains'
export const client = createPublicClient({
chain: mainnet,
transport: http(),
})
```
```ts twoslash [owner.ts (Private Key)] filename="owner.ts"
import { privateKeyToAccount } from 'viem/accounts'
export const owner = privateKeyToAccount('0x...')
```
:::
### Returns
`SmartAccount`
## Safe Smart Account
:::warning
**Note:** This implementation is maintained & distributed by permissionless.js.
:::
To implement [Safe Smart Account](https://github.com/safe-global/safe-smart-account), you can use the `toSafeSmartAccount` module from permissionless.js
### Install
:::code-group
```bash [pnpm]
pnpm add permissionless
```
```bash [npm]
npm install permissionless
```
```bash [yarn]
yarn add permissionless
```
```bash [bun]
bun add permissionless
```
:::
### Usage
:::code-group
```ts twoslash [example.ts]
import { toSafeSmartAccount } from 'permissionless/accounts' // [!code focus]
import { client } from './client.js'
import { owner } from './owner.js'
const account = await toSafeSmartAccount({ // [!code focus]
client, // [!code focus]
owners: [owner], // [!code focus]
version: '1.4.1', // [!code focus]
}) // [!code focus]
```
```ts twoslash [client.ts] filename="config.ts"
import { http, createPublicClient } from 'viem'
import { mainnet } from 'viem/chains'
export const client = createPublicClient({
chain: mainnet,
transport: http(),
})
```
```ts twoslash [owner.ts (Private Key)] filename="owner.ts"
import { privateKeyToAccount } from 'viem/accounts'
export const owner = privateKeyToAccount('0x...')
```
:::
### Returns
`SmartAccount`
## Simple Smart Account
:::warning
**Note:** This implementation is maintained & distributed by permissionless.js.
:::
To implement the [Simple Smart Account](https://github.com/eth-infinitism/account-abstraction/blob/develop/contracts/samples/SimpleAccount.sol), you can use the `toSimpleSmartAccount` module from permissionless.js
### Install
:::code-group
```bash [pnpm]
pnpm add permissionless
```
```bash [npm]
npm install permissionless
```
```bash [yarn]
yarn add permissionless
```
```bash [bun]
bun add permissionless
```
:::
### Usage
:::code-group
```ts twoslash [example.ts]
import { toSimpleSmartAccount } from 'permissionless/accounts' // [!code focus]
import { client } from './client.js'
import { owner } from './owner.js'
const account = await toSimpleSmartAccount({ // [!code focus]
client, // [!code focus]
owners: [owner], // [!code focus]
}) // [!code focus]
```
```ts twoslash [client.ts] filename="config.ts"
import { http, createPublicClient } from 'viem'
import { mainnet } from 'viem/chains'
export const client = createPublicClient({
chain: mainnet,
transport: http(),
})
```
```ts twoslash [owner.ts (Private Key)] filename="owner.ts"
import { privateKeyToAccount } from 'viem/accounts'
export const owner = privateKeyToAccount('0x...')
```
:::
### Returns
`SmartAccount`
## Solady Smart Account
The `toSoladySmartAccount` simple Smart Account Implementation that references [Solady's `ERC4337.sol`](https://github.com/Vectorized/solady/blob/main/src/accounts/ERC4337.sol) Smart Account contract.
:::warning
This implementation is unaudited. It is intended to be used for testing purposes or as a reference to implement a Custom Account.
:::
### Usage
:::code-group
```ts twoslash [example.ts]
import { toSoladySmartAccount } from 'viem/account-abstraction' // [!code focus]
import { client, owner } from './config.js'
const account = await toSoladySmartAccount({ // [!code focus]
client, // [!code focus]
owner, // [!code focus]
}) // [!code focus]
```
```ts twoslash [config.ts] filename="config.ts"
import { http, createPublicClient } from 'viem'
import { privateKeyToAccount } from 'viem/accounts'
import { mainnet } from 'viem/chains'
export const owner = privateKeyToAccount('0x...')
export const client = createPublicClient({
chain: mainnet,
transport: http(),
})
```
:::
### Returns
`SmartAccount`
### Parameters
#### entryPoint (optional)
* **Type:** `{ abi: Abi, address: Address, version: EntryPointVersion }`
Compatible EntryPoint for the Smart Account to reference. The EntryPoint is used
to:
* Determine the target EntryPoint address for the User Operation
* Compute User Operation hashes
* Retrieve the Smart Account nonce
* Distinguish which type of `UserOperation` structure to use
```ts
const account = await toSoladySmartAccount({
client,
entryPoint: { // [!code focus]
abi: [/* ... */], // [!code focus]
address: '0x0000000071727De22E5E9d8BAf0edAc6f37da032', // [!code focus]
version: '0.7', // [!code focus]
}, // [!code focus]
owner,
})
```
#### factoryAddress
* **Type:** `Address`
Factory address of the Smart Account.
```ts
const account = await toSoladySmartAccount({
client,
factoryAddress: '0xda4b37208c41c4f6d1b101cac61e182fe1da0754', // [!code focus]
owner,
})
```
#### owner
* **Type:** `Address | Account`
Owner of the Smart Account.
```ts
const account = await toSoladySmartAccount({
client,
owner: privateKeyToAccount('0x...'), // [!code focus]
})
```
#### salt (optional)
* **Type:** `Hex`
Salt to use for Smart Account deployment.
```ts
const account = await toSoladySmartAccount({
client,
owner,
salt: '0x5', // [!code focus]
})
```
## Thirdweb Smart Account
:::warning
**Note:** This implementation is maintained & distributed by permissionless.js.
:::
To implement [Thirdweb Smart Account](https://portal.thirdweb.com/), you can use the `toThirdwebSmartAccount` module from permissionless.js
### Install
:::code-group
```bash [pnpm]
pnpm add permissionless
```
```bash [npm]
npm install permissionless
```
```bash [yarn]
yarn add permissionless
```
```bash [bun]
bun add permissionless
```
:::
### Usage
:::code-group
```ts twoslash [example.ts]
import { toThirdwebSmartAccount } from 'permissionless/accounts' // [!code focus]
import { client } from './client.js'
import { owner } from './owner.js'
const account = await toThirdwebSmartAccount({ // [!code focus]
client, // [!code focus]
owner, // [!code focus]
}) // [!code focus]
```
```ts twoslash [client.ts] filename="config.ts"
import { http, createPublicClient } from 'viem'
import { mainnet } from 'viem/chains'
export const client = createPublicClient({
chain: mainnet,
transport: http(),
})
```
```ts twoslash [owner.ts (Private Key)] filename="owner.ts"
import { privateKeyToAccount } from 'viem/accounts'
export const owner = privateKeyToAccount('0x...')
```
:::
### Returns
`SmartAccount`
## Trust Smart Account
:::warning
**Note:** This implementation is maintained & distributed by permissionless.js.
:::
To implement the [Trust Smart Wallet](https://developer.trustwallet.com/developer/barz-smart-wallet/build-with-trust-wallet-and-barz-aa-sdk), you can use the `toTrustSmartAccount` module from permissionless.js
### Install
:::code-group
```bash [pnpm]
pnpm add permissionless
```
```bash [npm]
npm install permissionless
```
```bash [yarn]
yarn add permissionless
```
```bash [bun]
bun add permissionless
```
:::
### Usage
:::code-group
```ts twoslash [example.ts]
import { toTrustSmartAccount } from 'permissionless/accounts' // [!code focus]
import { client } from './client.js'
import { owner } from './owner.js'
const account = await toTrustSmartAccount({ // [!code focus]
client, // [!code focus]
owner: owner, // [!code focus]
}) // [!code focus]
```
```ts twoslash [client.ts] filename="config.ts"
import { http, createPublicClient } from 'viem'
import { mainnet } from 'viem/chains'
export const client = createPublicClient({
chain: mainnet,
transport: http(),
})
```
```ts twoslash [owner.ts (Private Key)] filename="owner.ts"
import { privateKeyToAccount } from 'viem/accounts'
export const owner = privateKeyToAccount('0x...')
```
:::
### Returns
`SmartAccount`
## ChatAI SDK
Our ChatAI SDK represents a strategic advancement in conversational AI integration, providing sophisticated communication capabilities with the ChatAI API infrastructure. This comprehensive framework delivers streamlined methodologies for both real-time streaming and traditional chat interactions within the Abstraxn ecosystem.
### Strategic Installation Framework
After extensive evaluation of package management approaches, our team recommends the following installation methodology for optimal SDK integration:
:::code-group
```bash [npm]
npm install @abstraxn/chat-ai
```
Alternative package manager support:
```bash [Yarn]
yarn add @abstraxn/chat-ai
```
:::
### Implementation Quick Start
Our deliberative analysis of developer experience optimization has produced the following streamlined initialization approach:
```typescript
import { ChatAIClient } from "@abstraxn/chat-ai";
const client = new ChatAIClient({
apiKey: "your-api-key-here",
});
// Strategic chat execution
const response = await client.chat("What is machine learning?");
console.log(response.response);
```
### Strategic Feature Architecture
Our comprehensive ChatAI SDK provides sophisticated capabilities designed to enhance conversational AI integration within the Abstraxn platform:
* **Simplified API Framework** - Streamlined implementation with minimal configuration overhead
* **Advanced Streaming Capabilities** - Real-time response delivery through Server-Sent Events architecture
* **Intelligent Session Management** - Persistent conversation context across multiple interaction cycles
* **Cross-Origin Resource Sharing** - Configurable header management for diverse deployment scenarios
* **Comprehensive TypeScript Integration** - Complete type definitions for enhanced development experience
* **Sophisticated Error Management** - Detailed error handling with comprehensive diagnostic messaging
* **Flexible Header Configuration** - Support for additional HTTP headers and custom request modifications
### Implementation Examples
#### Foundational Chat Implementation
Our research team developed the following approach for non-streaming conversational interactions:
```typescript
import { ChatAIClient } from "@abstraxn/chat-ai";
const client = new ChatAIClient({
apiKey: "your-api-key",
});
async function basicChat() {
try {
const response = await client.chat("What is artificial intelligence?");
console.log("AI Response:", response.response);
console.log("Session ID:", response.sessionId);
} catch (error) {
console.error("Error:", error.message);
}
}
basicChat();
```
#### Advanced Streaming Architecture
For real-time conversational experiences, our framework supports sophisticated streaming capabilities:
```typescript
import { ChatAIClient } from "@abstraxn/chat-ai";
const client = new ChatAIClient({
apiKey: "your-api-key",
});
async function streamingChat() {
try {
const stream = await client.chatStream("Explain deep learning in detail");
for await (const chunk of stream) {
if (chunk.type === "content") {
process.stdout.write(chunk.content); // Real-time content delivery
}
if (chunk.type === "done") {
console.log("\n[Stream execution complete]");
}
}
} catch (error) {
console.error("Streaming execution error:", error.message);
}
}
streamingChat();
```
#### Strategic Session Management
Our session management architecture enables persistent conversational context across multiple interactions:
```typescript
import { ChatAIClient } from "@abstraxn/chat-ai";
const client = new ChatAIClient({ apiKey: "your-api-key" });
async function conversation() {
const sessionId = "user-session-123";
// Initial conversation establishment
const response1 = await client.chat("Hello, my name is John", {
sessionId: sessionId,
});
console.log("AI:", response1.response);
// Context-aware follow-up interaction
const response2 = await client.chat("What is my name?", {
sessionId: sessionId,
});
console.log("AI:", response2.response);
}
```
#### Advanced Configuration Framework
Our flexible architecture supports sophisticated header management and cross-origin configuration:
```typescript
const client = new ChatAIClient({
apiKey: "your-api-key",
origin: "https://my-frontend.com",
headers: {
"X-Request-ID": "abc123",
"X-Client-Version": "1.0.0",
},
});
```
#### Comprehensive Error Management
Our error handling framework provides detailed diagnostic capabilities:
```typescript
try {
const response = await client.chat("Tell me about AI");
console.log(response.response);
} catch (error) {
if (error.status) {
console.error(`API Error ${error.status}:`, error.message);
} else {
console.error("Network Error:", error.message);
}
}
```
### Technical API Reference
#### ChatAIClient Architecture
##### Constructor Configuration
```typescript
new ChatAIClient(config);
```
**Strategic Configuration Options:**
* `apiKey` (required): Authentication credential for ChatAI API access
* `timeout` (optional): Request timeout duration in milliseconds (default: 30000)
* `origin` (optional): Cross-origin resource sharing header specification (default: \*)
* `headers` (optional): Additional custom HTTP headers for request modification
##### Core Methods
##### chat(query, options)
Execute conversational interaction with complete response delivery.
**Parameters:**
* `query` (string): Message content for AI processing
* `options` (object, optional):
* `sessionId` (string, optional): Session identifier for conversation continuity
* `stream` (boolean, optional): Force non-streaming execution mode (default: false)
**Returns:** `Promise`
##### chatStream(query, options)
Execute conversational interaction with real-time streaming response delivery.
**Parameters:**
* `query` (string): Message content for AI processing
* `options` (object, optional):
* `sessionId` (string, optional): Session identifier for conversation continuity
**Returns:** `AsyncGenerator`
### Type Definitions
#### ChatResponse Interface
```typescript
interface ChatResponse {
error: boolean;
sessionId: string;
response: string;
outOfContext?: boolean;
}
```
#### ChatChunk Interface
```typescript
interface ChatChunk {
type: "session" | "content" | "done" | "error";
sessionId?: string;
content?: string;
timestamp?: string;
timing?: {
total: number;
};
outOfContext?: boolean;
message?: string;
}
```
Our ChatAI SDK represents a collaborative synthesis of conversational AI capabilities with Abstraxn's technical excellence standards. Should additional integration requirements or architectural considerations emerge, we remain prepared to conduct further analysis and enhance our ChatAI framework to maintain optimal alignment with evolving conversational AI demands.
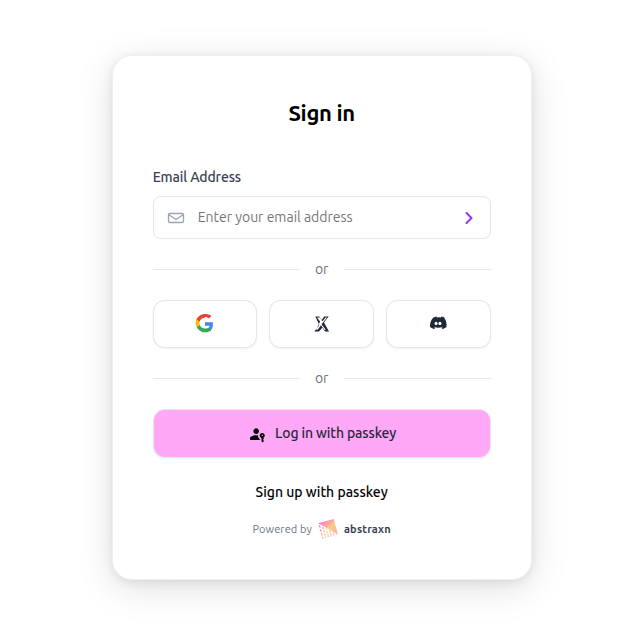 > You can also follow the [Quickstart in the Dashboard](https://dashboard.abstraxn.com/services/smart-wallets/quickstart).
### 1. Clone template repo
```bash
npx create-next-app my-abstraxn-wallets-app -e https://github.com/abstraxn/smart-wallets-quickstart
cd my-abstraxn-wallets-app
```
:::info
**Note:** The template repository URL is a placeholder. Once your demo repository is ready, update this URL with the actual repository link.
:::
### 2. Set up environment
Once you have your project cloned down and you are in the `my-abstraxn-wallets-app` level in your terminal, go to your project's root, create a `.env` file and copy-paste the following into it:
```shell
# Paste this in your .env file
NEXT_PUBLIC_ABSTRAXN_API_KEY=YOUR_ABSTRAXN_API_KEY
```
#### Get Your API Key
1. Visit [https://dashboard.abstraxn.com/](https://dashboard.abstraxn.com/)
2. Log in or sign up
3. Go to **Apps** → click **Create New App**
4. Navigate to **Wallets** → click **Add Wallet Service**
5. Click **View Details** → copy your **API Key**
### 3. Run app
In your terminal, run:
```bash
npm run dev
```
Your `localhost:3000` should now display the following:
> You can also follow the [Quickstart in the Dashboard](https://dashboard.abstraxn.com/services/smart-wallets/quickstart).
### 1. Clone template repo
```bash
npx create-next-app my-abstraxn-wallets-app -e https://github.com/abstraxn/smart-wallets-quickstart
cd my-abstraxn-wallets-app
```
:::info
**Note:** The template repository URL is a placeholder. Once your demo repository is ready, update this URL with the actual repository link.
:::
### 2. Set up environment
Once you have your project cloned down and you are in the `my-abstraxn-wallets-app` level in your terminal, go to your project's root, create a `.env` file and copy-paste the following into it:
```shell
# Paste this in your .env file
NEXT_PUBLIC_ABSTRAXN_API_KEY=YOUR_ABSTRAXN_API_KEY
```
#### Get Your API Key
1. Visit [https://dashboard.abstraxn.com/](https://dashboard.abstraxn.com/)
2. Log in or sign up
3. Go to **Apps** → click **Create New App**
4. Navigate to **Wallets** → click **Add Wallet Service**
5. Click **View Details** → copy your **API Key**
### 3. Run app
In your terminal, run:
```bash
npm run dev
```
Your `localhost:3000` should now display the following:
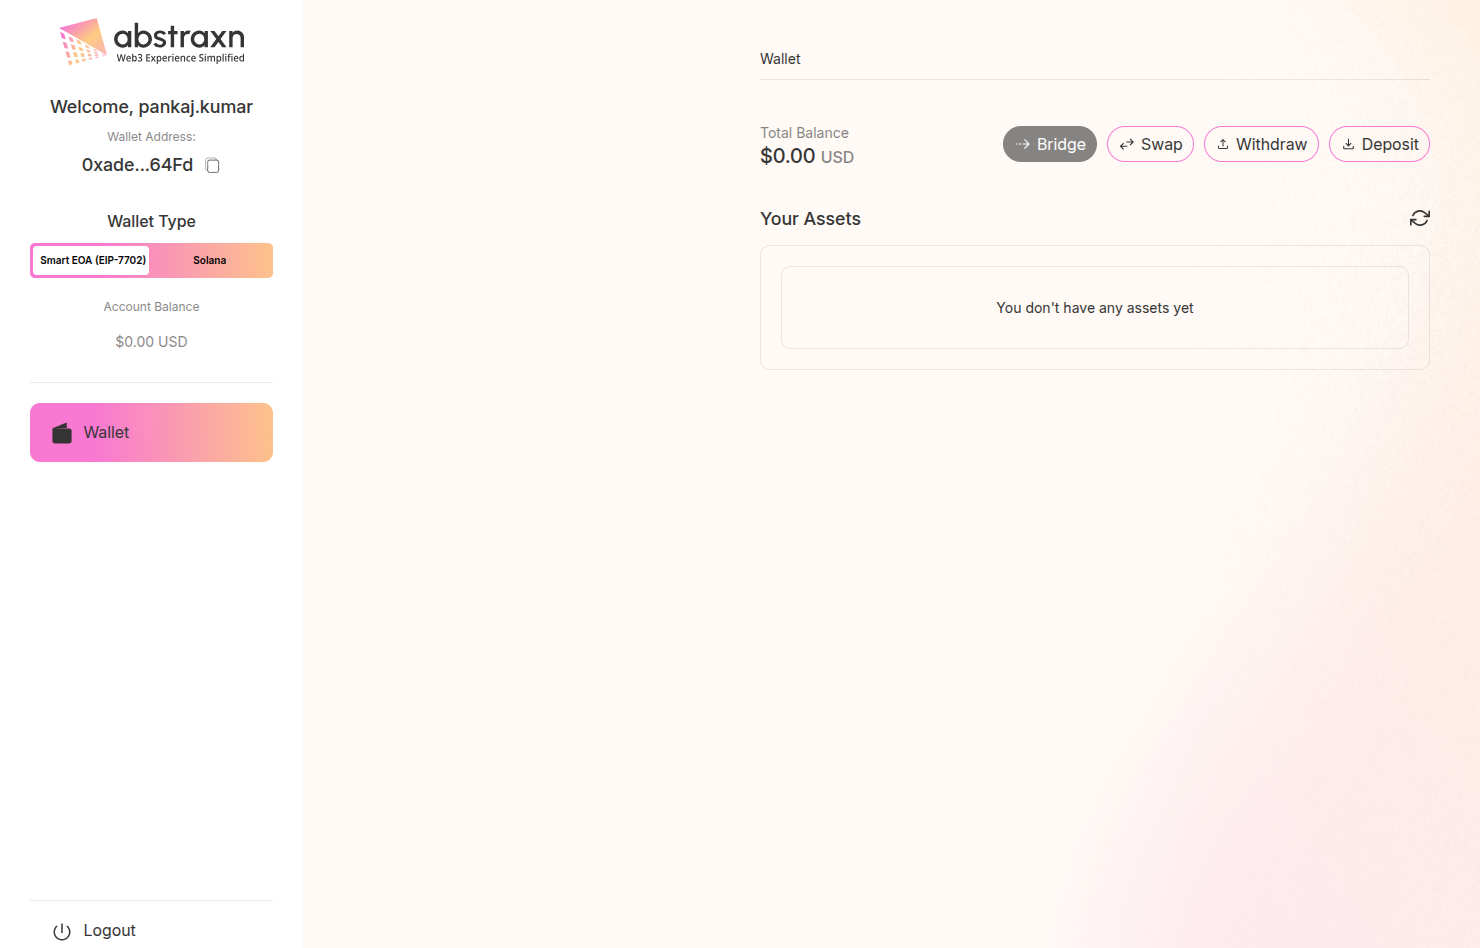 ### 4. Log in and view the app
You can use a service like [Temp Mail](https://temp-mail.org/en/) to test logins with throwaway email accounts.
> Note: Social login will not work just yet!
Once you use an email, you will receive a 6-digit authentication code. Copy-paste it into the following screen:
### 4. Log in and view the app
You can use a service like [Temp Mail](https://temp-mail.org/en/) to test logins with throwaway email accounts.
> Note: Social login will not work just yet!
Once you use an email, you will receive a 6-digit authentication code. Copy-paste it into the following screen:
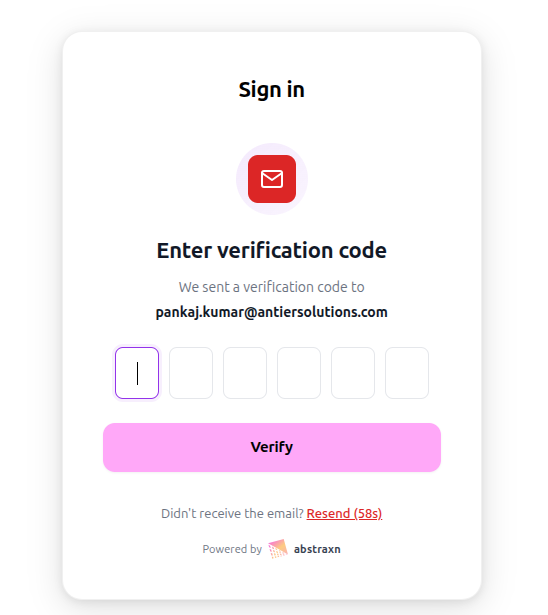 Once you have signed in, you can interact with your wallet! 🎉
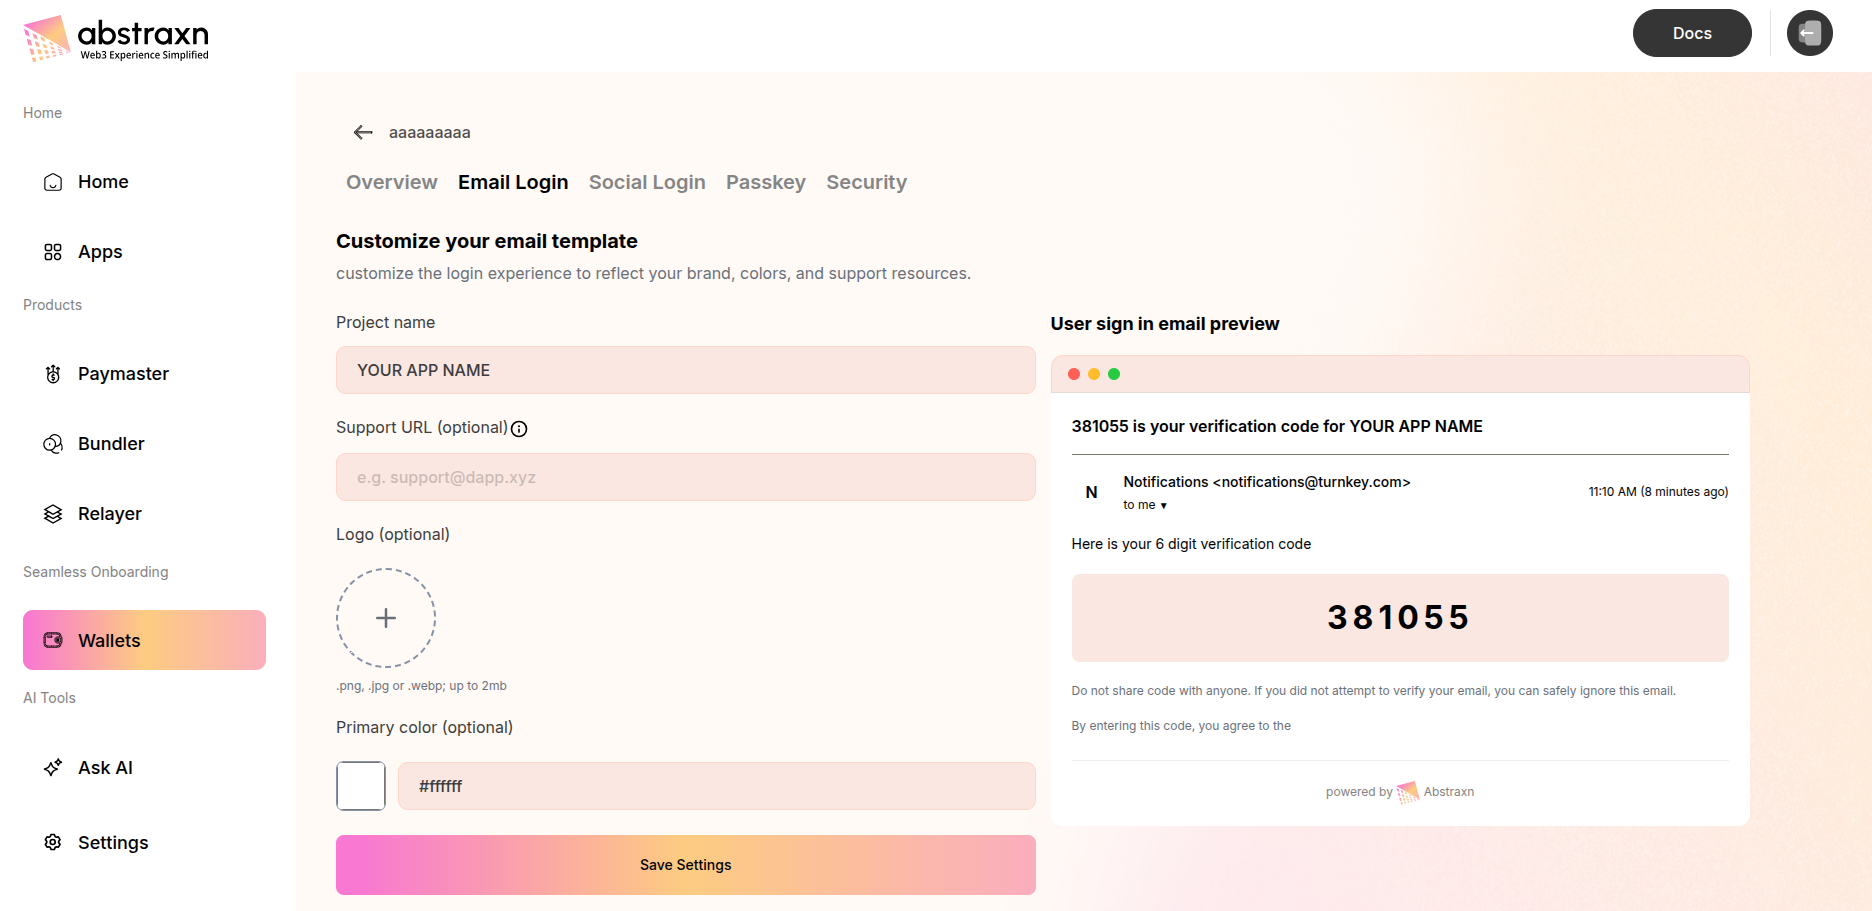 #### Available Customization Options
##### Project Name
Set your application name that will appear in the email subject and body:
* **Field**: Project name
* **Default**: "YOUR APP NAME"
* **Usage**: This name appears in the email subject line and verification code message
##### Support URL (Optional)
Add a support URL where users can get help:
* **Field**: Support URL (optional)
* **Format**: e.g., `support@dapp.xyz` or `https://support.yourdomain.com`
* **Purpose**: Provides users with a way to contact support if they encounter issues
##### Logo (Optional)
Upload your application logo to appear in the email:
* **Field**: Logo (optional)
* **Accepted formats**: `.png`, `.jpg`, or `.webp`
* **Size limit**: Up to 2MB
* **Display**: Logo appears in the email template to reinforce your brand identity
##### Primary Color (Optional)
Set your brand's primary color for the email template:
* **Field**: Primary color (optional)
* **Format**: Hex color code (e.g., `#9333ea`)
* **Usage**: Applied to buttons, highlights, and accent elements in the email
#### Email Preview
The dashboard provides a live preview of how your verification email will appear to users. The preview shows:
* Email subject line with verification code
* Sender information
* Branded email body with your logo and colors
* 6-digit verification code display
* Security disclaimer text
#### Saving Settings
After configuring your email template settings, click **Save Settings** to apply your changes. The updated template will be used for all future email verification codes sent to your users.
### Social Login Configuration
Enable and configure social authentication providers to allow users to sign in with their existing accounts from popular services.
#### Accessing Social Login Settings
1. Navigate to your app in the [Abstraxn Dashboard](https://dashboard.abstraxn.com/)
2. Go to **Wallets** → Select your wallet service
3. Click on the **Social Login** tab
#### Available Customization Options
##### Project Name
Set your application name that will appear in the email subject and body:
* **Field**: Project name
* **Default**: "YOUR APP NAME"
* **Usage**: This name appears in the email subject line and verification code message
##### Support URL (Optional)
Add a support URL where users can get help:
* **Field**: Support URL (optional)
* **Format**: e.g., `support@dapp.xyz` or `https://support.yourdomain.com`
* **Purpose**: Provides users with a way to contact support if they encounter issues
##### Logo (Optional)
Upload your application logo to appear in the email:
* **Field**: Logo (optional)
* **Accepted formats**: `.png`, `.jpg`, or `.webp`
* **Size limit**: Up to 2MB
* **Display**: Logo appears in the email template to reinforce your brand identity
##### Primary Color (Optional)
Set your brand's primary color for the email template:
* **Field**: Primary color (optional)
* **Format**: Hex color code (e.g., `#9333ea`)
* **Usage**: Applied to buttons, highlights, and accent elements in the email
#### Email Preview
The dashboard provides a live preview of how your verification email will appear to users. The preview shows:
* Email subject line with verification code
* Sender information
* Branded email body with your logo and colors
* 6-digit verification code display
* Security disclaimer text
#### Saving Settings
After configuring your email template settings, click **Save Settings** to apply your changes. The updated template will be used for all future email verification codes sent to your users.
### Social Login Configuration
Enable and configure social authentication providers to allow users to sign in with their existing accounts from popular services.
#### Accessing Social Login Settings
1. Navigate to your app in the [Abstraxn Dashboard](https://dashboard.abstraxn.com/)
2. Go to **Wallets** → Select your wallet service
3. Click on the **Social Login** tab
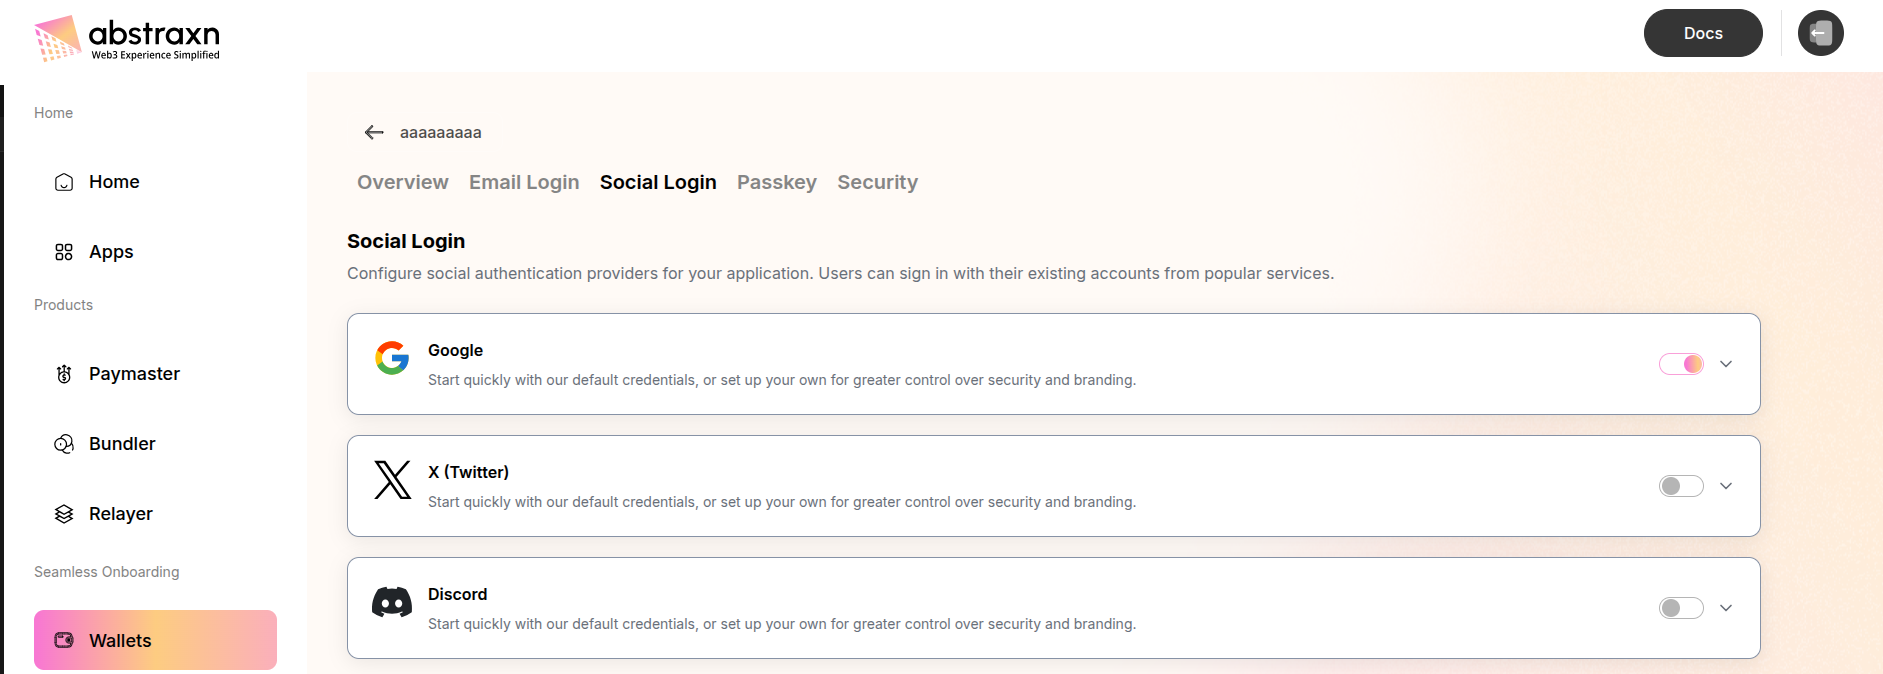 #### Available Social Providers
##### Google Social Login
Enable Google OAuth authentication for your application.
**Configuration Options:**
* **Toggle**: Enable/disable Google login
* **Client ID (optional)**: Your Google OAuth Client ID
* Format: `e.g. ey1289x....`
* Leave empty to use Abstraxn's default credentials
* **Client Secret (optional)**: Your Google OAuth Client Secret
* Format: Secret key from Google Console
* Toggle visibility with the eye icon
**Using Default Credentials:**
* Start quickly with Abstraxn's default Google credentials
* No additional setup required
* Suitable for development and testing
**Using Your Own Credentials:**
For production or greater control over security and branding:
1. Create a project in [Google Cloud Console](https://console.cloud.google.com/)
2. Enable Google+ API
3. Create OAuth 2.0 credentials
4. Add the callback URL provided by Abstraxn to your Google Console API client
5. Copy your Client ID and Client Secret to the dashboard
6. Click the copy icon next to the callback URL message to copy the required callback URL
##### X (Twitter) Social Login
Enable X (formerly Twitter) OAuth authentication for your application.
**Configuration Options:**
* **Toggle**: Enable/disable X login
* **Client ID (optional)**: Your X OAuth Client ID
* Format: `e.g. ey1289x....`
* Leave empty to use Abstraxn's default credentials
* **Client Secret (optional)**: Your X OAuth Client Secret
* Format: Secret key from X Developer Portal
* Toggle visibility with the eye icon
**Using Default Credentials:**
* Start quickly with Abstraxn's default X credentials
* No additional setup required
* Suitable for development and testing
**Using Your Own Credentials:**
For production or greater control:
1. Create an app in [X Developer Portal](https://developer.twitter.com/)
2. Configure OAuth 2.0 settings
3. Add the callback URL provided by Abstraxn to your X Console API client
4. Copy your Client ID and Client Secret to the dashboard
5. Click the copy icon next to the callback URL message to copy the required callback URL
##### Discord Social Login
Enable Discord OAuth authentication for your application.
**Configuration Options:**
* **Toggle**: Enable/disable Discord login
* **Client ID (optional)**: Your Discord OAuth Client ID
* **Client Secret (optional)**: Your Discord OAuth Client Secret
**Setup Steps:**
1. Create an application in [Discord Developer Portal](https://discord.com/developers/applications)
2. Configure OAuth2 redirect URI
3. Add the callback URL provided by Abstraxn
4. Copy your Client ID and Client Secret to the dashboard
#### Enabling Social Login in Your App
After configuring social login providers in the dashboard, you can enable them in your application code:
```tsx
const providerConfig: AbstraxnProviderConfig = {
apiKey: process.env.NEXT_PUBLIC_ABSTRAXN_API_KEY,
ui: {
authMethods: ["otp", "google", "twitter", "discord"], // Enable configured providers
},
};
```
### Passkey Authentication
Enable Passkey (WebAuthn) authentication to allow users to sign in using biometric authentication or security keys.
#### Accessing Passkey Settings
1. Navigate to your app in the [Abstraxn Dashboard](https://dashboard.abstraxn.com/)
2. Go to **Wallets** → Select your wallet service
3. Click on the **Passkey** tab
#### Available Social Providers
##### Google Social Login
Enable Google OAuth authentication for your application.
**Configuration Options:**
* **Toggle**: Enable/disable Google login
* **Client ID (optional)**: Your Google OAuth Client ID
* Format: `e.g. ey1289x....`
* Leave empty to use Abstraxn's default credentials
* **Client Secret (optional)**: Your Google OAuth Client Secret
* Format: Secret key from Google Console
* Toggle visibility with the eye icon
**Using Default Credentials:**
* Start quickly with Abstraxn's default Google credentials
* No additional setup required
* Suitable for development and testing
**Using Your Own Credentials:**
For production or greater control over security and branding:
1. Create a project in [Google Cloud Console](https://console.cloud.google.com/)
2. Enable Google+ API
3. Create OAuth 2.0 credentials
4. Add the callback URL provided by Abstraxn to your Google Console API client
5. Copy your Client ID and Client Secret to the dashboard
6. Click the copy icon next to the callback URL message to copy the required callback URL
##### X (Twitter) Social Login
Enable X (formerly Twitter) OAuth authentication for your application.
**Configuration Options:**
* **Toggle**: Enable/disable X login
* **Client ID (optional)**: Your X OAuth Client ID
* Format: `e.g. ey1289x....`
* Leave empty to use Abstraxn's default credentials
* **Client Secret (optional)**: Your X OAuth Client Secret
* Format: Secret key from X Developer Portal
* Toggle visibility with the eye icon
**Using Default Credentials:**
* Start quickly with Abstraxn's default X credentials
* No additional setup required
* Suitable for development and testing
**Using Your Own Credentials:**
For production or greater control:
1. Create an app in [X Developer Portal](https://developer.twitter.com/)
2. Configure OAuth 2.0 settings
3. Add the callback URL provided by Abstraxn to your X Console API client
4. Copy your Client ID and Client Secret to the dashboard
5. Click the copy icon next to the callback URL message to copy the required callback URL
##### Discord Social Login
Enable Discord OAuth authentication for your application.
**Configuration Options:**
* **Toggle**: Enable/disable Discord login
* **Client ID (optional)**: Your Discord OAuth Client ID
* **Client Secret (optional)**: Your Discord OAuth Client Secret
**Setup Steps:**
1. Create an application in [Discord Developer Portal](https://discord.com/developers/applications)
2. Configure OAuth2 redirect URI
3. Add the callback URL provided by Abstraxn
4. Copy your Client ID and Client Secret to the dashboard
#### Enabling Social Login in Your App
After configuring social login providers in the dashboard, you can enable them in your application code:
```tsx
const providerConfig: AbstraxnProviderConfig = {
apiKey: process.env.NEXT_PUBLIC_ABSTRAXN_API_KEY,
ui: {
authMethods: ["otp", "google", "twitter", "discord"], // Enable configured providers
},
};
```
### Passkey Authentication
Enable Passkey (WebAuthn) authentication to allow users to sign in using biometric authentication or security keys.
#### Accessing Passkey Settings
1. Navigate to your app in the [Abstraxn Dashboard](https://dashboard.abstraxn.com/)
2. Go to **Wallets** → Select your wallet service
3. Click on the **Passkey** tab
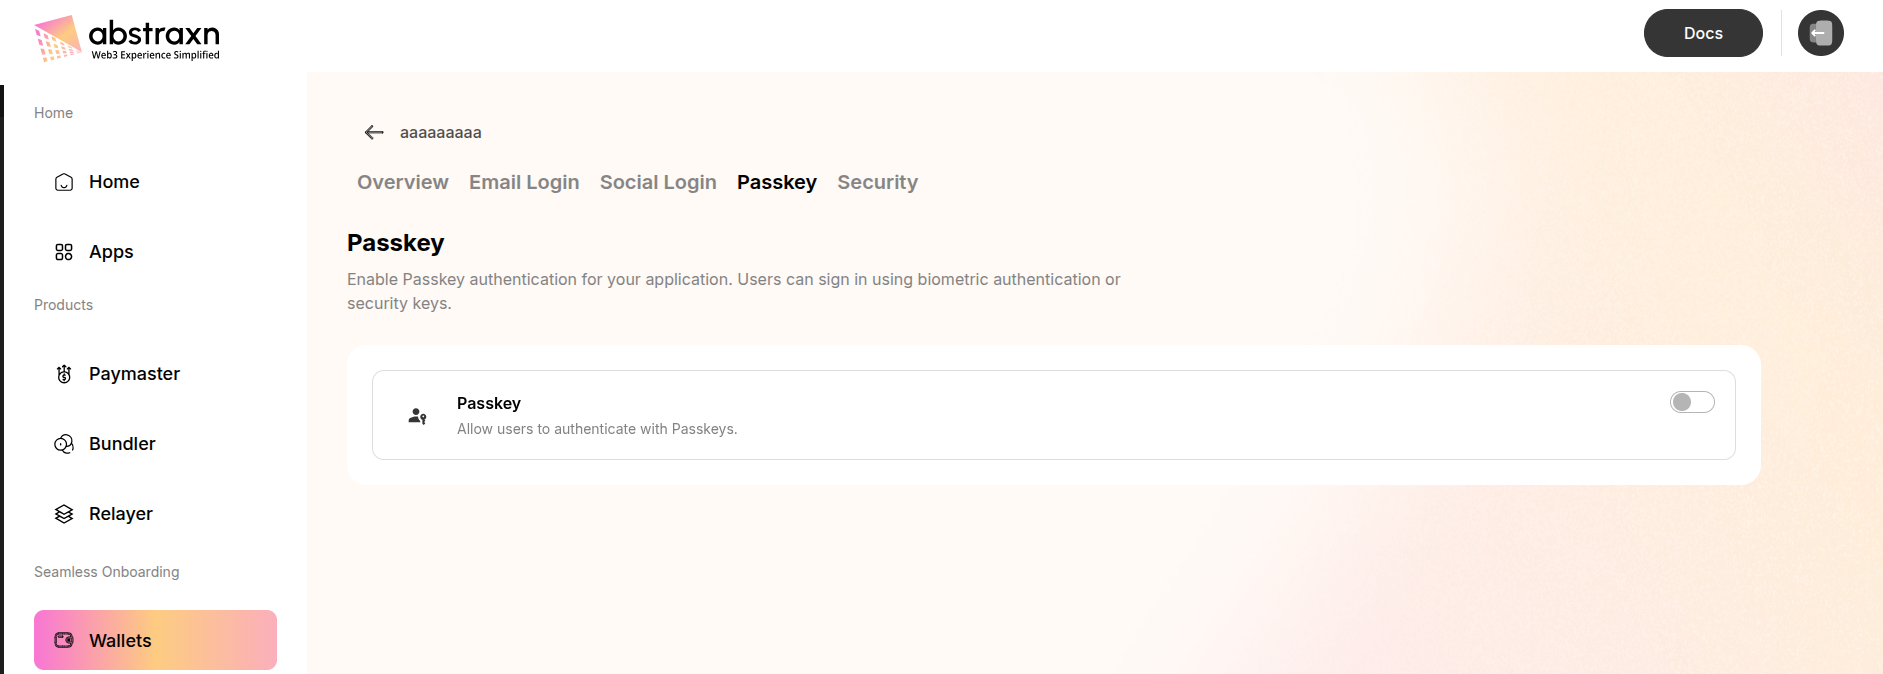 #### Configuration
**Enable Passkey:**
* **Toggle**: Enable/disable Passkey authentication
* **Description**: Allow users to authenticate with Passkeys using biometric authentication (fingerprint, face recognition) or security keys
**Benefits:**
* Enhanced security with public key cryptography
* Passwordless authentication experience
* Support for biometric authentication
* Cross-device compatibility
#### Enabling Passkey in Your App
After enabling Passkey in the dashboard, add it to your authentication methods:
```tsx
const providerConfig: AbstraxnProviderConfig = {
apiKey: process.env.NEXT_PUBLIC_ABSTRAXN_API_KEY,
ui: {
authMethods: ["otp", "passkey", "google"], // Include 'passkey'
},
};
```
### Security Settings
Configure security settings to protect your application and control access.
#### Accessing Security Settings
1. Navigate to your app in the [Abstraxn Dashboard](https://dashboard.abstraxn.com/)
2. Go to **Wallets** → Select your wallet service
3. Click on the **Security** tab
#### Configuration
**Enable Passkey:**
* **Toggle**: Enable/disable Passkey authentication
* **Description**: Allow users to authenticate with Passkeys using biometric authentication (fingerprint, face recognition) or security keys
**Benefits:**
* Enhanced security with public key cryptography
* Passwordless authentication experience
* Support for biometric authentication
* Cross-device compatibility
#### Enabling Passkey in Your App
After enabling Passkey in the dashboard, add it to your authentication methods:
```tsx
const providerConfig: AbstraxnProviderConfig = {
apiKey: process.env.NEXT_PUBLIC_ABSTRAXN_API_KEY,
ui: {
authMethods: ["otp", "passkey", "google"], // Include 'passkey'
},
};
```
### Security Settings
Configure security settings to protect your application and control access.
#### Accessing Security Settings
1. Navigate to your app in the [Abstraxn Dashboard](https://dashboard.abstraxn.com/)
2. Go to **Wallets** → Select your wallet service
3. Click on the **Security** tab
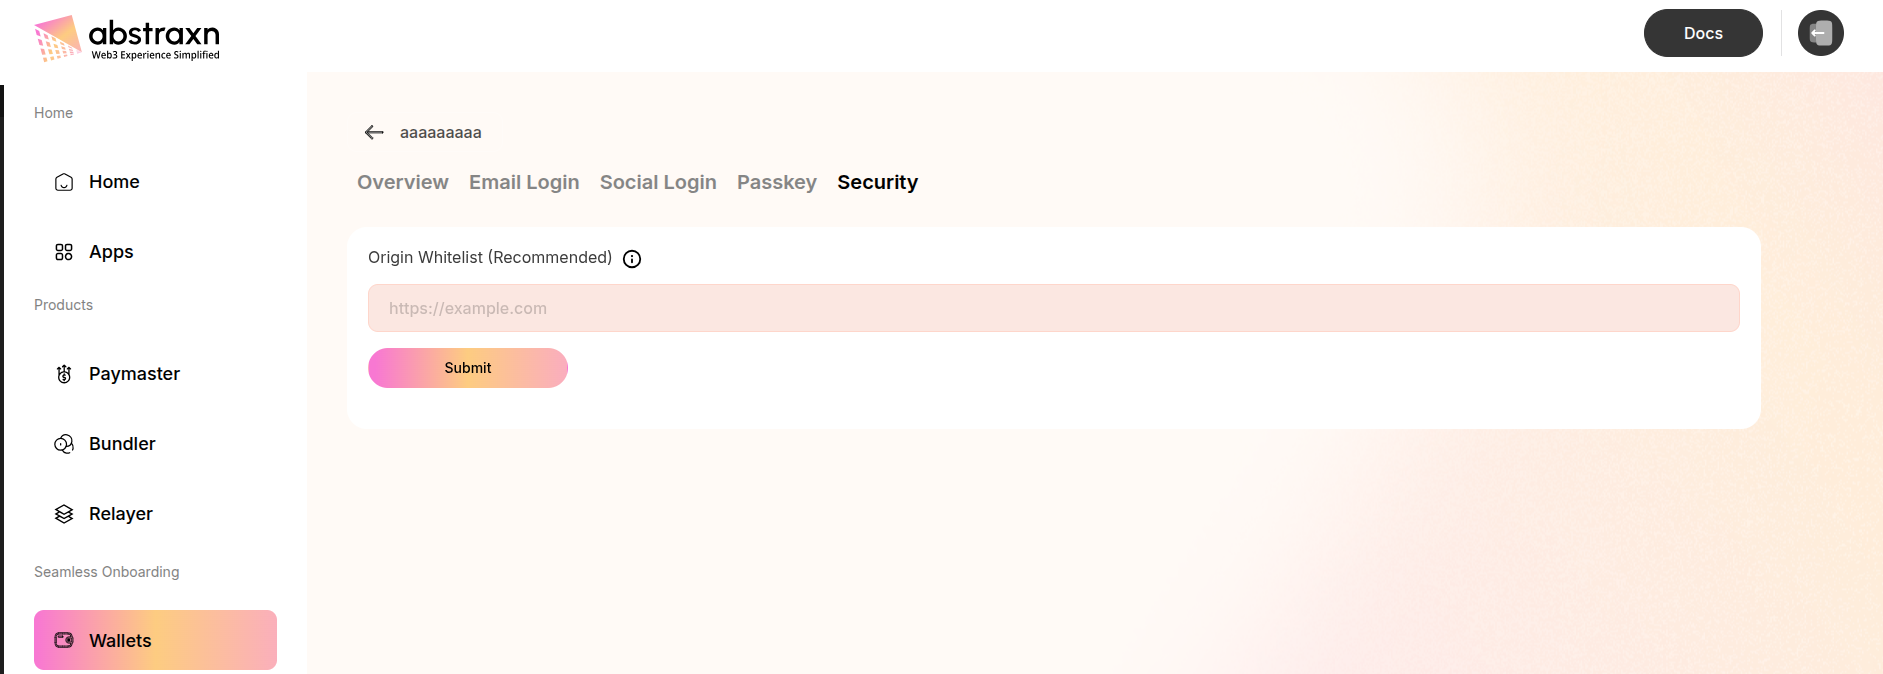 #### Origin Whitelist (Recommended)
The Origin Whitelist restricts which domains can initiate wallet connections, preventing unauthorized access and potential security vulnerabilities.
**Configuration:**
* **Field**: Origin Whitelist
* **Format**: Full URL with protocol (e.g., `https://example.com`)
* **Purpose**: Only allow wallet connections from whitelisted origins
* **Security**: Helps prevent cross-site request forgery (CSRF) attacks
**Adding Origins:**
1. Enter the full URL of your application domain
2. Include the protocol (`https://` or `http://`)
3. Click **Submit** to add the origin to the whitelist
4. You can add multiple origins for different environments (development, staging, production)
**Example Origins:**
```
https://myapp.com
https://www.myapp.com
https://staging.myapp.com
http://localhost:3000 // For local development
```
**Best Practices:**
* Always whitelist your production domain
* Include staging and development URLs as needed
* Remove unused origins regularly
* Never whitelist wildcard domains (`*`) in production
:::info
**Note:** While the origin whitelist is optional, it's highly recommended for production applications to enhance security and prevent unauthorized access.
:::
### Next Steps
After configuring your dashboard settings:
* \[Customize the UI]\(./UI Customization) - Further customize the login experience in your app
* \[Integrate your app]\(./App Integration) - Connect your application to the configured wallet service
* [Set up Smart Accounts](/guides/Accounts/SmartAccounts/Accounts) - Configure smart account providers
* [Configure Paymaster](/guides/Paymaster/Paymaster) - Enable gasless transactions
### Useful Links
* Dashboard: [https://dashboard.abstraxn.com/](https://dashboard.abstraxn.com/)
* Support: [https://www.abstraxn.com/contact-us/](https://www.abstraxn.com/contact-us/)
* Documentation: [Getting Started](/guides/getting-started)
## Environment Setup
> How to set up Abstraxn Smart Wallets using the Abstraxn Dashboard.
### Get Your API Key
To use Abstraxn Smart Wallets, you need to obtain an API key from the Abstraxn Dashboard.
:::tip
**Why create an App first?**
An **App** in the Abstraxn Dashboard represents your application or project. It acts as a container that organizes all your services, including Wallet Services, Paymasters, Bundlers, and more.
Think of it this way:
* **App** = Your project/application (e.g., "My DApp", "NFT Marketplace")
* **Wallet Service** = A specific wallet service configuration within that app
You need to create an App first because Wallet Services are associated with a specific App. This allows you to:
* Organize multiple services under one project
* Manage different configurations for different apps
* Track usage and analytics per application
Once you create an App, you can then add a Wallet Service to it, which will provide you with the API Key needed for your React application.
:::
1. Visit [https://dashboard.abstraxn.com/](https://dashboard.abstraxn.com/) and log in or sign up
2. Navigate to the **Apps** section:
* Direct link: [https://dashboard.abstraxn.com/auth/apps](https://dashboard.abstraxn.com/auth/apps)
:::info
**First-time users:** If you're visiting for the first time and haven't created any apps yet, you'll see an empty table with a **Create New App** button at the top. This is normal - proceed to step 3 to create your first app.
:::
If you already have apps, you'll see a list of your existing apps and a **Create New App** button at the top.
#### Origin Whitelist (Recommended)
The Origin Whitelist restricts which domains can initiate wallet connections, preventing unauthorized access and potential security vulnerabilities.
**Configuration:**
* **Field**: Origin Whitelist
* **Format**: Full URL with protocol (e.g., `https://example.com`)
* **Purpose**: Only allow wallet connections from whitelisted origins
* **Security**: Helps prevent cross-site request forgery (CSRF) attacks
**Adding Origins:**
1. Enter the full URL of your application domain
2. Include the protocol (`https://` or `http://`)
3. Click **Submit** to add the origin to the whitelist
4. You can add multiple origins for different environments (development, staging, production)
**Example Origins:**
```
https://myapp.com
https://www.myapp.com
https://staging.myapp.com
http://localhost:3000 // For local development
```
**Best Practices:**
* Always whitelist your production domain
* Include staging and development URLs as needed
* Remove unused origins regularly
* Never whitelist wildcard domains (`*`) in production
:::info
**Note:** While the origin whitelist is optional, it's highly recommended for production applications to enhance security and prevent unauthorized access.
:::
### Next Steps
After configuring your dashboard settings:
* \[Customize the UI]\(./UI Customization) - Further customize the login experience in your app
* \[Integrate your app]\(./App Integration) - Connect your application to the configured wallet service
* [Set up Smart Accounts](/guides/Accounts/SmartAccounts/Accounts) - Configure smart account providers
* [Configure Paymaster](/guides/Paymaster/Paymaster) - Enable gasless transactions
### Useful Links
* Dashboard: [https://dashboard.abstraxn.com/](https://dashboard.abstraxn.com/)
* Support: [https://www.abstraxn.com/contact-us/](https://www.abstraxn.com/contact-us/)
* Documentation: [Getting Started](/guides/getting-started)
## Environment Setup
> How to set up Abstraxn Smart Wallets using the Abstraxn Dashboard.
### Get Your API Key
To use Abstraxn Smart Wallets, you need to obtain an API key from the Abstraxn Dashboard.
:::tip
**Why create an App first?**
An **App** in the Abstraxn Dashboard represents your application or project. It acts as a container that organizes all your services, including Wallet Services, Paymasters, Bundlers, and more.
Think of it this way:
* **App** = Your project/application (e.g., "My DApp", "NFT Marketplace")
* **Wallet Service** = A specific wallet service configuration within that app
You need to create an App first because Wallet Services are associated with a specific App. This allows you to:
* Organize multiple services under one project
* Manage different configurations for different apps
* Track usage and analytics per application
Once you create an App, you can then add a Wallet Service to it, which will provide you with the API Key needed for your React application.
:::
1. Visit [https://dashboard.abstraxn.com/](https://dashboard.abstraxn.com/) and log in or sign up
2. Navigate to the **Apps** section:
* Direct link: [https://dashboard.abstraxn.com/auth/apps](https://dashboard.abstraxn.com/auth/apps)
:::info
**First-time users:** If you're visiting for the first time and haven't created any apps yet, you'll see an empty table with a **Create New App** button at the top. This is normal - proceed to step 3 to create your first app.
:::
If you already have apps, you'll see a list of your existing apps and a **Create New App** button at the top.
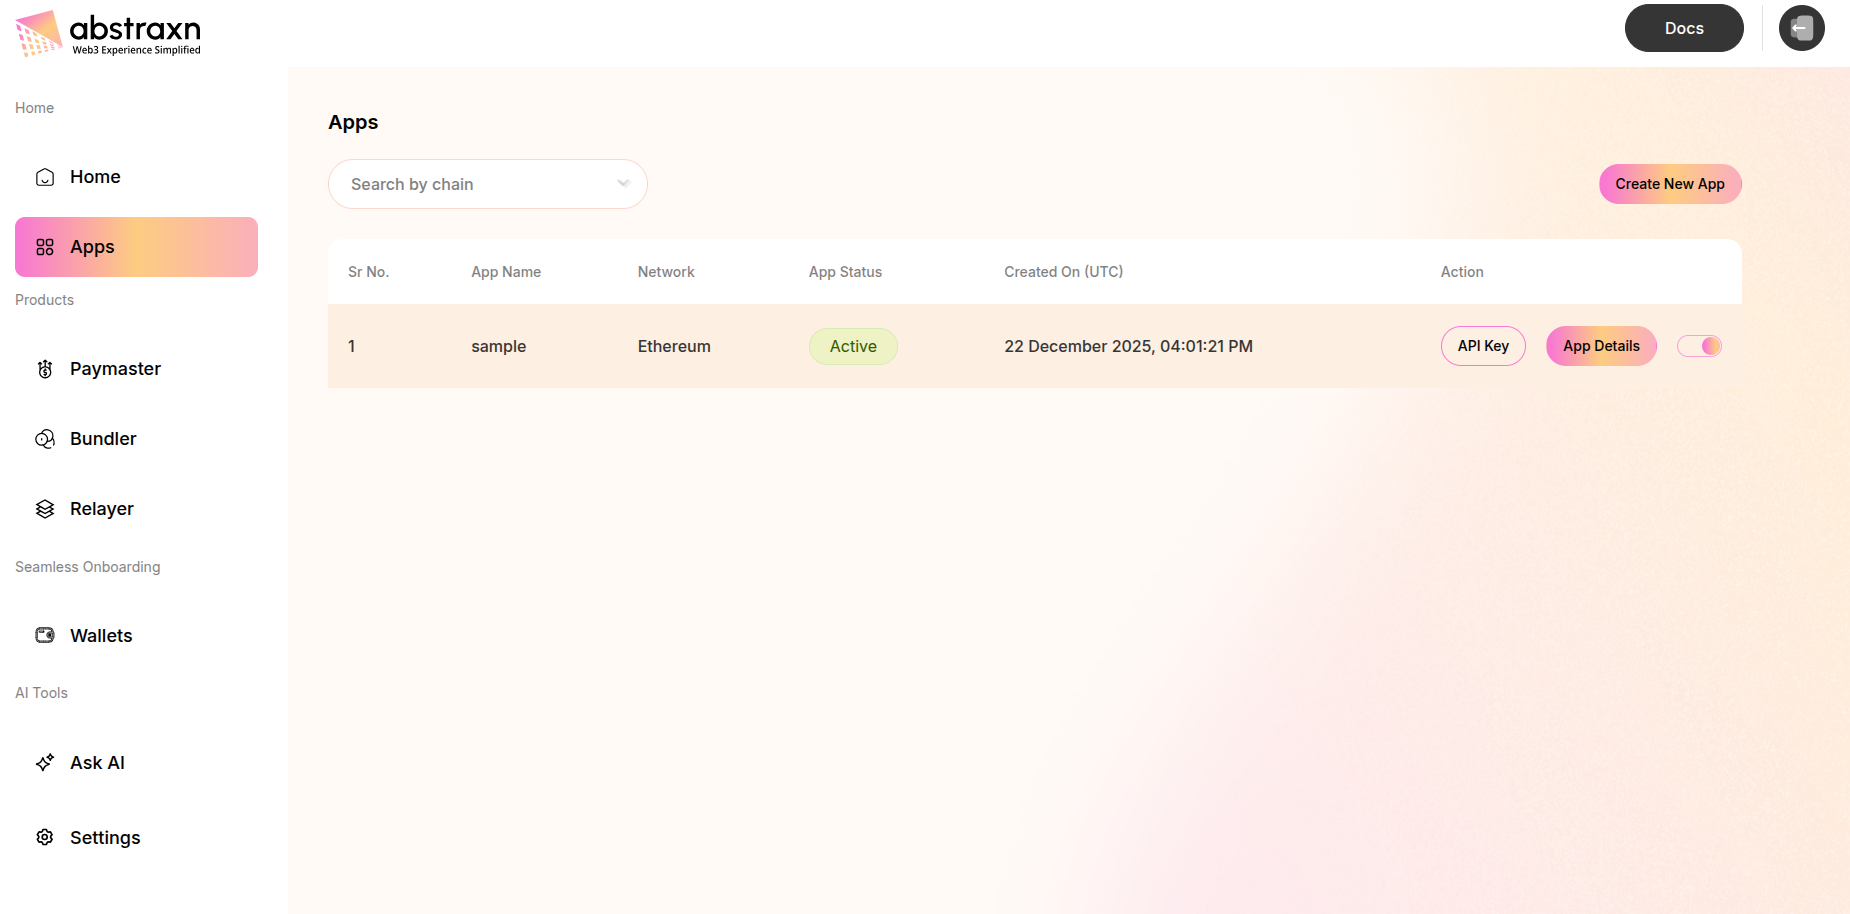 3. Click the **Create New App** button to open the creation modal
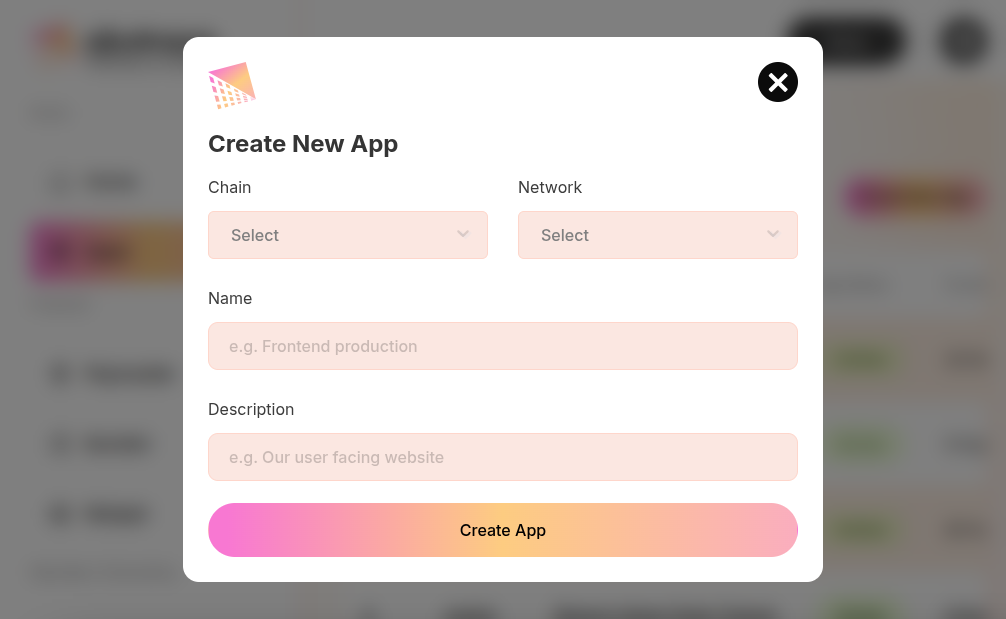 Fill in the form:
* **Chain**: Select the blockchain (e.g., Ethereum, Polygon, etc.)
* **Network**: Select the network (Mainnet, Testnet, etc.)
* **Name**: Enter a name for your app
* **Description**: (Optional) Add a description
* Click **Create App**
4. After creating your app, navigate to **Wallets** section:
* Direct link: [https://dashboard.abstraxn.com/auth/wallets](https://dashboard.abstraxn.com/auth/wallets)
Fill in the form:
* **Chain**: Select the blockchain (e.g., Ethereum, Polygon, etc.)
* **Network**: Select the network (Mainnet, Testnet, etc.)
* **Name**: Enter a name for your app
* **Description**: (Optional) Add a description
* Click **Create App**
4. After creating your app, navigate to **Wallets** section:
* Direct link: [https://dashboard.abstraxn.com/auth/wallets](https://dashboard.abstraxn.com/auth/wallets)
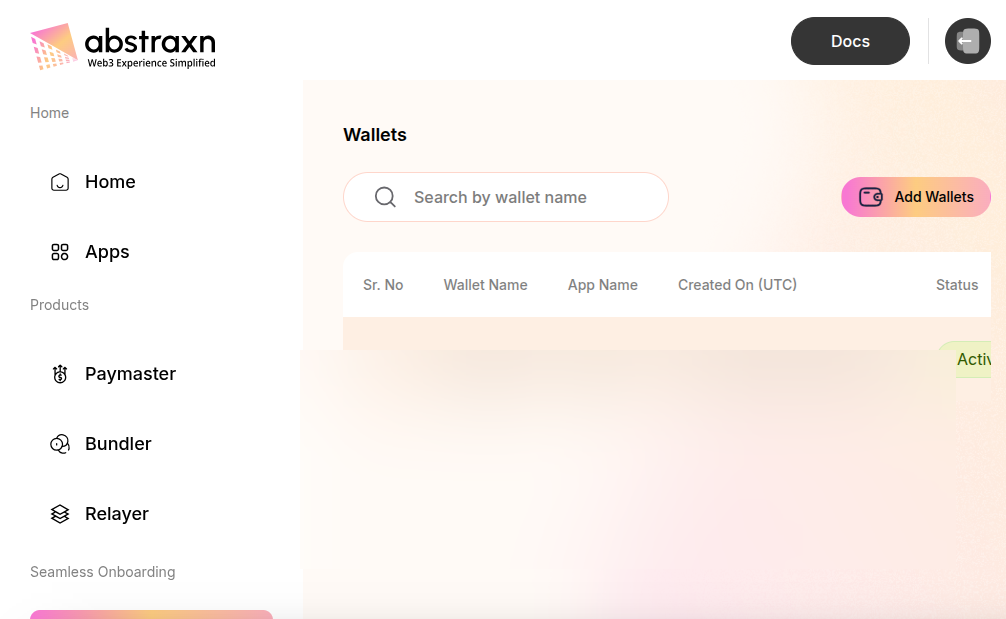 5. Click **Add Wallets** button to create a new wallet service
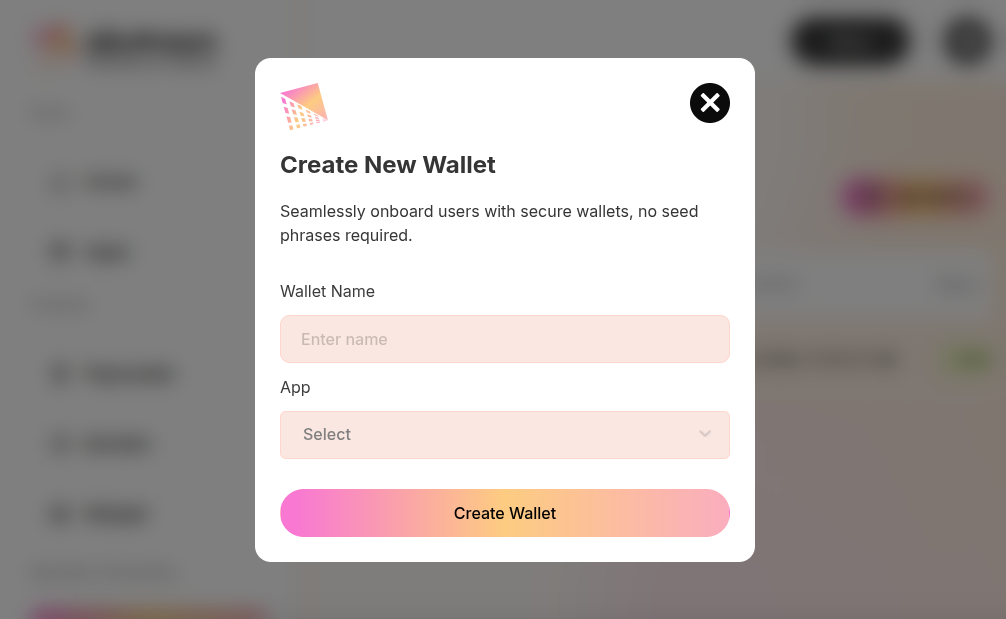 Fill in the form:
* **Wallet Name**: Enter a name for your wallet service
* **App**: Select the app you created earlier
* Click **Create Wallet**
6. After creating the wallet, click **View Details** on your wallet from the wallets list
7. On the wallet details page, you'll see your **API Key** displayed. Click the copy button to copy it.
Fill in the form:
* **Wallet Name**: Enter a name for your wallet service
* **App**: Select the app you created earlier
* Click **Create Wallet**
6. After creating the wallet, click **View Details** on your wallet from the wallets list
7. On the wallet details page, you'll see your **API Key** displayed. Click the copy button to copy it.
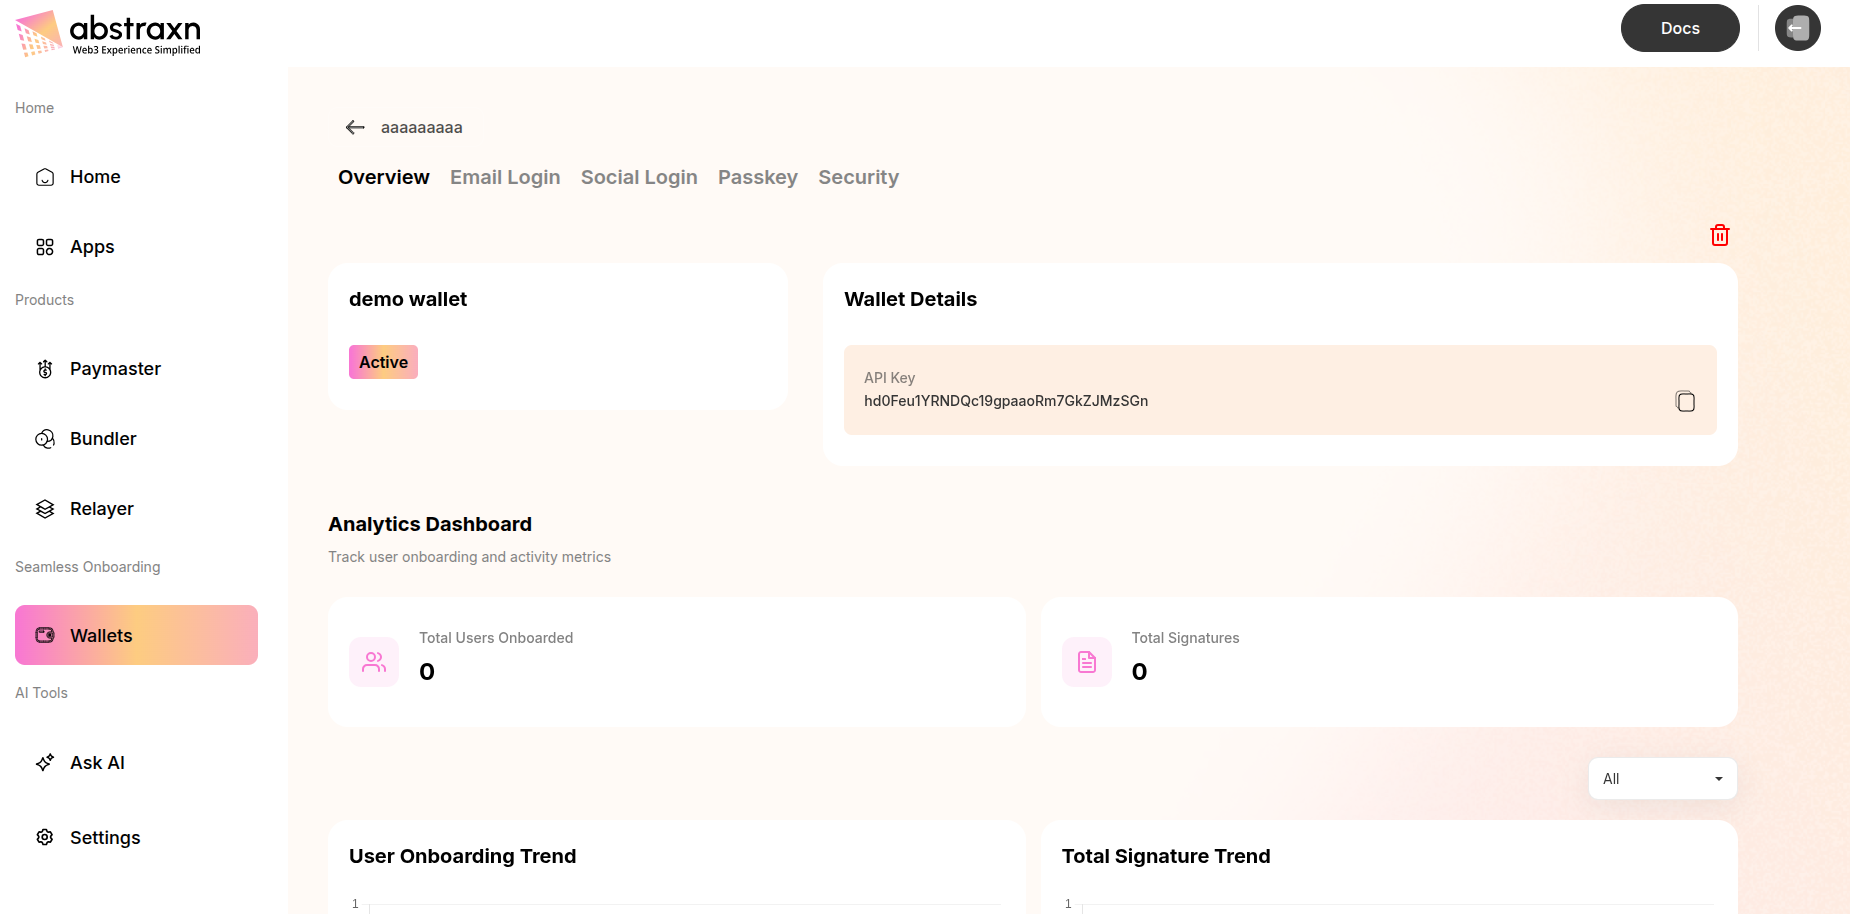 The wallet details page URL format is: `https://dashboard.abstraxn.com/auth/wallets/{walletId}`
:::warning
**Warning:** Keep your API key secure by storing it in environment variables. Never expose it in public client-side code or commit it to version control.
:::
### Configure Environment Variables
Create a `.env` file at the root of your project and add your API key.
#### For Vite Projects
Create a `.env` file in your project root:
```env
VITE_ABSTRAXN_API_KEY=your_api_key_here
```
The `VITE_` prefix is required for Vite to expose the variable to your client-side code. Access it in your code using:
```tsx
import.meta.env.VITE_ABSTRAXN_API_KEY;
```
#### For Next.js Projects
Create a `.env.local` file in your project root:
```env
NEXT_PUBLIC_ABSTRAXN_API_KEY=your_api_key_here
```
The `NEXT_PUBLIC_` prefix is required for Next.js to expose the variable to the browser. Access it in your code using:
```tsx
process.env.NEXT_PUBLIC_ABSTRAXN_API_KEY;
```
:::tip
**Note:** For Next.js, you can also use `.env` for server-side only variables, but use `.env.local` for variables that should be available in the browser. The `.env.local` file is automatically ignored by git.
:::
### Additional Configuration (Optional)
#### Wallet Service Configuration
To enable specific login methods and customize your wallet service:
1. Navigate to **Wallets** → **Configuration** in the [dashboard](https://dashboard.abstraxn.com/services/smart-wallets/configuration)
2. Configure your preferred authentication methods (OTP, Passkey, Google, Discord, Twitter, etc.)
3. Customize wallet settings as needed
## Initialization
> Build Abstraxn Smart Wallets in a new app
In this doc and the following ones, we will build a React application with Abstraxn Smart Wallets from scratch. This guide supports both **Vite** and **Next.js** setups.
### Create a new React app
Choose your preferred framework:
#### Option 1: Vite + React (Recommended)
Start by initializing a new React application with Vite:
```bash
npm create vite@latest my-abstraxn-app -- --template react-ts
cd my-abstraxn-app
```
Or with other package managers:
```bash pnpm
pnpm create vite my-abstraxn-app --template react-ts
cd my-abstraxn-app
```
```bash yarn
yarn create vite my-abstraxn-app --template react-ts
cd my-abstraxn-app
```
#### Option 2: Next.js
Start by initializing a new [Next.js app](https://nextjs.org/):
```bash
npx create-next-app@latest \
--typescript \
--tailwind \
--app
cd my-abstraxn-app
```
This command passes in flags to use Typescript, Tailwind and the next app router.
### Install Dependencies
You will need these core libraries:
* **@abstraxn/signer**: Abstraxn Signer SDK for handling wallet interactions and transaction signing
* **@tanstack/react-query**: A required async state library for managing smart wallet state ([learn more](https://tanstack.com/query/latest/docs/framework/react/overview))
Install them with:
```bash npm
npm install @abstraxn/signer @tanstack/react-query
```
```bash pnpm
pnpm add @abstraxn/signer @tanstack/react-query
```
```bash yarn
yarn add @abstraxn/signer @tanstack/react-query
```
### Setup AbstraxnProvider
The Abstraxn SDK requires wrapping your application with the `AbstraxnProvider` component. This provides the wallet context to all components in your app.
#### For Vite Projects
Update your `src/main.tsx` (or `src/main.jsx`) file:
```tsx
import { StrictMode } from "react";
import { createRoot } from "react-dom/client";
import "./index.css";
import App from "./App.tsx";
import {
AbstraxnProvider,
type AbstraxnProviderConfig,
} from "@abstraxn/signer/react";
const providerConfig: AbstraxnProviderConfig = {
apiKey: import.meta.env.VITE_ABSTRAXN_API_KEY || "YOUR_API_KEY",
autoConnect: false,
autoInit: true,
enableLogging: true,
ui: {
authMethods: ["otp", "passkey", "google", "discord", "twitter"],
theme: "light",
logoName: "My App",
welcomeMessage: "Welcome to My App",
showFooter: true,
},
};
createRoot(document.getElementById("root")!).render(
The wallet details page URL format is: `https://dashboard.abstraxn.com/auth/wallets/{walletId}`
:::warning
**Warning:** Keep your API key secure by storing it in environment variables. Never expose it in public client-side code or commit it to version control.
:::
### Configure Environment Variables
Create a `.env` file at the root of your project and add your API key.
#### For Vite Projects
Create a `.env` file in your project root:
```env
VITE_ABSTRAXN_API_KEY=your_api_key_here
```
The `VITE_` prefix is required for Vite to expose the variable to your client-side code. Access it in your code using:
```tsx
import.meta.env.VITE_ABSTRAXN_API_KEY;
```
#### For Next.js Projects
Create a `.env.local` file in your project root:
```env
NEXT_PUBLIC_ABSTRAXN_API_KEY=your_api_key_here
```
The `NEXT_PUBLIC_` prefix is required for Next.js to expose the variable to the browser. Access it in your code using:
```tsx
process.env.NEXT_PUBLIC_ABSTRAXN_API_KEY;
```
:::tip
**Note:** For Next.js, you can also use `.env` for server-side only variables, but use `.env.local` for variables that should be available in the browser. The `.env.local` file is automatically ignored by git.
:::
### Additional Configuration (Optional)
#### Wallet Service Configuration
To enable specific login methods and customize your wallet service:
1. Navigate to **Wallets** → **Configuration** in the [dashboard](https://dashboard.abstraxn.com/services/smart-wallets/configuration)
2. Configure your preferred authentication methods (OTP, Passkey, Google, Discord, Twitter, etc.)
3. Customize wallet settings as needed
## Initialization
> Build Abstraxn Smart Wallets in a new app
In this doc and the following ones, we will build a React application with Abstraxn Smart Wallets from scratch. This guide supports both **Vite** and **Next.js** setups.
### Create a new React app
Choose your preferred framework:
#### Option 1: Vite + React (Recommended)
Start by initializing a new React application with Vite:
```bash
npm create vite@latest my-abstraxn-app -- --template react-ts
cd my-abstraxn-app
```
Or with other package managers:
```bash pnpm
pnpm create vite my-abstraxn-app --template react-ts
cd my-abstraxn-app
```
```bash yarn
yarn create vite my-abstraxn-app --template react-ts
cd my-abstraxn-app
```
#### Option 2: Next.js
Start by initializing a new [Next.js app](https://nextjs.org/):
```bash
npx create-next-app@latest \
--typescript \
--tailwind \
--app
cd my-abstraxn-app
```
This command passes in flags to use Typescript, Tailwind and the next app router.
### Install Dependencies
You will need these core libraries:
* **@abstraxn/signer**: Abstraxn Signer SDK for handling wallet interactions and transaction signing
* **@tanstack/react-query**: A required async state library for managing smart wallet state ([learn more](https://tanstack.com/query/latest/docs/framework/react/overview))
Install them with:
```bash npm
npm install @abstraxn/signer @tanstack/react-query
```
```bash pnpm
pnpm add @abstraxn/signer @tanstack/react-query
```
```bash yarn
yarn add @abstraxn/signer @tanstack/react-query
```
### Setup AbstraxnProvider
The Abstraxn SDK requires wrapping your application with the `AbstraxnProvider` component. This provides the wallet context to all components in your app.
#### For Vite Projects
Update your `src/main.tsx` (or `src/main.jsx`) file:
```tsx
import { StrictMode } from "react";
import { createRoot } from "react-dom/client";
import "./index.css";
import App from "./App.tsx";
import {
AbstraxnProvider,
type AbstraxnProviderConfig,
} from "@abstraxn/signer/react";
const providerConfig: AbstraxnProviderConfig = {
apiKey: import.meta.env.VITE_ABSTRAXN_API_KEY || "YOUR_API_KEY",
autoConnect: false,
autoInit: true,
enableLogging: true,
ui: {
authMethods: ["otp", "passkey", "google", "discord", "twitter"],
theme: "light",
logoName: "My App",
welcomeMessage: "Welcome to My App",
showFooter: true,
},
};
createRoot(document.getElementById("root")!).render(