Customize your wallet dashboard settings including email templates, social login providers, and security configurationsThe Abstraxn Dashboard provides comprehensive customization options for your wallet service. You can configure email templates, enable social login providers, and set up security settings to match your brand and requirements.
Email Template Customization
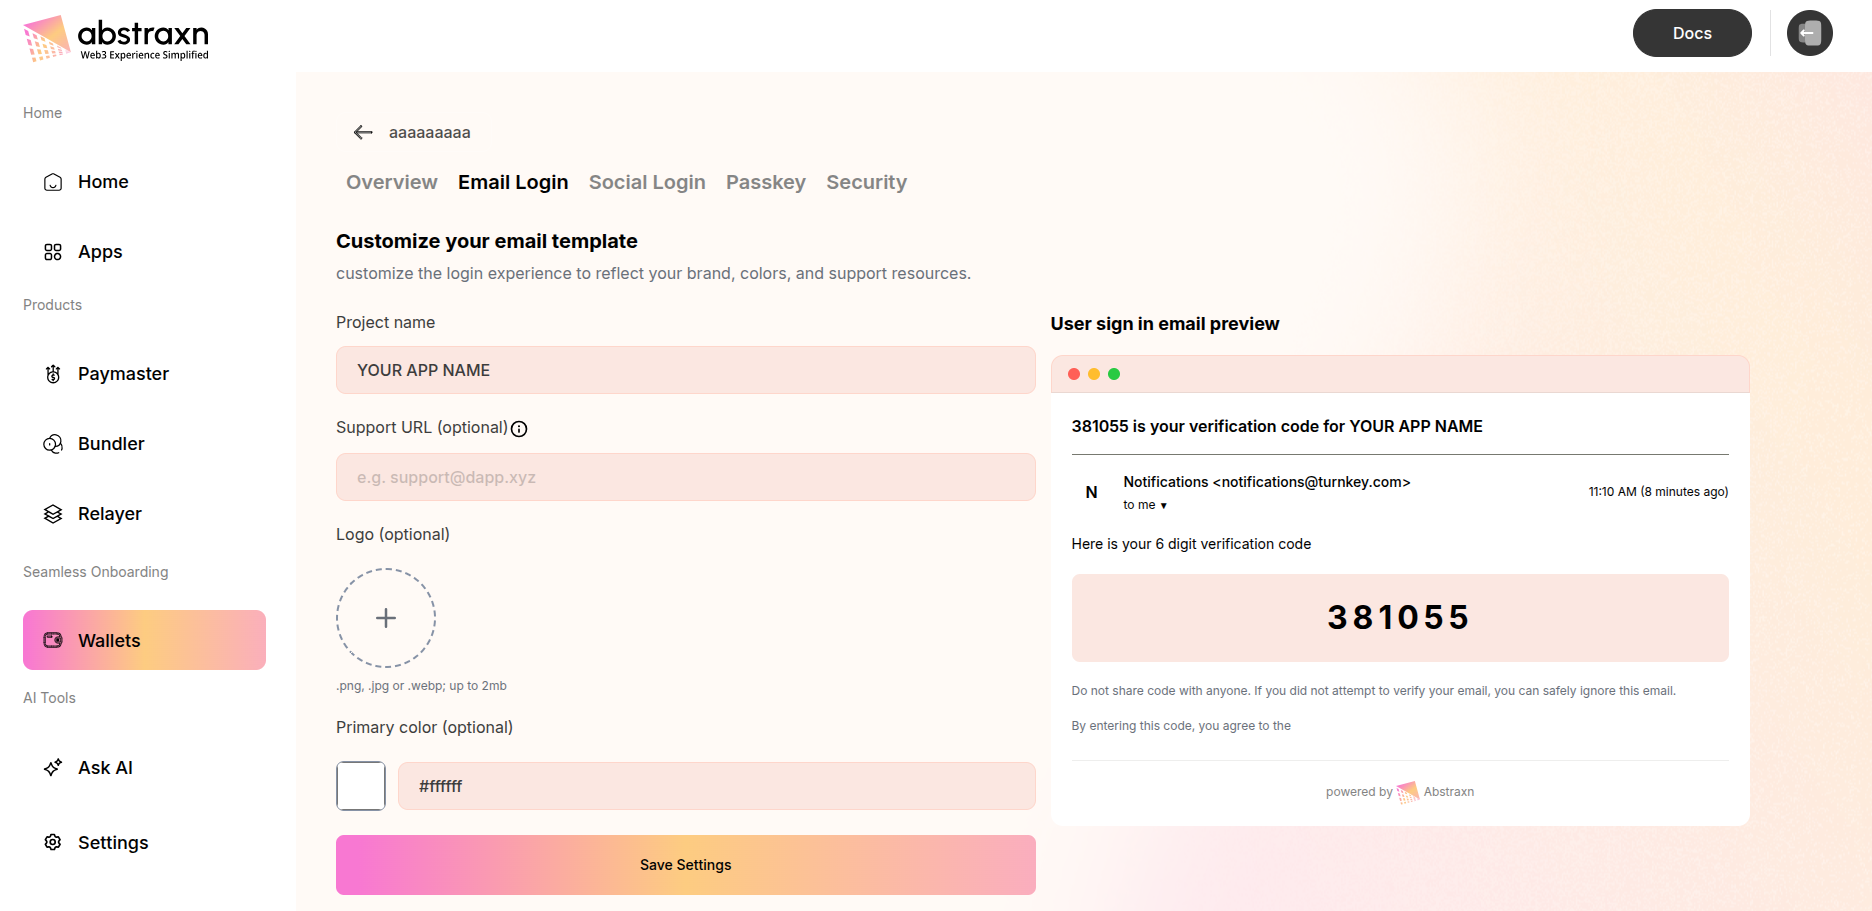
Customize the email verification template that users receive when signing in with email OTP. This allows you to brand the authentication emails to match your application’s identity.Accessing Email Template Settings
- Navigate to your app in the Abstraxn Dashboard
- Go to Wallets → Select your wallet service
- Click on the Email Login tab
Available Customization Options
Project Name
Set your application name that will appear in the email subject and body:- Field: Project name
- Default: “YOUR APP NAME”
- Usage: This name appears in the email subject line and verification code message
Support URL (Optional)
Add a support URL where users can get help:- Field: Support URL (optional)
- Format: e.g.,
[email protected]orhttps://support.yourdomain.com - Purpose: Provides users with a way to contact support if they encounter issues
Logo (Optional)
Upload your application logo to appear in the email:- Field: Logo (optional)
- Accepted formats:
.png,.jpg, or.webp - Size limit: Up to 2MB
- Display: Logo appears in the email template to reinforce your brand identity
Primary Color (Optional)
Set your brand’s primary color for the email template:- Field: Primary color (optional)
- Format: Hex color code (e.g.,
#9333ea) - Usage: Applied to buttons, highlights, and accent elements in the email
Email Preview
The dashboard provides a live preview of how your verification email will appear to users. The preview shows:- Email subject line with verification code
- Sender information
- Branded email body with your logo and colors
- 6-digit verification code display
- Security disclaimer text
Saving Settings
After configuring your email template settings, click Save Settings to apply your changes. The updated template will be used for all future email verification codes sent to your users.Social Login Configuration
Enable and configure social authentication providers to allow users to sign in with their existing accounts from popular services.Accessing Social Login Settings
- Navigate to your app in the Abstraxn Dashboard
- Go to Wallets → Select your wallet service
- Click on the Social Login tab
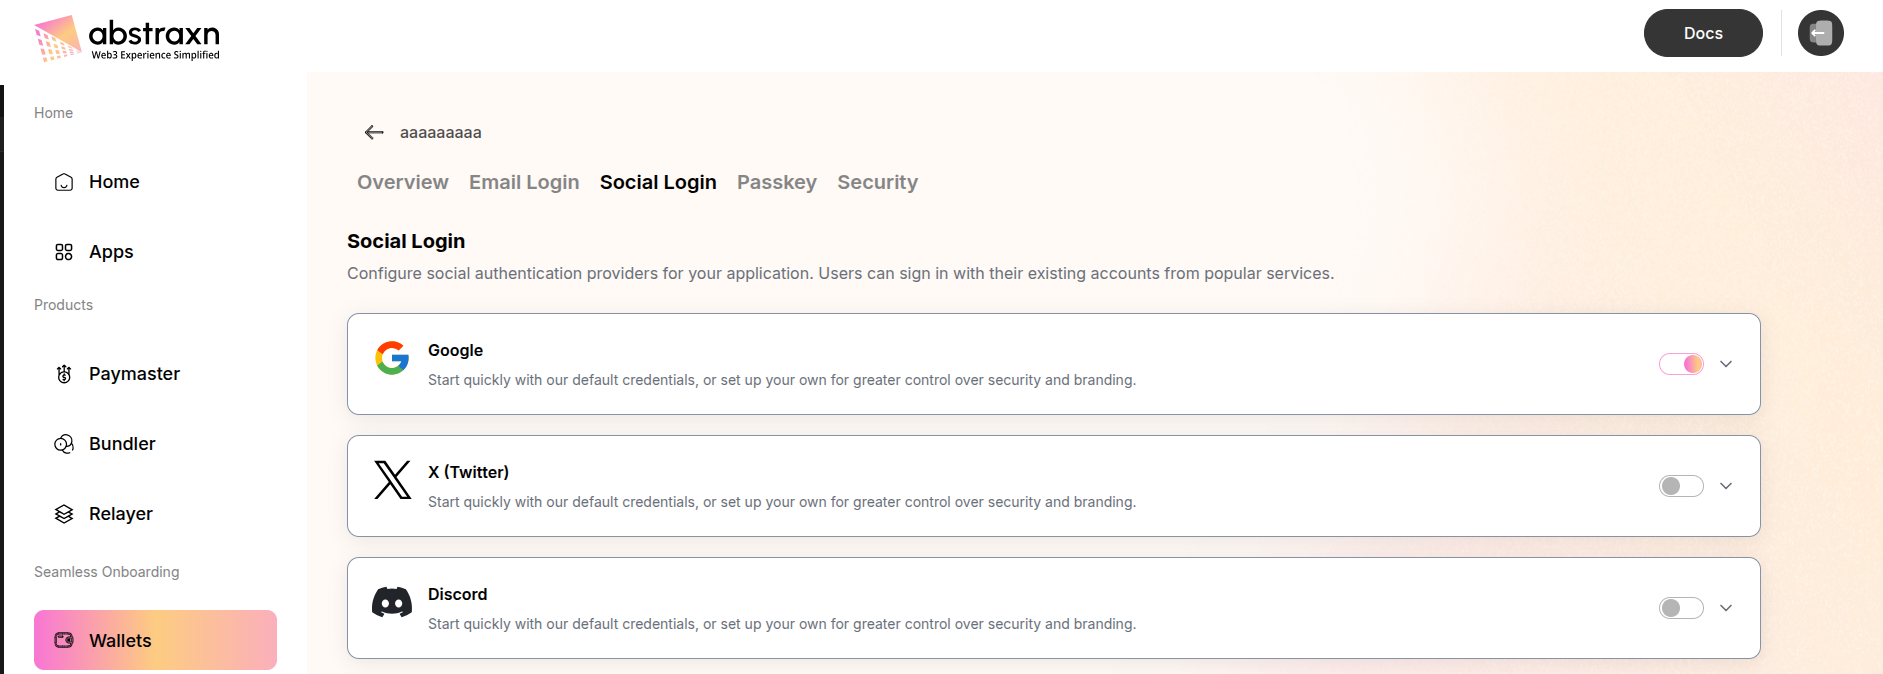
Available Social Providers
Google Social Login
Enable Google OAuth authentication for your application. Configuration Options:- Toggle: Enable/disable Google login
- Client ID (optional): Your Google OAuth Client ID
- Format:
e.g. ey1289x.... - Leave empty to use Abstraxn’s default credentials
- Format:
- Client Secret (optional): Your Google OAuth Client Secret
- Format: Secret key from Google Console
- Toggle visibility with the eye icon
- Start quickly with Abstraxn’s default Google credentials
- No additional setup required
- Suitable for development and testing
- Create a project in Google Cloud Console
- Enable Google+ API
- Create OAuth 2.0 credentials
- Add the callback URL provided by Abstraxn to your Google Console API client
- Copy your Client ID and Client Secret to the dashboard
- Click the copy icon next to the callback URL message to copy the required callback URL
X (Twitter) Social Login
Enable X (formerly Twitter) OAuth authentication for your application. Configuration Options:- Toggle: Enable/disable X login
- Client ID (optional): Your X OAuth Client ID
- Format:
e.g. ey1289x.... - Leave empty to use Abstraxn’s default credentials
- Format:
- Client Secret (optional): Your X OAuth Client Secret
- Format: Secret key from X Developer Portal
- Toggle visibility with the eye icon
- Start quickly with Abstraxn’s default X credentials
- No additional setup required
- Suitable for development and testing
- Create an app in X Developer Portal
- Configure OAuth 2.0 settings
- Add the callback URL provided by Abstraxn to your X Console API client
- Copy your Client ID and Client Secret to the dashboard
- Click the copy icon next to the callback URL message to copy the required callback URL
Discord Social Login
Enable Discord OAuth authentication for your application. Configuration Options:- Toggle: Enable/disable Discord login
- Client ID (optional): Your Discord OAuth Client ID
- Client Secret (optional): Your Discord OAuth Client Secret
- Create an application in Discord Developer Portal
- Configure OAuth2 redirect URI
- Add the callback URL provided by Abstraxn
- Copy your Client ID and Client Secret to the dashboard
Enabling Social Login in Your App
After configuring social login providers in the dashboard, you can enable them in your application code:Passkey Authentication
Enable Passkey (WebAuthn) authentication to allow users to sign in using biometric authentication or security keys.Accessing Passkey Settings
- Navigate to your app in the Abstraxn Dashboard
- Go to Wallets → Select your wallet service
- Click on the Passkey tab
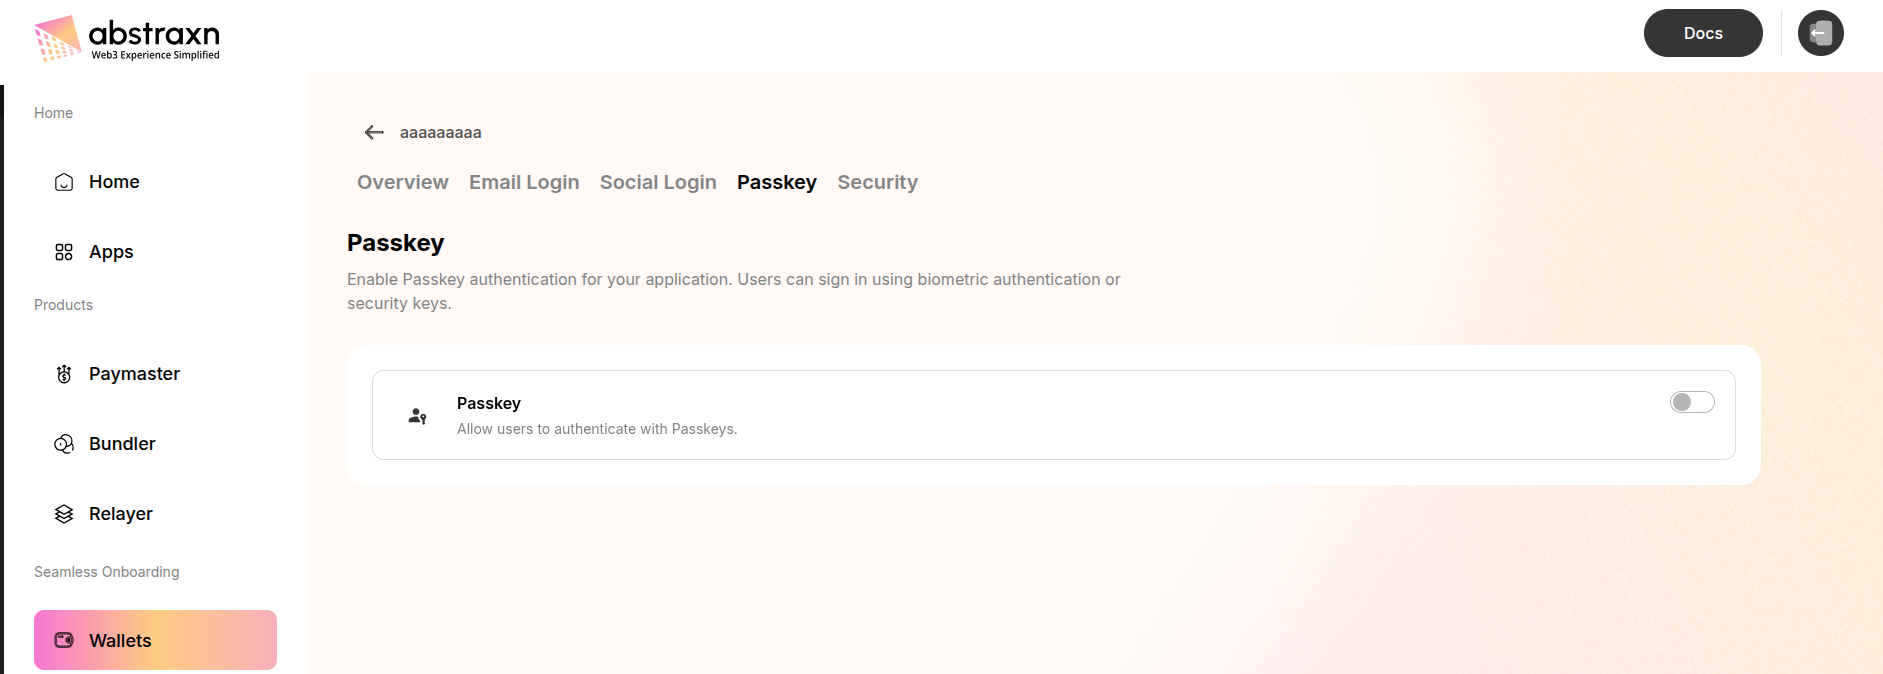
Configuration
Enable Passkey:- Toggle: Enable/disable Passkey authentication
- Description: Allow users to authenticate with Passkeys using biometric authentication (fingerprint, face recognition) or security keys
- Enhanced security with public key cryptography
- Passwordless authentication experience
- Support for biometric authentication
- Cross-device compatibility
Enabling Passkey in Your App
After enabling Passkey in the dashboard, add it to your authentication methods:Security Settings
Configure security settings to protect your application and control access.Accessing Security Settings
- Navigate to your app in the Abstraxn Dashboard
- Go to Wallets → Select your wallet service
- Click on the Security tab
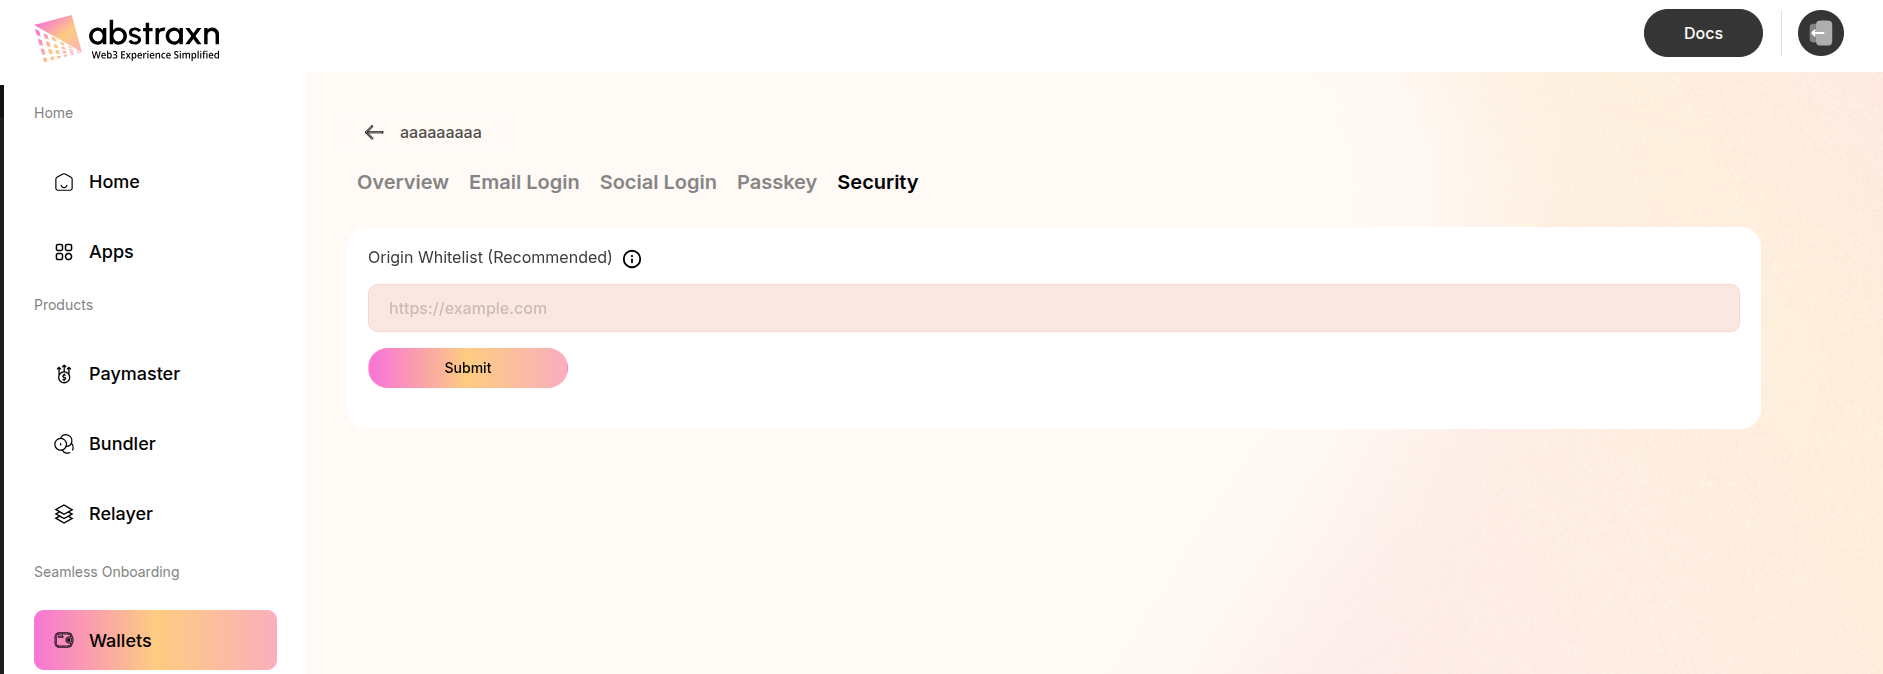
Origin Whitelist (Recommended)
The Origin Whitelist restricts which domains can initiate wallet connections, preventing unauthorized access and potential security vulnerabilities. Configuration:- Field: Origin Whitelist
- Format: Full URL with protocol (e.g.,
https://example.com) - Purpose: Only allow wallet connections from whitelisted origins
- Security: Helps prevent cross-site request forgery (CSRF) attacks
- Enter the full URL of your application domain
- Include the protocol (
https://orhttp://) - Click Submit to add the origin to the whitelist
- You can add multiple origins for different environments (development, staging, production)
- Always whitelist your production domain
- Include staging and development URLs as needed
- Remove unused origins regularly
- Never whitelist wildcard domains (
*) in production
Note: While the origin whitelist is optional, it’s highly recommended for production applications to enhance security and prevent unauthorized access.
Next Steps
After configuring your dashboard settings:- Customize the UI - Further customize the login experience in your app
- Integrate your app - Connect your application to the configured wallet service
- Set up Smart Accounts - Configure smart account providers
- Configure Paymaster - Enable gasless transactions
Useful Links
- Dashboard: https://dashboard.abstraxn.com/
- Support: https://www.abstraxn.com/contact-us/
- Documentation: Getting Started